Sunday, April 28, 2013

Tofu Walnut Dumplings and Balsamic Vegetables in Quinoa


This is one of my totally made up recipes. :D I cooked it up for lunch on a very hungry afternoon and as all hunger powered experiments go, it turned out to be scrumptious.

I had spent the most part of my late morning visiting my fellow food bloggers' spaces, and the constant barrage of yummy looking vegan food photography had left me feeling famished.

I *had* to make something delicious and special that would hit the spot and it had to be quick! Really, really quick!

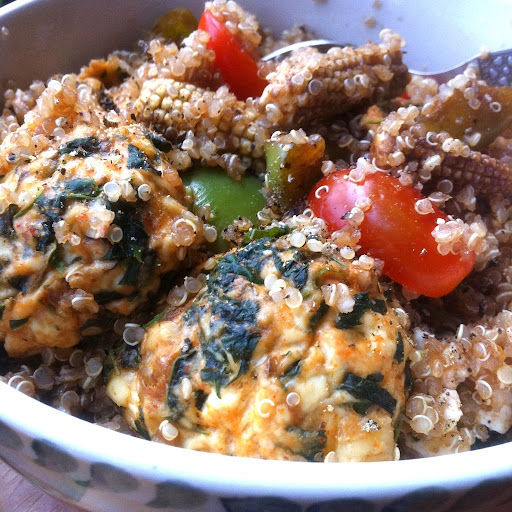
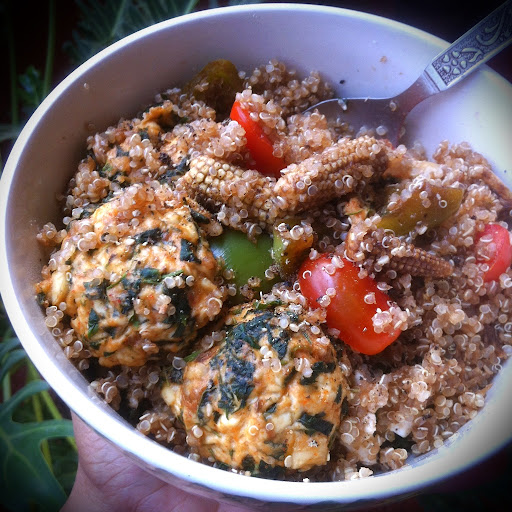
Thence arrived the fancy looking, fancy sounding, super easy to make Tofu Walnut Dumplings and Balsamic Vegetables in Quinoa! :)

Tofu Walnut Dumplings and Balsamic Vegetables in Quinoa

For the Quinoa:

3/4 C Quinoa
2 C Water
Cherry Tomatoes

Wash the quinoa well under running water and drain.
Heat a heavy bottomed pan and toast the quinoa for a minute.
Add the water and bring to a boil.
Reduce the heat to low and cover with a lid or plate leaving a slight gap for the steam to escape.
Cook for 15-20 minutes, until all the water has been absorbed and the quinoa is translucent and fluffy.
Turn off the heat and keep the pot aside.
Slice the cherry tomatoes into halves and add to the cooked quinoa.
Mix well, cover and keep aside.

For the Balsamic Vegetables:

150 gms Baby Corn
1 Capsicum
5-7 large cloves of Garlic
2 T Balsamic Vinegar
1 tsp Liquid Jaggery (or any other sweetener)
1 tsp Soy Sauce

Slice the baby corn and capsicum any way you like.
Roughly crush the garlic.
Toss all ingredients together and keep aside for 10-15 minutes.
Bake or microwave for 10 minutes.

For the Tofu Walnut Dumplings:

500 gms Tofu (I used Silken but Firm might be even better)
1 C Greens (I used a local green called Chilkavare Soppu)
1/2 C Walnuts
1 T Corn Starch (Corn Flour)
1/2 tsp Red Chilli Powder
Freshly Crushed Pepper
Salt

Blanch the greens, drain, gently squeeze out the excess water and chop finely.
Break the walnuts roughly into little pieces.
Drain the tofu and gently squeeze out as much water as possible.
Place everything in a bowl and mix with your hand while mashing the tofu.
Shape into balls and place on a baking tray.
Bake or microwave for 8-10 minutes.
Then grill/broil for 5 minutes, until it's browned lightly.
Allow to cool slightly and gently remove from the pan with the help of a spatula or flat spoon.

How to Proceed:

Pour the balsamic veggies along with their liquids over the quinoa and mix well.
Add the tofu walnut dumplings and gently toss, ensuring that the dumplings stay intact.
Serve hot with freshly crushed pepper on top.
Enjoy! :)

Tofu Walnut Dumplings and Balsamic Vegetables in Quinoa

Update: 23rd June 2013

The ingredients for this recipe can now be purchased in India in the form of a recipe box from Global Graynz.

Global Graynz Rare Box Link

Here are the links to purchase the three kinds of boxes for this recipe:

1. Rare Ingredients box
2. All Packaged Ingredients
3. All Ingredients Including Fresh/Perishable Ones (pictured below)


Global Graynz Everything Recipe Box

Wednesday, April 24, 2013

Veg Kheema - Guest post by dassana of veg recipes of india


I met dassana, today's special guest, on the blogosphere and when I visited her blog Veg Recipes of India for the first time, I was overcome by a drool attack over all her delicious Indian recipes and the beautiful, step by step photographs.

Her recipes are vegetarian and a lot of them are vegan. My favourite is the amritsari chole. I loved her idea of using black tea while cooking the chickpeas! Ever since I read that recipe, I've often popped tea bags into the pressure cooker while cooking all kinds of beans.

A unique aspect of dassana's writing style on her blog and Facebook page is that she types in lowercase all the time. It's sort of her style. Just thought I'd share that bit of information in case you were wondering why I hadn't capitalised the 'd' in dassana's name. It's because she writes it that way. :)

Now on to the delicious veg kheema recipe that dassana is sharing today.

Thank you for guest posting on Veganosaurus, dassana! :)

--

Veg Kheema - Guest post by dassana of veg recipes of india

susmitha had asked me long time back to guest post for her. not that i had forgotten but life became busy and i was not able to write the guest post. so finally i mailed susmitha that i will be writing the post and here it is.

this recipe of veg kheema is basically lightly spiced minced veggies cooked indian style. kheema is the hindi word which means to mince. the veggies are minced/grated/finely chopped and then steamed with indian herbs and spices. veg kheema goes well with rotis and even bread. they can also be stuffed in burgers or buns with some raw tomato-cucumber slices along with lettuce and you have a healthy snack or brunch.

any vegetables of your choice can be used. the dish is mildy spiced, aromatic & too good to taste and healthy as well. the recipe is easy to make and does not take much of your time.

veg kheema recipe details below:

1 medium size carrot, grated or minced or chopped finely
7-8 mushrooms, chopped finely
7-8 cauliflower florets, grated or minced or chopped finely
7-8 french beans, chopped finely
1/2 cup green peas, boiled
2 medium size tomatoes, finely chopped
1 medium size onion, finely chopped
1 green chilli, finely chopped
1/2 inch ginger and 2-3 garlic - crushed finely in a mortar-pestle or made into a paste
1 black cardamom
1 inch cinnamon
1/2 tp turmeric powder
1/2 tsp red chilli powder
1/2 tsp garam masala powder
1 tsp coriander powder
2 cups water
1-2 tbsp sunflower oil
salt as required

heat oil in a pan.
add whole garam masala spices - black cardamom & cinnamon.
add chopped onion.
fry till light brown.
add the ginger garlic paste.
then add tomatoes and all the spice powders.
fry the whole mixture till the oil separates.
add all the veggies except boiled green peas.
add water and salt.
cover and cook till all veggies are cooked well.
the mixture should become dry and there should be no moisture.
now add the green peas and stir.
check the seasonings.
serve hot garnished with coriander leaves with some rotis, phulkas, naan or bread.

Veg Kheema - Guest post by dassana of veg recipes of india

Tuesday, April 23, 2013

Peanut/Groundnut Mylk Curds/Yogurt Tutorial


Many new and potential vegans, especially in India, often ask about a plant based replacement for yogurt. Vegan curds can be made with a wide variety of plant mylks - soy, cashew, rice, coconut, almond, oat, peanut/groundnut... Each kind of yogurt has its own consistency and delicious flavour. And all of them have a longer shelf life than the curds made out of animal fluids.

My favourite of the lot, peanut curds, also happens to be the most popular vegan yogurt among vegans and non-vegans alike. Even my traditional, vegetarian grandmothers really enjoy the soothing, creamy taste and texture it offers.

Peanut/Groundnut Mylk Curds/Yogurt

Peanut curds is really versatile. It can be enjoyed straight by the spoonfuls or in the form or good old South Indian curd rice. It can be turned into majjige (buttermilk) or lassi or added into yogurt based dishes like avial, majjige huli, kadhi, raita, etc...

One of the most visited posts on my blog is Creamy Peanut Milk Curds/Yogurt. I wrote that post when I had newly learnt how to make yogurt out of groundnuts.

Today I created a video demonstrating the process step by step so that it'll be easier for everyone to understand.

Watch the clip, if you have any questions, post them as a comment here and I'll reply as soon as possible.

Enjoy! :)

Peanut Mylk Yogurt/Curds.


A few pointers (I've mentioned most of these in my older blog post too):

- You can optionally strain the cooked peanut mylk before turning it into curds. But I prefer to leave the pulp in there.

- I have said "green chilli crowns" as one of the starters but the crowns of any variety of chilli can be used.

- After making the first batch of curds using any of the starters I mentioned on the HowDo, start saving a spoonful of yogurt from each batch you make to use as a starter for the next batch. The flavour of the curds gets better and better with each generation of the lactobacilli.

- Peanut curds sets well in 8-12 hours (depending on the climate) but let it sit out at room temperature for up to 24 hours if you want it to sour well.

- The yogurt will stay fine in the fridge for 10-15 days at least. I think it might last longer but we usually finish up even our largest batches within two weeks. It's that yum! :)

Wednesday, April 17, 2013

Spicy Mulberry Balsamic Jam


This isn't a jam jam. It doesn't have a smooth, spreadable consistency. It's more like a sticky, yummy, eat-with-your-fingers type of jam.

I enjoy jam but I rarely ever make any. I like my fruits fresh and whole and I feel cooking them with loads of sugar takes away from the taste. So I don't have traditional jam making ingredients like pectin in my pantry. That's why this jam is not of a jammy consistency.

For those occasions when nothing but jam hits the spot (certain weekend mornings come to mind), I have a jar or two of fruity, pink and purple jams in my fridge. I'm a sucker for jams made of berries and grapes and mixed fruits. Yellow jams like mango and pineapple aren't too appealing to me. Not because of their colour, but because they have that tart taste which is distracting when I dip my bread and jam into coffee and take a bite.

I'm not particular about the make and brand. I appreciate the standard Kissan mixed fruit jam just as much as a fancy artisan one. My latest favourite is Towness' grape and strawberry jam.

When Towness announced that they were introducing seasonal mulberries at their store for a few days, people started to comment excitedly on their facebook page. Having never tasted this fruit before, I was really tempted to order some even though I usually avoid fruits which are expensive.

I hadn't realised that 200gms was a lot of mulberries! Hubby and I quickly finished half of it when the box arrived. But there is only so much mulberry one can eat and the other half was sitting in the fridge going soft for a few days. That's why I decided to make jam with it.

I really don't have quantities for the jam. It was one of those put together-taste-adjust things. So I'll just tell you the ingredients I used and the process I followed and you adjust the quantities to your taste. I think this recipe will work well with other berries too. I can easily picture it made with strawberries, blackberries and blueberries. Let me know if you try it with any of them.

Spicy Mulberry Balsamic Jam

Spicy Mulberry Balsamic Jam
Ingredients listed in descending order of quantities used.

Mulberries
Sugar
Balsamic Vinegar
Chilli Powder
Salt

Wash mulberries and drain.
Place them in a pan with sugar and cook while stirring.
Add a bit of salt and continue to stir and cook on medium heat.
When the whole mixture is mushy, add chilli powder and a generous splash of balsamic vinegar.
Reduce the heat to low and stir well.
Taste and adjust the chilli powder and salt quantities.
Once everything reaches a sort of jammy consistency turn off the heat and allow to cool completely.
Transfer to a glass jar and store in the fridge.
Enjoy! :)

Thursday, April 04, 2013

Spicy Tamarind Brandy Sorbet


Summer's here. A wretchedly hot one at that! All cold things are a welcome bliss. So it's no wonder that when my beloved grocery store, Towness announced a recipe contest for their customers, my brain cogs turned towards icy ideas.

The theme for the contest was tamarind. Though puliyogare is at the top of my favourite tamarind based dishes, I wanted to be creative with my recipe submission. And I mean a little more creative than my usual navane puliyogare (made with foxtail millet instead of the traditional rice) which many of you tasted at VGF in Feb.

So I thought of making a tamarind based ice cream. But that idea flew right out the window the moment I started picturing how any kind of mylk would coagulate as soon as I started stirring the tamarind in. So I decided on a sorbet.

Spicy Tamarind Brandy Sorbet

It started out being a goody goody sorbet, but somewhere in the process of putting random ingredients together, I felt the urge to slosh some brandy into it. *slurp* It added a kick and enhanced all the flavours. I tested it out on a couple of willing 'guinea pigs' (no animal testing here folks, only human testing). Two out of the three people who tried it said it was really good. And since I also enjoyed it thoroughly, I declared it tried, tested and contest worthy.

And guess what, it won me a dinner voucher to Imli!!! Yay! :D

I've heard many people speak well about this place so I'm really looking forward to going. I'm getting super hungry just looking at their menu. Yum!

There were 30+ recipes submitted and 15 of those were shortlisted by the judges for trial. They picked the prepared food from the 15 peoples' homes this last Sunday and after tasting everything for themselves, the winners were announced yesterday.

Towness Tamarind Recipe Contest Winners

Here's the recipe if you want to try this out yourself. If you don't consume alcohol, don't worry, just skip the brandy and add a little more chilli powder. It'll still be yummy. :)

Spicy Tamarind Brandy Sorbet

2 T tamarind paste
2 T date syrup or jaggery syrup
1/4 tsp chaat masala
1/4 tsp red chilli powder
2 C water
Big splash of brandy *hic*

Blend everything together.
Transfer to an airtight container and freeze for 2 hours.
Whip vigorously and freeze again for 5-6 hours.
Transfer to a grinder jar and blend for a minute.
Put back into the airtight container and freeze for two to three more hours.
Serve in small scoops.
Enjoy! :) *hic*

This is this the point where I usually end my blog posts, but I realized that while I was talking about prizes, I had to tell you about the one I won in Feb. Heheh yep, apparently I'm on a prize winning streak since I won that Green Foodie Recipe Challenge by The Alternative as well as the VVP T-Shirt in December. :D

Towness had a Food Photography contest for Valentines month and my Baked Akki Rotti Bites photo got the 2nd Prize. :)

Baked Akki Rotti Bites Photo

Towness Food Photography Contest Winners

When I was asked which restaurant I'd like to have a romantic dinner at, I opted to get vouchers to my favourite grocery store instead. So for the last month, I've been having many romantic dinners. Thank you Towness! :)