Today I have a very special guest on my blog - Harini of Tongue Ticklers. I have mentioned her beautiful vegan blog here many times before and I also guest blogged for her early last year.
I 'met' Harini on a Facebook group (way back when her blog was called Tum Yum Treats) and we became friends because of our shared passion for vegan food photography and blogging. I should thank Preethi of Krya for connecting us, otherwise I might not have seen Harini's blog when I did.
I have since then had the pleasure of meeting Harini in person. And today I am really happy to finally have her here with a recipe for delicious Vegan Vanilla Sugar Cookies. I am especially thrilled to have Harini's GLORIOUS photographs of the cookies here on my blog.
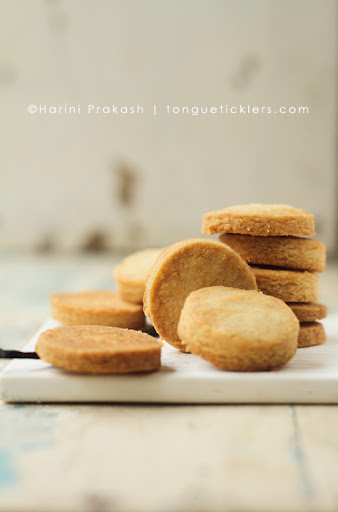
In the pic above, I want to have my mouth open at the end of the white slab so the cookie comes rolling right into my mouth. :oP
Harini, thank you so much for taking the time to do this blog post on Veganosaurus and for all the love and effort you have put into the photographs. :)
Now on to Harini's post...
--
Susmitha and I are very well acquainted but I am not sure whether you know me. Since I believe in forging bonds over food, I won’t take up much of your time. Let’s proceed quickly over to the introduction to what I think are the best vanilla sugar cookies I have ever baked. Does that make you curious?
Calling these ‘my vanilla cookies’ is not entirely correct. I made them mine but they originally belonged to Maggie Beer. I don’t think she will be able to tell that because they have taken quite a turn from the original recipe. So much that I do not recall the original recipe anymore. I first came to know Maggie Beer through MasterChef Australia, and most of her recipes introduced in the show sounded well. You know what I mean, don’t you? I do not try recipes that do not ‘sound’ good, by which I mean that reading the recipe should make my mouth water, must look good and look technically sound. Most of Maggie Beer’s recipes are just that, except that they are not vegan. They are, however, easily adaptable.
You do not need any special or hard-to-find ingredients for making these cookies. All ingredients, save the olive oil, are usually available in any pantry.
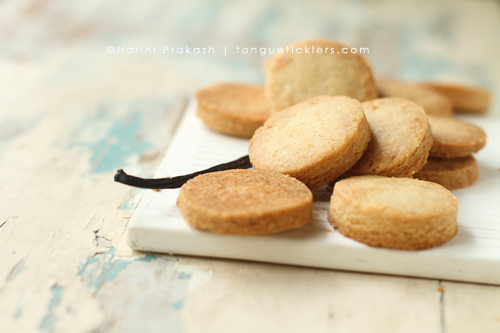
Recipe: Vegan Vanilla Sugar Cookies
(Inspired and modified from a Maggie Beer recipe)
Yield: 24 cookies, about 1.5inches in diameter
Ingredients:
Refined flour – 2 cups | 288g
Soaked and ground cashewnut paste – 2 tbsp | 32g
Pink salt – 2 generous pinches | 1g
Baking powder – about ½ tsp. | 3g
Vanilla seeds from 2 vanilla sticks
Olive oil – ½ cup | 80g
Caster sugar – ½ cup | 88g
Soy milk / Water / Coconut milk – 1-2 tbsp.
Method:
Place flour, cashew paste, salt, baking powder and vanilla seeds in a blender and blend till even. Remove the blended dry flour into a mixing bowl.
Blend olive oil, caster sugar and 1 tbsp. of soy/coconut milk/water lightly and add this to the dry mixture to form a soft dough. Do not knead. Make the dough by mixing with your finger tips, gather and press with your palm. The resultant dough should be soft but break when pressed. Add more milk only if needed. Adjust consistency by sprinkling a teaspoon of flour if too soft. You should not feel the liquid on your finger tips while gathering.
Divide the dough into two thick discs. Wrap them in separate cling films and refrigerate for at least an hour, or till needed. I usually prepare the dough in the night and bake the cookies the next morning.
When ready to bake, remove the dough and let thaw till it softens slightly and you can handle it. Pre-heat oven to 160 deg. C.
Sprinkle your platform with a little flour; place the disc with the cling film on it. Open the cling film and fold it back a little loose. Dust the rolling pin with flour and roll the disc to desired thickness, preferably 3-4mm. The cling film may break as you roll but that should not be a bother. When rolled, peel away the cling film.
Using a 1.5 inch circular cookie cutter, cut several circles. Place them on a baking tray lined with foil/baking sheet. Gather the remnants into a ball, flatten into a disc, place inside the cling film and roll again. Cut and continue making cookies as before.
These do not spread much after baking; hence they can be placed close, separated by just an inch. Place the baking tray in the center rack of the pre-heated oven and bake for about 15-20 minutes or till the cookies start turning golden around the edges.
Remove and using a flat spatula, carefully transfer the cookies onto a wire rack and cool completely.
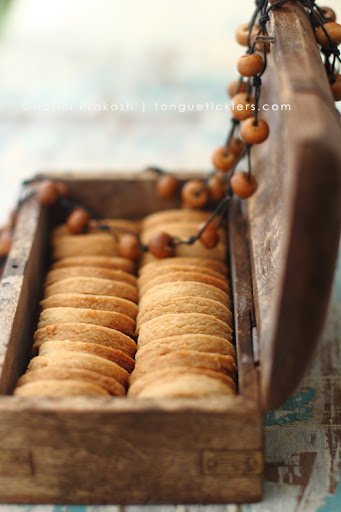
Store in air-tight containers till needed. If you are traveling, stack ten cookies and roll them in cling film, and again with foil. Fold the ends. They will travel well this way without breaking.
Wednesday, August 29, 2012
Monday, August 20, 2012
Healthy Steamed Chocolate Cake - my guest post on Shinsveganlovin
Ooooo what do we have here? It's a ridiculously healthy and incredibly tasty vegan chocolate cake. It has no oil, no white flour and here's the kicker... it's not baked, it's STEAMED! *gasp*
Wanna know what went into it and how my friend Arun (one of the awesome guys behind Samabhava) is responsible for it? Of course you do! :D
Well, you can find all the details in my guest post on my friend Bou Shin's blog - Shin's Vegan Lovin'.
You won't be able to resist trying it out. When you do, come back here and let me know how you like it. I'm sure Arun will be very happy to hear the results.
Arun got the original recipe from another of our vegan friends, Sneha. She is also a great vegan chef and comes up with all kinds of yummy concoctions while experimenting in her kitchen.
The recipe on Bou's blog is a modified version by me with ingredients I had on hand. If you'd like the original recipe that Arun sent me, here it is, directly copy/pasted:
Dry Ingredients:
Whole Wheat Flour: 1.5 cups,
Sugar: 1 cup, (I use white)
Cocoa Powder: 1/3 cup,
Baking Soda: 1 teaspoon (tsp)
Salt: 1/2 tsp
Wet Ingredients:
Apple Sauce: 1/3 cup
Apple Cider Vinegar/Lime Juice: 3 tsp,
Vanilla Flavour/Essence: 1 tsp
Water: 0.8 cup
Put some water in a cooker and allow it to come to a boil.
Grease a container for the cake.
Mix dry and wet ingredients separately well, and then combine them and quickly transfer to the greased container.
Immerse a plate inside the boiling water in the cooker, place the container containing cake mixture inside the cooker, cover it, and allow it to get cooked like idly (don't put weight).
After 30-45 mins, check for done-ness of the cake by inserting a toothpick at the center, and checking if it comes out clean.
Notes:
- We can keep the cooker open after 30 mins or so, if we feel that the mixture is still wet. Opening the cooker will let the steam go, and can reduce the moisture of the cooking environment (but keep cooking).
- Original recipe for oven calls for 1 cup of water, but since there will be a lot of moisture inside cooker, I added less water (convection mode blows dry air; steam is wet and hot).
- Apple sauce: Peel apple (eat skin), chop into fine pieces, add 1/4 volume water, and blend it. If we are using it just for cake, we can use just this juice. If we want sauce, we need to heat the juice in low flame for 10 mins.
Friday, August 17, 2012
Vegan Gokulashtami: Uppu Seedais and Vella Seedais
While I was growing up, Gokulashtami was a small festival, with a couple of very simple dishes for naivedhyam. It was only after I married my Iyer boy that I discoverd these crunchy, delicious, deep friend snacks called Seedais.

Hubs and I are not very religious and our poojas are always very quick, but we do enjoy the cultural aspects of our traditional Hindu festivals. And of course the food! :)
On our first Gokulashtami back home in Bangalore, hubby insisted that we make Uppu Seedais and Vella Seedais together and make baby Krishna footsteps kolam too. It was so much fun that it became a yearly tradition for us. Now, as long as we're here in Bangalore during Gokulashtami, we don't miss out on celebrating it in our small way.

Now after so many years, I've become fairly good at making the Seedais and a pro at shaping the footsteps out of rice flour paste.


People often take the easy way out with the kolam by just drawing an 8 with a flattened top and quickly putting dots for the toes, but we always insist on using the more traditional, side-fist method. Takes a bit more patience but it's worth the effort. Clench palms into tight fists, dip them in rice flour paste and press them onto the floor, right fist for the right foot and left fist for the left foot, then finally dot the toes on top with the index finger. If there are real little babies at home, then their wee feet are used as the tools for making the footsteps. :oP

For those who have no clue about what I'm talking about, Gokulashtami aka Krishna Janmashtami is a festival in celebration of Krishna's birthday. The little footsteps on are drawn from the main door of the house, all the way up to the pooja chamber/altar. They represent baby Krishna running into our home happily and jumping up onto his place in the altar in front of the yummy food offerings. The idol on the altar is of an adorable baby Krishna in a little cradle.

All Hindu festivals basically involve these steps: prepare the favorite foods of the God or Goddess who is being celebrated and place said food on the pooja altar, in front of the idols/symbols/pictures which represent the deity. Light Lamps of sesame oil and incense sticks with a pleasant, calming fragrance. Chant ancient prayers (this part of the ritual could be long or short and would involve ringing a brass or silver bell and lighting a few pieces of camphor on fire to purify and cleanse the house). Next, express gratitude for our many blessings. Offer the naivedhyam food to the God or Goddess in question. And finally proceed to gleefully stuff our faces with the delicious festival goodies.
Little Krishna is known for his love of butter and curds, but we believe that if he lived on Earth today, he would definitely be vegan because he loved cows with all his heart and would never put up with the cruelties inflicted upon these gentle creatures by humans to satisfy our greedy desires. So of course all the goodies we prepare are completely vegan.
This year I made Tapioca Payasam, Vella Appam, Uppu Seedai and Vella Seedai.

For the Vella Appams, I followed the recipe from Subbu's Kitchen. Instead of deep frying them however, I shallow fried them in my Paddu/Paniyaram Pan. This helped them hold their shape well.
For the Uppu Seedais and Vella Seedais, I followed the recipes from Chefinyou, with a few modifications.
Uppu Seedais
Uppu Seedais are known to be tricky little buggers. I've heard that they often turn into little bombs while being fried and splatter oil all over the kitchen. But thankfully, my little Uppu Seedais have always been very well behaved. It's possibly because I use coconut oil instead of butter and dry coconut instead of fresh coconut, which reduces the moisture content in the balls, hence drastically reducing the risk of air pockets being formed inside. Or perhaps it's simply vegan karma at play here. :oP

1 C rice flour
2 T urad dal flour - I followed this recipe to make it and sieved through a cheesecloth to get a very fine powder
1/4 C white sesame seeds
1/4 C dry/desiccated coconut powder
2 T coconut oil
1 tsp asafoetida powder
Salt to taste
Additional coconut oil for deep frying
Mix all the ingredients together.
Add a little water at a time and form a stiff dough.
Shape the dough into small, about 10mm thick, balls.
Heat the coconut oil for a couple of minutes and drop the balls into it in batches.
Fry them on a medium flame and stir once in a while to ensure even cooking.
After a couple of minutes, the balls will turn to a light, golden colour.
Remove them with a slotted spoon and place them on tissue paper to absorb excess oil.
Enjoy! :)
Vella Seedais

1 C rice flour
2 tsp urad dal flour - I followed this recipe to make it and sieved through a cheesecloth to get a very fine powder
1 T dry/desiccated coconut powder
1/4 C white sesame seeds
1 cup jaggery - dissolved in 1/2 C of hot water and strained
1 cardamom pod's worth of crushed seeds
Small pinch of salt
Coconut oil for deep frying
In a dry, heavy bottomed pan, roast the rice flour on a low flame for a minute or so, being careful not to burn it and set aside.
Lightly toast the sesame seeds and coconut powder.
Mix everything, except the jaggery syrup, in a large bowl.
Slowly knead in the jaggery syrup and form a stiff dough, using only as much jaggery syrup as required.
Cover the bowl with a plate and set aside for half an hour.
Shape the dough into 1 inch balls and keep aside.
Heat the coconut oil for a couple of minutes and drop the balls into it in batches.
Fry them for a few minutes on a medium flame and stir once in a while to ensure even cooking. If the balls brown too quickly, reduce the heat a little more.
They are done when they turn to a dark golden brown colour.
Remove them with a slotted spoon and place them on tissue paper to drain away any excess oil.
Enjoy! :)
Hubs and I are not very religious and our poojas are always very quick, but we do enjoy the cultural aspects of our traditional Hindu festivals. And of course the food! :)
On our first Gokulashtami back home in Bangalore, hubby insisted that we make Uppu Seedais and Vella Seedais together and make baby Krishna footsteps kolam too. It was so much fun that it became a yearly tradition for us. Now, as long as we're here in Bangalore during Gokulashtami, we don't miss out on celebrating it in our small way.
Now after so many years, I've become fairly good at making the Seedais and a pro at shaping the footsteps out of rice flour paste.
People often take the easy way out with the kolam by just drawing an 8 with a flattened top and quickly putting dots for the toes, but we always insist on using the more traditional, side-fist method. Takes a bit more patience but it's worth the effort. Clench palms into tight fists, dip them in rice flour paste and press them onto the floor, right fist for the right foot and left fist for the left foot, then finally dot the toes on top with the index finger. If there are real little babies at home, then their wee feet are used as the tools for making the footsteps. :oP
For those who have no clue about what I'm talking about, Gokulashtami aka Krishna Janmashtami is a festival in celebration of Krishna's birthday. The little footsteps on are drawn from the main door of the house, all the way up to the pooja chamber/altar. They represent baby Krishna running into our home happily and jumping up onto his place in the altar in front of the yummy food offerings. The idol on the altar is of an adorable baby Krishna in a little cradle.
All Hindu festivals basically involve these steps: prepare the favorite foods of the God or Goddess who is being celebrated and place said food on the pooja altar, in front of the idols/symbols/pictures which represent the deity. Light Lamps of sesame oil and incense sticks with a pleasant, calming fragrance. Chant ancient prayers (this part of the ritual could be long or short and would involve ringing a brass or silver bell and lighting a few pieces of camphor on fire to purify and cleanse the house). Next, express gratitude for our many blessings. Offer the naivedhyam food to the God or Goddess in question. And finally proceed to gleefully stuff our faces with the delicious festival goodies.
Little Krishna is known for his love of butter and curds, but we believe that if he lived on Earth today, he would definitely be vegan because he loved cows with all his heart and would never put up with the cruelties inflicted upon these gentle creatures by humans to satisfy our greedy desires. So of course all the goodies we prepare are completely vegan.
This year I made Tapioca Payasam, Vella Appam, Uppu Seedai and Vella Seedai.
For the Vella Appams, I followed the recipe from Subbu's Kitchen. Instead of deep frying them however, I shallow fried them in my Paddu/Paniyaram Pan. This helped them hold their shape well.
For the Uppu Seedais and Vella Seedais, I followed the recipes from Chefinyou, with a few modifications.
Uppu Seedais
Uppu Seedais are known to be tricky little buggers. I've heard that they often turn into little bombs while being fried and splatter oil all over the kitchen. But thankfully, my little Uppu Seedais have always been very well behaved. It's possibly because I use coconut oil instead of butter and dry coconut instead of fresh coconut, which reduces the moisture content in the balls, hence drastically reducing the risk of air pockets being formed inside. Or perhaps it's simply vegan karma at play here. :oP
1 C rice flour
2 T urad dal flour - I followed this recipe to make it and sieved through a cheesecloth to get a very fine powder
1/4 C white sesame seeds
1/4 C dry/desiccated coconut powder
2 T coconut oil
1 tsp asafoetida powder
Salt to taste
Additional coconut oil for deep frying
Mix all the ingredients together.
Add a little water at a time and form a stiff dough.
Shape the dough into small, about 10mm thick, balls.
Heat the coconut oil for a couple of minutes and drop the balls into it in batches.
Fry them on a medium flame and stir once in a while to ensure even cooking.
After a couple of minutes, the balls will turn to a light, golden colour.
Remove them with a slotted spoon and place them on tissue paper to absorb excess oil.
Enjoy! :)
Vella Seedais
1 C rice flour
2 tsp urad dal flour - I followed this recipe to make it and sieved through a cheesecloth to get a very fine powder
1 T dry/desiccated coconut powder
1/4 C white sesame seeds
1 cup jaggery - dissolved in 1/2 C of hot water and strained
1 cardamom pod's worth of crushed seeds
Small pinch of salt
Coconut oil for deep frying
In a dry, heavy bottomed pan, roast the rice flour on a low flame for a minute or so, being careful not to burn it and set aside.
Lightly toast the sesame seeds and coconut powder.
Mix everything, except the jaggery syrup, in a large bowl.
Slowly knead in the jaggery syrup and form a stiff dough, using only as much jaggery syrup as required.
Cover the bowl with a plate and set aside for half an hour.
Shape the dough into 1 inch balls and keep aside.
Heat the coconut oil for a couple of minutes and drop the balls into it in batches.
Fry them for a few minutes on a medium flame and stir once in a while to ensure even cooking. If the balls brown too quickly, reduce the heat a little more.
They are done when they turn to a dark golden brown colour.
Remove them with a slotted spoon and place them on tissue paper to drain away any excess oil.
Enjoy! :)
Saturday, August 11, 2012
Basil and Walnut Sauce with Broccoli and Baby Corn
There's nothing more inspiring to me than a crisper full of fresh vegetables! My tastiest dinners are always made on the evenings my Towness groceries come home.
Town Essentials is a gem of an online grocery store that was recommended to us early this year by our friends Amrita and Vijay of Vegan India! They told us that the quality of vegetables and fruits was very impressive and the service is great. Towness turned out to be all that and much more. The veggies are truly hand picked and so very clean and fresh. And their customer service is hands down *the best* compared to any other Bangalore store we've shopped at or ordered from. They are extremely dependable when it comes to delivering at the promised time and they take very good care to ensure that the veggies reach us in perfect condition.
All other stores seem to be lacking in service when compared to these guys. They've really spoiled our shopping experience for life! :oP
One Towness veggie that I'm most happy with is Broccoli. It isn't always easy to get good, clean Broccoli here in Bangalore. There's usually a lot of effort involved in cleaning it before it's in an acceptable condition to cook with. But Towness magically seems to get its hands on super fresh Broccoli that can be quickly washed, cut and used.
This time, apart from Broccoli, I ordered Baby Corn and Italian Basil from the 'exotic vegetables' section and the moment they hit my kitchen counter, the gears started turning in my head and I found myself whipping up a simple and delicious dinner.
I find local (Naati) Tomatoes to be most flavourful and use them in a lot of my cooking. For a less tangy sauce, use Plum (Hybrid) Tomatoes.
This is a fairly mild sauce but if you like to spice it up a bit, add a fresh Green Chilly while blending the sauce.

Handful Italian Basil Leaves
Handful Walnuts
1/4 Onion
3-4 Garlic Cloves
2 Medium Tomatoes
Turmeric (a pinch)
Pepper
Salt
Baby Corn (sliced)
Broccoli Florets
Capsicum (sliced)
Lime Juice
Freshly Crushed Pepper
Steam or nuke the veggies with a pinch of salt and keep aside.
Meanwhile, blend the first eight ingredients together into a smooth sauce, using a bit of water if required.
Pour the sauce over the veggies and cook for a few minutes (I microwaved for 3 minutes but if you prefer, you can just boil it in a pan while stirring).
Let it cool for a minute and then add lime juice and mix well.
Crush pepper on top and serve hot.
I served this Basil and Walnut Sauce over Kodo Millet but it will go very well with Rice or Bread.
Enjoy! :)
Town Essentials is a gem of an online grocery store that was recommended to us early this year by our friends Amrita and Vijay of Vegan India! They told us that the quality of vegetables and fruits was very impressive and the service is great. Towness turned out to be all that and much more. The veggies are truly hand picked and so very clean and fresh. And their customer service is hands down *the best* compared to any other Bangalore store we've shopped at or ordered from. They are extremely dependable when it comes to delivering at the promised time and they take very good care to ensure that the veggies reach us in perfect condition.
All other stores seem to be lacking in service when compared to these guys. They've really spoiled our shopping experience for life! :oP
One Towness veggie that I'm most happy with is Broccoli. It isn't always easy to get good, clean Broccoli here in Bangalore. There's usually a lot of effort involved in cleaning it before it's in an acceptable condition to cook with. But Towness magically seems to get its hands on super fresh Broccoli that can be quickly washed, cut and used.
This time, apart from Broccoli, I ordered Baby Corn and Italian Basil from the 'exotic vegetables' section and the moment they hit my kitchen counter, the gears started turning in my head and I found myself whipping up a simple and delicious dinner.
I find local (Naati) Tomatoes to be most flavourful and use them in a lot of my cooking. For a less tangy sauce, use Plum (Hybrid) Tomatoes.
This is a fairly mild sauce but if you like to spice it up a bit, add a fresh Green Chilly while blending the sauce.
Handful Italian Basil Leaves
Handful Walnuts
1/4 Onion
3-4 Garlic Cloves
2 Medium Tomatoes
Turmeric (a pinch)
Pepper
Salt
Baby Corn (sliced)
Broccoli Florets
Capsicum (sliced)
Lime Juice
Freshly Crushed Pepper
Steam or nuke the veggies with a pinch of salt and keep aside.
Meanwhile, blend the first eight ingredients together into a smooth sauce, using a bit of water if required.
Pour the sauce over the veggies and cook for a few minutes (I microwaved for 3 minutes but if you prefer, you can just boil it in a pan while stirring).
Let it cool for a minute and then add lime juice and mix well.
Crush pepper on top and serve hot.
I served this Basil and Walnut Sauce over Kodo Millet but it will go very well with Rice or Bread.
Enjoy! :)
Labels:
Main Course Dishes
Tuesday, August 07, 2012
Adzuki Bean and Pumpkin Stew/Chilli
Adzuki is an East Asian bean and I've seen it being mentioned in a few vegan recipe books. But since we don't get it here, I hadn't got a chance to try it. I normally like to cook beans from scratch, using dry beans by quick soaking them and then pressure cooking with a wee bit of salt and spices. But a few days ago, I found a can of pre-cooked Adzuki Beans at Brown Tree and I couldn't resist grabbing one. Anyone who enjoys cooking will tell you that 'exotic' ingredients are hard to resist. :oP
Since they are commonly used to make sweet dishes, like Amanattō, I figured the beans would have a slightly sweet taste to them, but when I popped one into my mouth, it kind of tasted like Karamani (Black Eyed Peas) to me. A bean that looks like a small Rajma (Red Kidney Beans) and tastes like Karamani, interesting but not worth ₹139 for 400 gms (to their credit, they were organic). It is possible that the canning made it more bland in taste, so the next time I buy the Adzuki bean is when I find it locally grown in dried form.
I don't have any regrets though because this Chilli/Stew turned out a-mazing!! *slurp* It was sweet, tart, spicy, salty, umami all at once. A beautiful balance in flavours achieved by the super enthusiasm that only working with a new ingredient can inspire. :D
When you try this recipe, I recommend using a combination of beans - Pink and Red Rajma, Chickpeas, White and Red Double Beans, Butter Beans, Adzuki Beans... each spoonful will bring wholesome heavenly goodness into your mouth.

Stir Frying Ingredients:
1 Large Onion - thinly sliced
7-8 Cloves of Garlic - roughly crushed
4 Green Chillies - chopped finely
1 Carrot - chopped into small cubes
1 200gms block of Tofu (I really like the Ka Kims brand in Bangalore) - cubed
1 400gms can Adzuki Beans - drained and rinsed
2 tsp Cumin Powder
1 T Coriander Powder
Pinch of Cumin Seeds
1 T Coconut Oil
Pumpkin Sauce Ingredients:
1 medium slice of Red Pumpkin - cubed (with peel) and steamed or microwaved
1 small Banana (the Yelakki kind, because it has a very mild flavour)
4 medium sized Tomatoes (local, Naati ones)
1/4 tsp Red Chilly Powder
Pinch of Turmeric
Salt
Nutritional Yeast (optional)
Handful Italian Basil Leaves (optional)
Additional Ingredients:
1 tsp Tamarind Paste
Lime Juice
Raw Onion - chopped
Almonds - sliced
Fresh Cilantro - Chopped
Blend all the sauce ingredients together until creamy, using a bit of water as required. Keep aside.
Heat the coconut oil in a large wok or pan.
Add the cumin seeds and let them crackle for a few seconds.
Reduce flame to medium and add the garlic, onion and green chillies.
Leave them without stirring for a couple of minutes.
Once the garlic and onion has browned a bit, increase the heat and stir fry them for a minute.
Add the carrot and stir fry for a few minutes (until carrot is half cooked).
Reduce the flame to medium again, add the tofu and stir carefully without allowing it to break or stick to the bottom of the wok, until the tofu has slightly browned.
Add the adzuki beans, coriander powder, cumin powder and a tiny bit of salt and mix well.
Pour the blended sauce over everything and mix.
At this point, if you want it to be like a chilli, add one or two cups of water so it can be had in a big bowl with a spoon.
For a thicker stew that can be served over rice or bread, add only about half a cup of water, if you feel it's necessary or don't add any water at all.
Mix and bring to a boil.
Reduce the heat, cover and simmer for about 20 minutes.
Add tamarind paste, mix well and simmer for another minute.
Turn off the flame and let it cool for a few minutes.
Stir in lime juice when serving.
Optionally top with chopped onions, cilantro and sliced almonds.
Serve hot.
Enjoy! :)

Since they are commonly used to make sweet dishes, like Amanattō, I figured the beans would have a slightly sweet taste to them, but when I popped one into my mouth, it kind of tasted like Karamani (Black Eyed Peas) to me. A bean that looks like a small Rajma (Red Kidney Beans) and tastes like Karamani, interesting but not worth ₹139 for 400 gms (to their credit, they were organic). It is possible that the canning made it more bland in taste, so the next time I buy the Adzuki bean is when I find it locally grown in dried form.
I don't have any regrets though because this Chilli/Stew turned out a-mazing!! *slurp* It was sweet, tart, spicy, salty, umami all at once. A beautiful balance in flavours achieved by the super enthusiasm that only working with a new ingredient can inspire. :D
When you try this recipe, I recommend using a combination of beans - Pink and Red Rajma, Chickpeas, White and Red Double Beans, Butter Beans, Adzuki Beans... each spoonful will bring wholesome heavenly goodness into your mouth.
Stir Frying Ingredients:
1 Large Onion - thinly sliced
7-8 Cloves of Garlic - roughly crushed
4 Green Chillies - chopped finely
1 Carrot - chopped into small cubes
1 200gms block of Tofu (I really like the Ka Kims brand in Bangalore) - cubed
1 400gms can Adzuki Beans - drained and rinsed
2 tsp Cumin Powder
1 T Coriander Powder
Pinch of Cumin Seeds
1 T Coconut Oil
Pumpkin Sauce Ingredients:
1 medium slice of Red Pumpkin - cubed (with peel) and steamed or microwaved
1 small Banana (the Yelakki kind, because it has a very mild flavour)
4 medium sized Tomatoes (local, Naati ones)
1/4 tsp Red Chilly Powder
Pinch of Turmeric
Salt
Nutritional Yeast (optional)
Handful Italian Basil Leaves (optional)
Additional Ingredients:
1 tsp Tamarind Paste
Lime Juice
Raw Onion - chopped
Almonds - sliced
Fresh Cilantro - Chopped
Blend all the sauce ingredients together until creamy, using a bit of water as required. Keep aside.
Heat the coconut oil in a large wok or pan.
Add the cumin seeds and let them crackle for a few seconds.
Reduce flame to medium and add the garlic, onion and green chillies.
Leave them without stirring for a couple of minutes.
Once the garlic and onion has browned a bit, increase the heat and stir fry them for a minute.
Add the carrot and stir fry for a few minutes (until carrot is half cooked).
Reduce the flame to medium again, add the tofu and stir carefully without allowing it to break or stick to the bottom of the wok, until the tofu has slightly browned.
Add the adzuki beans, coriander powder, cumin powder and a tiny bit of salt and mix well.
Pour the blended sauce over everything and mix.
At this point, if you want it to be like a chilli, add one or two cups of water so it can be had in a big bowl with a spoon.
For a thicker stew that can be served over rice or bread, add only about half a cup of water, if you feel it's necessary or don't add any water at all.
Mix and bring to a boil.
Reduce the heat, cover and simmer for about 20 minutes.
Add tamarind paste, mix well and simmer for another minute.
Turn off the flame and let it cool for a few minutes.
Stir in lime juice when serving.
Optionally top with chopped onions, cilantro and sliced almonds.
Serve hot.
Enjoy! :)
Labels:
Stews
Subscribe to:
Comments (Atom)


