Wednesday, April 29, 2009

Creating a Facebook Fan Page


If you belong to the Etsy community, you're most likely familiar with Timothy Adams of the Handmadeology fame. Yep, he's the guy who very generously shares loads of tips and information on how to market your products efficiently and successfully. He spends hours creating detailed tutorials and blog posts to help make things easy for etsy sellers. His most recent post was about how to make use of Facebook to market yourself, you can find it on his Etsy Secrets blog.

The blog post gives detailed information, complete with screenshots, on what information and applications to add to your Facebook Profile and Fan Page and how to further promote them.

After reading this post, Donna of Creative Treasures, a dear friend of mine who makes gorgeous lampwork and crystal jewelry had a couple of clarifications. Since she's very new to facebook and I live half my life on it, she approached me with a few questions, one of which was exactly how to make a Facebook Fan Page in the first place.

Inspired by Timothy's effort, I also decided to create a tutorial and share it here on my blog. It might not be as professionally done but it's basic, easy to use information and I hope it helps you create your own fan page on facebook.

You need to already have a facebook account to have a fan page. This page is different from your personal profile.

1. You start by adding an application called Pages. The easiest way to find a link to this application is by going to someone else's pre-existing fan page and finding the 'Create a page for my business' link. Here's a screen shot of  my Art by Susmitha Page. You can see that the link you're looking for at the bottom of the left hand column (click pic to see a larger version).


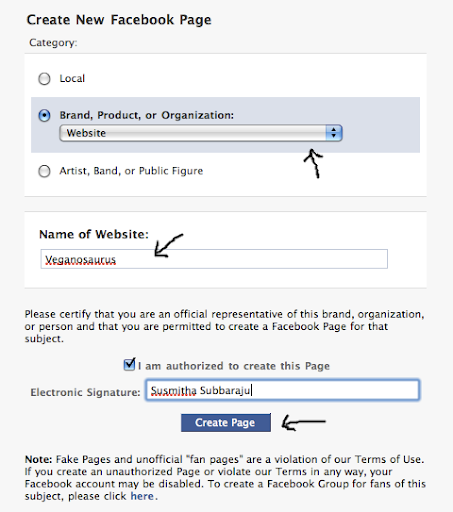
2. Add the application and you will be taken to the 'Create New Facebook Page' link where you enter the first bit of information.


3. Now your new, empty fan page has been created. Begin by clicking on the 'Edit Information' link.


4. Enter the basic and detailed information. Hit 'Save Changes' at the bottom and then 'Done Editing on top'.


5. Now you'll be taken back to your main page where you can add your website info and URL and also a profile picture of your logo or product. When you hover over the top right corner of the profile picture space, the edit icon will appear.


6.  After you've got your pic and URL info added, go on to edit the page by clicking 'Edit Page'.


7. This will take you to the Settings and Applications page. Make any adjustments you'd like here.


8. Then scroll to the bottom of the Settings and Applications page. Click on the edit icon at the corner of 'More Applications' and browse for more apps.


9. To add your Etsy Mini to your page do a search for 'my stuff' and click on the 'gigya my stuff' application and add it.


10. Go back to your page, click on the + sign next to the Wall, Info, Photos... tabs. Add the 'My Stuff' application to your tabs.


11. Follow the instructions and paste the flash version (larger code) of the code into the box (the java version cannot be added). Now you have your etsy mini tab all set.


12. Finally, click on the 'Photos' tab and add loads of images of your products.


Your basic fan page is now ready. Hit the 'Publish This Page' link (its in red) on top and tell all your friends about it :)

Thursday, April 23, 2009

Herbed Brown Rice with Veggies in Spicy Tomato Yogurt Sauce


When we were in college Bangalore used to be very different. And that was barely 10 years ago! Those were the good old days before multiplexes and malls f#*@ed up our beautiful city. All hangouts used to be cozy, uncrowded and comfortable. We knew the true meaning of chilling out. Yes, the choices were comparatively limited, but we still loved them. When we wanted to watch movies we went to Rex, Galaxy and other such nice, old, single theaters. When we wanted to shop we visited the Commercial Street side lanes. When we wanted to window shop we dropped in to Shoppers Stop or Lifestyle. And when we wanted to grab a nice lunch Casa Picola was THE place to go to.

There was this one dish at Casas that I really loved. It involved large chunks of capsicum, mushroom and cottage cheese in a yogurt based tomato sauce served with some kind of rice and garlic bread on the side (I hadn't turned vegan yet). It was one delectable meal! It's been years since I last tasted it and I always wondered what went into that sauce.

Last year I was at my now absolute favorite hang out Infinitea with a few friends and we decided to take lunch instead of the usual herbal tea and Momos (best Momos eva!). That's when I discovered this dish which was very similar to my old Casas favorite.  I was more than thrilled to discover that their sauce did not contain yogurt and that they could easily replace the cottage cheese with some extra veggies (I usually ditch the mushrooms too and get broccoli and extra bell peppers instead).

I'd been meaning to try a similar dish at home for the longest time and tonight finally happened to be the night that I did. Well it didn't taste the same of course but it did turn out delicious and I was extremely pleased with the result :)


Herbed Brown Rice with Veggies in a Spicy Tomato Yogurt Sauce

For the Rice:

1 C Long Grained Brown Rice
3 C Water
1 t Vinegar
2 T Oil
2-3 t Mixed Dried Herbs (basil, thyme, chives etc...)

Sea Salt
Pepper

Put the first five ingredients and a wee bit of salt in a microwave safe glass dish and cook on high for about 18-20 minutes. Let it stand for a few minutes. Fluff with a fork. Sprinkle more salt as desired and crush pepper with a pepper mill directly over the rice. Mix gently with fork and keep aside covered.

Veggies:

2 Carrots
7-8 Baby Corns
1 small Capsicum (Green Bell Pepper)

Chop the veggies. Sprinkle a tiny pinch of sugar over them and mix. Cook in a microwave safe glass dish on high for 5-7 minutes, mixing in between.

Sauce:

6-7 Tomatoes
7-10 cloves of Garlic
1 inch piece Ginger
3-4 Dry Red Chillies
Salt

Grind everything in a blender adding some water if required.

How to proceed:

Pour blended liquid over the veggies in the glass dish. Mix well and cook on high for 3 let it sit for 1 minute. Stir and cook again for 2 minutes.

Add 1/2 C Soy Yogurt (optional) and stir well.

Serve hot. Enjoy! :)


Thursday, April 02, 2009

Bisi Bele Bath


A delicious mixture of rice, lentils, vegetables and spices. The perfect hearty, wholesome one dish meal! Here's a picture of my Bisi Bele Bhath (literal translation: Hot Lentil Rice Dish). It's served with a dollop of fresh, homemade soy yogurt.


We (meaning my mom) make the masalapowder for this at home from scratch and nothing can beat that taste but making it is a long, drawn out process and you need access to various 'exotic' spices. So instead I suggest you get your hands on a packet of the Bisi Bele Bhath Masala powder which will make do to begin with. They'll be easily available at Indian stores. The MTR brand is the most well known. If you can't find the Bisi Bele Bath Masala powder then the Vanghibath Masala Powder will do just fine as an alternative.

There are various styles of making this dish, our method follows... The recipe may look long but it's really a very easy dish to make.

Bisi Bele Bhath


1 C Rice
3/4 C Toor Dal (split yellow peas)
2 C or more mixed, diced veggies - Potato, Carrots, Beans, Broccoli, Capsicum (Green Bell Peppers), Peas...
1 Onion sliced
5-6 cloves Garlic (optional)
3-4 Tomatoes Cut into medium chunks
1 T Tamarind Paste
2 t Bisi Bele Bhath or Vangibhath Masala Powder
3-4 T Oil (coconut oil makes it extra yum!)
2 Dried Red Chillies (broken into half)
Juice of 1 Lemon
Mustard seeds
Asafotedia powder
Curry Leaves
Turmeric
Salt

Cook the rice and toor dal together with plenty of water till very soft (a pressure cooker would make things easy).

Meanwhile chop and slice all the mixed vegetables and cook them separately (I like baking and grilling them for about 7 minutes with salt and oil sprinkled on in the microwave using the combi option but boiling them in salted water is fine too).

Slice the onion and dice the tomatoes and keep them aside separately.

Heat oil in a large saucepan or wok for about 30 seconds or so till it's hot (but don't overheat). Add a dash of mustard seeds, they will immediately crackle so be careful and cover the pan with a lid till the crackling is done. Quickly add a pinch of turmeric and a pinch of asafotedia. Then add the curry leaves. Finally add the red chillies and immediately add the garlic and the onions. Fry till the onions are transparent and slightly browned.

Sprinkle the masala powder and stir. Add 1-2 C water, the tamarind paste and salt to taste. Mix well, cover and simmer the veggies in the masala on a medium flame for a couple of minutes.

Pour in the cooked rice and dal and mix well. Add more water if required. Let everything simmer together for a few minutes.

Finally mix in the chopped tomatoes and mix. Turn off the flame.

After about a minute, squeeze the lemon juice over the Bisi Bele Bhath and mix well.

Serve hot by itself or with soy yogurt (plain, unsweetened) and a few potato chips for the crunch.

Wednesday, April 01, 2009

Vegan Donuts


I spent all evening in the kitchen making Vegan Donuts today. I made 3 types - sugar coated, chocolate glazed and cinnamon twisted. They turned out delish!!

Thanks to Jenny Marmalade for making me want to attempt these. And thanks to Lisa for the recipe (there used to be a link here but that page has disappeared).
I approximately halved the quantity of the ingredients and also instead of Vegan Butter I used Coconut Oil. My egg replacer was flax seeds and only that I used the full quantity equivalent to 1 egg instead of half.

Lessons I learnt...

1. Vegan Donuts are soooo YUM!!

2. They are labor intensive and time consuming (well at least they seemed that way because it was my first try).

3. Hubby's fall in love with you all over again from the very the first bite :D

4. They are so not healthy! Not even in their vegan form so I dread to think of the non vegan version. EGAD!!! *shudders*. They suck oil like nobody's business and they are made completely out of all purpose aka nutrient-less flour.

5. Take pics almost as soon as you've made them since they disappear real fast.

6. Make and eat them once in a rare while and you'll be fine :)

Kiva - make a loan, change a life


My friend Nathalie is a constant source of inspiration to me. Not only is she a highly talented artist but she is also an endless source of information which she shares freely and abundantly. Today she told me about Kiva, an online place where we can lend money to underprivileged entrepreneurs and help them start and grow businesses to improve their lifestyle.

I was really moved by the thought and the work behind this organization and immediately signed up.

I chose to pitch in towards the loan requested by Victoriana Rolon. You can see her on my Lender Page or learn more about her business by visiting her profile.


I would appreciate any help in raising the complete loan for Victoriana. The loan can be as small as $25. Every bit counts.