Monday, June 17, 2013

Spiced Pumpkin Mousse - guest post by Rithika of Vegan on the Prowl


Today's special guest blogger, Rithika, is baker extrodinaire at The Green Stove, a vegan bakery in Mumbai, India and blogger at Vegan on the Prowl where she shares her innovative, healthy recipes and stories about her adventures around the world in quest of vegan food. :)

To my knowledge, The Green Stove was the first vegan bakery in India when it was launched. Rithika makes some amazingly drool worthy everyday baked goodies and desserts as well as gorgeous ones for special occasions like weddings, birthdays, anniversaries, etc. You can visit The Green Stove's Facebook Page to get updates about the vegan goodies that are baked.

Rithika and I have been online friends for a few years now. It's hard to believe that we have met in person just one time, on her visit to Bangalore a couple of years ago. She gave me this beautiful dragonfly glass jar that she hand painted with love and I still keep it in my home and cherish it. :)

Hand painted glass jar by Rithika

Now without further ado, let's move to Rithika's recipe for a delicious, innovative and healthy...dessert (but of course)! :) Thanks Rithika! It's a pleasure having you over on Veganosaurus.

--

This guest post is very, very long overdue. Imagine being late on a submission deadline and multiply that by ten, that is how long ago Susmitha asked me to write a guest post for her. She was nice enough (multiplied by ten again) to politely remind me that my deadline was long gone and that last push was enough for me to get my act together. I have only met Susmitha once over a lovely vegan buffet lunch in Bengaluru but I feel like we've been somehow connected from a previous life. She is the most kindhearted, proactive person I know and I love all the work she is doing in Bengaluru to promote compassionate eating and living. I only wish we lived closer so it would push me to do more.

With so many of the recipes on her blog being sweet, I thought it was only apt to come up with something that would go with her persona and her blog. So here is my recipe for a Spiced Pumpkin Mousse.

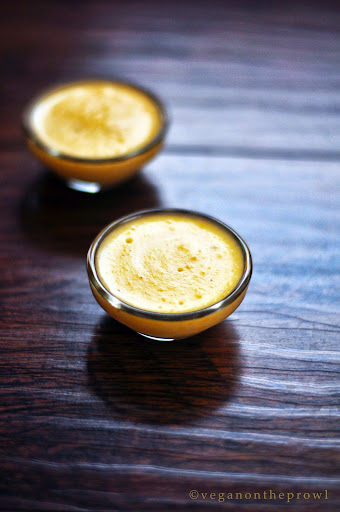
Spiced Pumpkin Mousse

Spiced Pumpkin Mousse

Ingredients:
3 cups freshly pressed, light Coconut Milk
1 cup peeled and cubed Yellow Pumpkin
1/2 tsp Cinnamon
1/4 tsp All Spice Powder
1/4 tsp Nutmeg Powder
3 tbsp Raw Organic Sugar*
2 tbsp Arrowroot Starch
1/2 tsp Turmeric

*Use a sweetener of your choice and also as much as you like. I find 3 tbsp to be more than enough but you can increase the quantity depending on when it hits your sweet spot!

Steam the cubed Pumpkin for about 15 minutes and purée it until no lumps remain.

In a small bowl, mix the arrowroot starch with a little bit of the coconut milk and stir well until it has dissolved.

In a thick bottomed vessel, add the coconut milk, spices, pumpkin purée and turmeric and heat it over a low flame. After about ten minutes, add the starch mixture and keep stirring continuously. The mixture will eventually start to thicken. When it reaches a thick soup consistency (should take less than 10 minutes) take it off the flame and pour it into individual bowls. Refrigerate for an hour or till it sets into a mousse.

Serve cold.

Spiced Pumpkin Mousse

Thursday, June 13, 2013

Whole Wheat Foxtail Millet Multi-Seed Bread


Yesterday, a friend of mine who regularly follows my blog and my facebook pages - artbysusmitha and veganosaurus - asked me why there has been a lack of activity on my blog and I decided it was time for some action.

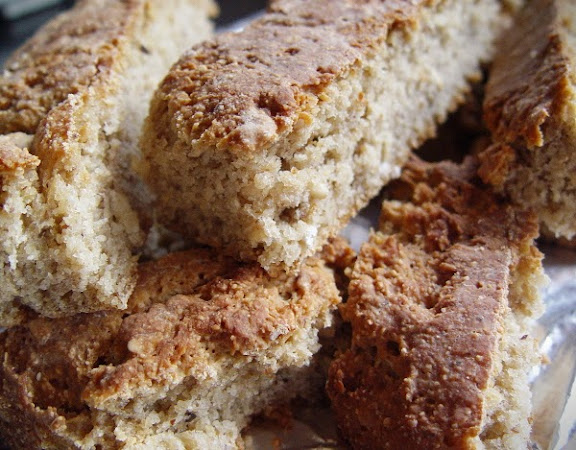
Whole Wheat Foxtail Millet Multi Seed Bread

I made this bread a few weeks ago. I quickly clicked some pics and typed out the ingredients but this laziness causing cloudy weather and busy life in general has been getting in the way of me completing the post, until now.

I started out to make a regular whole wheat, multi-seed bread but at some point I got the idea of putting broken foxtail millet in there and I must say, it was a brilliant move! Sometimes bakers knead chiroti rava/sooji (fine semolina) into the dough to get an interesting texture. But rava is one of those nutrient-less carbs and I wanted to make this bread with whole ingredients, that's why I decided to use the millet rava instead.

Whole Wheat Foxtail Millet Multi Seed Bread

The millet gives the bread an excellent texture! And don't even get me started on the delightfully crunchy, browned crust. Mmmmmmm.

The next time I make this bread, I will turn a portion of it into Rusk. I'm sure that the millet will give it the perfect kind of crunch. It's been so long since I made Rusk. Just the thought of it is making me want to bake right now.

The procedure of making this bread is pretty basic. If you're making bread for the first time, you can watch my step-by-step video tutorial for making basic bread dough to get a general idea about yeast frothing, kneading, etc., and then make this Whole Wheat Foxtail Millet Multi-Seed Bread using the ingredients and recipe below.

Whole Wheat Foxtail Millet Multi Seed Bread

Whole Wheat Foxtail Millet Multi-Seed Bread

3 C Wheat Flour
1/2 C Broken Foxtail Millet (Navane Idli Rava)
1 tsp Sprouted Fenugreek Powder (optional)
2 T Flax Seed Powder
Mixed Seeds - Melon, Black Sesame, White Sesame, Poppy
2 T Wheat Berries - soaked in hot water for 15-30 mins and drained
2 T Coconut Oil + 1 tsp for greasing the mixing bowl
1 T Apple Cider Vinegar (white vinegar can be used instead)
1 tsp Salt
1/4 C + 2 T Sugar
2 tsp Active Dry Yeast
3/4 C Soy or other Vegan Mylk
3/4 C Water
Optional - Vegan Yogurt mixed with Corn Starch (Corn Flour) to brush on top of the bread

  • Mix the water and soy mylk and heat them together in a pan.

  • Add 2 T sugar and stir to dissolve

  • Let the liquid come down to lukewarm temperature.

  • Sprinkle the active dry yeast onto the liquid and keep aside for 10-15 minutes, allowing the yeast to froth and bubble.

  • Meanwhile, in a large bowl, place 2 C of the whole wheat flour with broken foxtail millet, sprouted fenugreek powder, flax seed powder, remaining 1/4 C sugar, salt and 2 T coconut oil.

  • Mix everything together with your fingers, rubbing the oil into the flour.

  • Make a deep well in the centre and once the yeast mixture is frothed and ready, pour it into the well.

  • Add the apple cider vinegar and mix everything with a fork to get a sticky dough.

  • Add as much of the remaining 1 C whole wheat flour as required, a little at a time, and mix with your hand to get a rough ball of dough.

  • Knead in the seeds and wheat berries.

  • Transfer the dough to a floured surface and knead well to form a smooth, elastic dough.

  • Grease the mixing bowl with the remaining 1 tsp of coconut oil.

  • Place the ball of dough into the bowl and swirl around to coat it with oil on all sides.

  • Cover the bowl with a large plastic bag and place it in a warm/sunny spot.

  • Allow the dough to rise for 1 1/2 to 2 hours.

  • After the dough has doubled in volume, punch it down and transfer to a floured surface.

  • Knead very lightly and shape into desired form (loaves, buns, rolls...anything you like).

  • I wanted to make mine into a braided loaf but it expanded so much in the baking tray that the shape got changed. haha

  • Cover again with a plastic bag and allow to rise in a warm place for another 1 1/2 to 2 hours.

  • Preheat oven to 190 C. Optionally lightly brush the top of the bread with the vegan yogurt and corn starch mixture.

  • If you've made loaves then bake in the preheated oven for about 50-55 minutes, if it's rolls/buns then 35-40 minutes will do.

  • Allow the bread to sit in the hot oven for 10-15 minutes after it's done.

  • Take the tray out and allow the bread to cool down in the tray for 1/2 an hour, then transfer to a cooling rack and let it cool down some more.

  • It's okay to slice the bread if it's a little warm but *do not slice into the bread while it's hot!!!*

  • The bread tastes great served with some hot soup/stew or just dipped in some garlic olive oil.

  • Since it doesn't have any additional spices, it even tastes yum with jam.

  • Enjoy! :)


  • Whole Wheat Foxtail Millet Multi Seed Bread

    Thursday, May 30, 2013

    Rose Hip Tea - guest post by Angela of Canned Time


    After a terribly hot summer, we've been having rainy, cloudy days these past couple of weeks. The monsoon season has begun! In this kind of weather, there's a constant craving for hot beverages, hearty stews and deep fried goodies. All I want to do is snuggle up in bed. My body feels like it's been been steeped in lethargy and I go through the movements of my daily life in a hazy, slow motion.

    Talking about steeping, today's guest post by Angela of Canned Time couldn't have come at a better time! She has shared the recipe for a deeply relaxing herbal tea and it sounds like it'll go perfectly with my wallowing-in-laziness plans. :D

    I first met Angela on Facebook when she joined our elite squad of Vegan Temptivists and ever since then we've been visiting each other on our various Internet spaces. :)

    Thank you Angela for guest posting on my blog today and I want to especially thank you for the beautiful, cheerful, colourful photographs. I can almost smell the soothing fragrance of those roses! :)

    Now on to Angela's post.

    --

    Guest posting today at Veganosaurus and it is such fun....thanks Susmitha for featuring my blog and for being such a wonderful friend and blogger ♥

    This is a simple...very simple...herbal tea recipe but it  has given me many hours of peaceful relaxation..............it's just great!

    Rose Hip Tea - Canned-Time.com

    I've discovered a new and healthy way to relax each evening and it's just 'groovy' that a habit can be good for me these days.....

    Rose Hip Tea - from Canned-Time.com

    Who knew that roses, such a lovely thing to look at, can also be a super healthy drink to sip and relax with?

    Rose Hip Tea is a mildly sweet herbal tea made from the fruit of the rose bush, or "hips".

    Rose Hip Tea - From Canned-Time.com

    For an extensive look at Rose Hips, check out my old friend and Foraging Expert Sunny Savage

    Rose Hip Tea - from Canned-Time.com

    Rose Hip Tea is most famous for it's abundance of Vitamin C but also contains significant amounts of A, B-1, B-2, B-3, D, E and K. It also provides plenty of Calcium, Iron, Zinc and lot's of fun flavonoids!  YEA......

    http://usa.paiskincare.com/pages/rosehip-oil-seed-extract-93

    So how can you steep up a cup of this light lovely tea for you?

    Well there are plenty of dried Rose Hip Teas in the market. The one I've been using is from Mountain Rose Herbs. I've had a tough time finding it in health food stores in its 'unpackaged' form, ie: just the dried hips. I do want to try making my own fresh but for now, I'm plenty satisfied with my store bought. I add a little stevia, sometimes a pinch of cinnamon, sometimes a little lemon.

    The Rose Hips can also be brewed and chilled for a summer fresh beverage:

    1) Combine 4 rounded teaspoons cut-and-sifted rose hips (ground in a spice mill or not) or 4 tablespoons whole dried rose hips with 4 cups of water in a nonreactive saucepan. Cover, bring to a boil, then simmer for 5 minutes.

    2) Alternatively, place fresh or crushed dried rose hips in a warmed teapot, pour boiling water over them, and steep, covered, for 10 minutes.

    3) Strain the tea and sweeten if desired with a scant 1/8 teaspoon stevia extract powder or 2 to 4 drops glycerin-based stevia liquid extract per cup. Serve immediately or cool and refrigerate, covered, for as long as 3 days.

    Rose Hip Tea - Canned-Time.com

    I always seem to have a drink, either hot or cold, with me most of the day. If you're like me and are looking for a healthier way to sip on a delicious, non-fattening beverage, be sure to check into Rose Hip Tea. It's a great way to enjoy your nutrients ♥

    Rose Hip Tea - Canned-Time.com

    Thanks Susmitha :)  Enjoy everyone......

    Monday, May 27, 2013

    Video and Recipes from my Vegan Demo at Soul Kadhi


    On 18th May, I was part of a vegan cooking demo and lunch event at Soul Kadhi. I had a really nice time talking about vegan food and showing people how to make a bunch of scrumptious, Indian, vegan dishes along with Chef Ajay.

    The response was very good. There were about 20 participants and all of them said they found the demo interesting and the food delicious. Less than half the attendees were vegan. The rest were people who wanted to learn vegan cooking for various reasons. It was all totally worth the effort! :)

    My hubby captured the demo on video and I spent some time editing and putting it together. The video explains the general outline of the recipes and also contains a few pointers about making vegan mylks and curds. I've shared all the recipes below, after the embedded video. Between the two, you will be able to clearly understand all the steps involved and easily make the recipes at home yourself.

    If you were present for the demo, do drop me a line here in the comments section to let me know how you liked the experience. :)

    Vegan Demo Video


    I already have a blog post explaining the process of making Peanut Curds in detail.

    In all the recipes below, the quantities of ingredients are approximate and certain quantities are not even mentioned. As you prepare the food, taste and adjust often to suit your preferences.

    Basundi

    1/2 C Cashews
    2-3 tsp Sugar
    Small pinch of salt
    Sliced Pistachios
    Crushed Saffron/Elaichi

    In a dry jar, grind together the cashews and sugar into a fine powder.
    Scrape down the sides and grind again until the cashew starts to release its oils and becomes slightly buttery.
    Add a small pinch of salt and a splash of water and blend to a smooth paste.
    Add a little more water and blend into a cream, it should have the consistency of condensed milk.
    Pour into a bowl and garnish with sliced pistachios and crushed saffron and/or elaichi.
    Chill for at least half an hour and serve.

    Notes:
    This dish doesn't need to be cooked and you can make it completely raw by using soaked dates in place of sugar.
    If you like, you can heat the Basundi for a few minutes while stirring continuously and chill it. This makes it a little more creamy but is not really a necessary step.

    Tamarind Tofu Tikka

    500 gms Firm Tofu
    1 Onion
    1 Capsicum (preferably red or yellow)
    1 Tomato
    1-2 T Thick Tamarind Paste
    1/4 tsp Dhania Powder
    1/4 tsp Jeera Powder
    1 tsp Kasauri Methi
    1 tsp Chilli Powder
    Mustard Oil
    Chopped Green Chillies
    Chopped Cilantro
    Salt

    Drain and gently squeeze the tofu to remove water.
    Make the tofu into 1 inch cubes.
    Cube the vegetables.
    Mix salt, tamarind paste, spices, herbs and mustard oil with a few spoons of water to get a creamy marinade.
    Toss the cubed tofu and vegetables in the marinade.
    Cover and keep aside for a minimum of 30 minutes.
    If you have more time then marinate overnight in the fridge to meld the flavours very well.
    Skewer and grill on high in a convection oven or tandoor for 8-10 minutes.
    Serve hot.

    Notes:
    You can alternately roast the skewered tikkas on a hot, non stick pan that's greased with oil, turning them occasionally to ensure even grilling. In this case, don't add the chilli powder in a marinade because it will create a lot of smoke. Instead, sprinkle the chilli powder on top of the tikkas after they have been grilled.

    Malai Kofta

    For the Kofta Balls:
    4 Potatoes - boil/steam, peel and grate
    200-250 gms Tofu - drain, rinse, gently squeeze to remove water, grate
    2 T Corn Starch
    Elaichi Powder
    Pepper Powder
    Salt
    Dry Fruits/Nuts - chopped finely and mixed

    Gently mix the grated potatoes and grated tofu together with a fork or spoon.
    Add the remaining ingredients and mix well.
    Dust a clean surface or a plate with corn starch.
    Rub corn starch on your palms and fingers.
    Shape the potato/tofu mixture into balls and make a hole in the center with your finger.
    Place some dry fruits/nuts in the hole and close the ball.
    Shape into elongated balls.
    Deep fry in hot oil until golden.
    If you want to make them more healthy, instead of deep frying, grease the kofta balls with a little oil and bake in a preheated oven at 200 C for about 15 minutes, until the balls have browned lightly.
    Drain on tissue paper and keep aside.

    For the Malai Sauce:
    Ginger-Garlic Paste
    Green Chilli Paste or Pepper Powder
    Thick Cashew Cream
    Elaichi Powder
    Salt
    Sugar (optional)
    Keora/Kewra Water (optional)

    Stir fry the ginger-garlic paste in a dry pan or optionally with a spoon of hot oil.
    Add the green chilli paste (if using) and stir.
    Add the thick cashew cream (this could be raw or cooked cashew cream, either way is fine).
    Add salt, elaichi powder and pepper powder (if using) and stir.
    Optionally add sugar and keora water and mix.
    Let the sauce simmer for a few minutes.
    Adjust the thickness of the sauce with some water.

    How to proceed:
    While the sauce is simmering on low heat, the prepared kofta balls and toss gently.
    Add a splash of water to the sauce to keep it in a constant simmer (so it doesn't start boiling vigorously).
    Simmer the koftas for a minute and turn off the heat.
    Serve hot with rotis or pulaos.

    Kadhi Pakora

    For the Pakoras:
    Besan Flour
    Ajwain
    Sliced Onion
    Chopped Curry Leaves
    Chopped Cilantro
    Chilli Powder
    Salt
    Oil

    Mix everything with some water to make a thick batter.
    Heat oil and drop spoonfuls of the batter.
    Deep fry while occasionally turning over, until crispy and golden brown.
    Drain on tissue paper and keep aside to cool.

    For the Kadhi:
    Peanut Curds
    Besan Flour
    Turmeric Powder
    Oil
    Dhania
    Jeera
    Finely Chopped Garlic
    Thinly Sliced Onion
    Amchoor Powder
    Roasted Red Chillies
    Salt

    Make a thick batter by whisking together besan, peanut curds and turmeric powder.
    Heat a spoon of oil in a pan.
    Add whole jeera and dhania and stir for a few seconds, allowing them to crackle.
    Add the finely chopped garlic and stir.
    Add the thinly sliced onion and stir fry until the onion is translucent and lightly browned.
    Pour in the peanut crud-besan batter and stir well.
    Add amchoor powder and salt and mix well.
    Adjust thickness of the sauce with a little water.
    Add the dry roasted red chillies and simmer.

    How to proceed:
    While the sauce is simmering, add the deep fried pakoras.
    Mix for half a minute and turn off the heat.
    Optionally season with toasted mustard seeds, dhania, jeera and curry leaves.
    Serve over hot, steamed rice.

    Carrot Halwa

    4 Large Carrots - grated
    1/2 C Thick Cashew Cream
    2-3 T Sugar
    1 T Oil
    2 Cloves
    2 Elaichis (crushed)
    Raisins
    Chopped Dates
    Slivered Almonds

    Grate the carrots.
    Heat oil in a heavy bottomed pan, add the cloves and stir.
    Add the grated carrots.
    Stir fry until the carrots are cooked and have reduced in quantity.
    Add thick cashew cream, stir and cook for a few minutes.
    Add crushed elaichi and sugar and stir for a minute.
    Mix in the sliced almonds, chopped dates and raisins and turn off the heat.

    Notes:
    You can reduce the sugar or eliminate it completely and add more dates and raisins for sweetness.
    If you want to avoid oil, steam the carrots whole and grate them, that way you can completely skip the stir frying process.
    You can add finely ground cashew powder instead of cashew cream.

    Enjoy! :)

    Friday, May 17, 2013

    Cool, Summery Chickpea Salad


    As I mentioned a couple of posts ago, tomorrow is my vegan cooking demo at Soul Kadhi. Right now I've come to Soul Kadhi to do a quick discussion about the event but their generator decided to act up and spew ash during the peak lunch time and that has kept Nirmala very occupied for over an hour. So while I wait, I thought I'd start a blog post (and finish it after I get home).

    Poor Nirmala hasn't had a moment's respite. She came to speak to me in the middle but something came up again and she had to go attend to it. It's nice that her mom is around to help out everyday but despite that, Nirmala is constantly on her feet. I have no idea how she manages to run three restaurants full time on the same premises and stay sane!

    A lot of my friends who have tasted my cooking/baking and even a few people who follow my blog have asked me why I haven't started a vegan café or restaurant yet. I really want to, hubby and I even keep talking about it, but I keep procrastinating and the main reason is that I don't know if I'll be able to handle all the stress that goes into running a food establishment.

    I like my work related life to be slow paced. When I create my jewellery, I need to be relaxed and in the zone to come up with beautiful designs which carry positive energy. Similarly, I feel that some of my tastiest and most creative dishes are made when I am taking it easy. I'm afraid of what my cooking will taste like if I am constantly under pressure.

    So if I do take steps to make my dream of a vegan café come true, I know for a fact that all the administration work will have to be done by someone else! My restaurant will be part of the slow food movement. That means, people need to come there with the intention to relax and enjoy the meal at a slow pace. People in a big huff to be served their food will not be allowed. :oP

    Amusingly, my recipe today does not belong to the slow food movement. It can be put together in a breeze and wolfed down in the blink of an eye. hehe

    Cool, Summery Chickpea Salad

    I've used small, Indian Chickpeas aka Gulabi Gram in this salad but even the larger Garbanzo Beans aka Kabuli Channa will taste yummy in this recipe. For that matter, any kind of bean will work, doesn't even have to be Chickpeas.

    I like eating this salad plain or as a side dish with chapathies.

    Cool, Summery Chickpea Salad

    1 C Indian Chickpeas (Gulabi Gram)
    3 Large Tomatoes
    1 Small European Cucumber (regular Cucumber is fine too)
    3 Small Carrots
    1 heaping tsp Peanut Butter (I used the Chia Peanut Butter that my friend Somera> sent me)
    1-2 tsp Balsamic Vinegar (it's okay to use lime juice, tamarind water or any other vinegar instead)
    1/2 tsp Liquid Jaggery (or other sweetener)
    1/2 tsp Red Chilli Powder
    Salt

    Soak the chickpeas overnight.
    Drain, rinse and pressure cook in fresh water for 3-4 whistles.
    Cool, drain (cooking water can be saved and used to cook something else) and keep aside.
    Finely dice the tomatoes and cucumber.
    Grate the carrots.
    Toss all the ingredients together and mix well (using your fingers if required to spread the peanut butter well).
    Cover and chill for a short while.
    Enjoy! :)