Showing posts with label Desserts. Show all posts

Thursday, December 10, 2009

Oatmeal Peanut Butter Coconut Crumble Cookie-Cake


Oatmeal Peanut Butter Coconut Crumble Cookie-Cake picture 1Made this for my granny's birthday. Since she's a huge peanut butter fan and prefers cookies over cakes, it was a perfect recipe. The inspiration was a no-bake cookie recipe which I modified in various ways to concoct this one. :)

Adjust quantities of all ingredients according to your taste. This is an extremely flexible dish. I made this one extra sweet just for her because she has a predominant sweet tooth. Just remember that the coconut oil tends to bring out the sweetness even more so always start with a lower quantity of sweetner and then increase it if required.

I just threw the ingredients into a bowl by handfuls and container tilts, but I've tried to put down measurements here to give you a general starting point.

Oatmeal Peanut Butter Coconut Crumble Cookie-Cake.


1 1/2 C Oatmeal
2 T Rice Flour
1/2 C Dry Coconut Powder/Flakes
1/2 C Chopped Walnuts
1/4 C Vegan White Chocolate Chips
2 T Coconut Oil
1 large scoop Peanut Butter
3/4 C Sugar

1. Toast the oatmeal in a dry pan for a few minutes by stirring constantly.

2. Put this into a mixing bowl. While it is still hot/warm add the peanut butter, coconut oil and sugar onto it and mix well. This softens the peanut butter and coconut oil helping them to get incorporated well.

3. Finally mix in the rest of the ingredients. Taste and adjust.

4. Put this 'batter' into a microwave safe dish and nuke for about 2-3 minutes. You can skip this step and directly go to step 5 but I liked doing this so the sugar would be slightly caramelized to add an extra crunch.

5. Cool down to room temperature. Press into a desired container/plate and pop into the freezer. Let it set for at least 20 minutes.

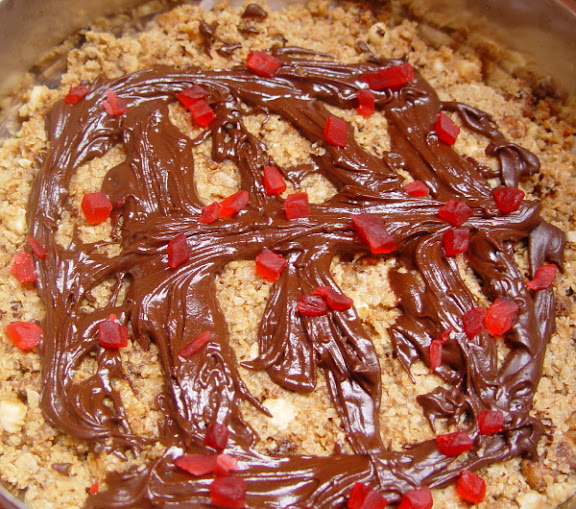
6. Meanwhile, get your toppings ready. You can serve the cookie just as is but since I made it for an occasion, I figured it called for a bit of decorating.

For the Topping:

1/4 C Vegan Semi-Sweet Dark Chocolate Chips
2 T Peanut Butter
2 t Tutti-Frutti (or other dried, chopped fruit)

Put the peanut butter and chocolate chips in a microwave safe bowl and nuke for 30 seconds. Stir and put it back in for another 30 seconds if required. Just stirring well now will melt the chocolate chips completely and mix the peanut butter in.

7. Once the cookie is set completely, take it out of the freezer. Decorate it with the melted chocolate (you can pipe it on but I just used a fork and drizzled it on in thick lines) and sprinkle the tutti-frutti over it.

8. Pop it back into the freezer for 10 more minutes for the chocolate to set.

Enjoy! :)

Please do share the variations (vegan only of course :)) you used to make your own in the comments section.

Oatmeal Peanut Butter Coconut Crumble Cookie-Cake picture 2

Wednesday, April 01, 2009

Vegan Donuts


I spent all evening in the kitchen making Vegan Donuts today. I made 3 types - sugar coated, chocolate glazed and cinnamon twisted. They turned out delish!!

Thanks to Jenny Marmalade for making me want to attempt these. And thanks to Lisa for the recipe (there used to be a link here but that page has disappeared).
I approximately halved the quantity of the ingredients and also instead of Vegan Butter I used Coconut Oil. My egg replacer was flax seeds and only that I used the full quantity equivalent to 1 egg instead of half.

Lessons I learnt...

1. Vegan Donuts are soooo YUM!!

2. They are labor intensive and time consuming (well at least they seemed that way because it was my first try).

3. Hubby's fall in love with you all over again from the very the first bite :D

4. They are so not healthy! Not even in their vegan form so I dread to think of the non vegan version. EGAD!!! *shudders*. They suck oil like nobody's business and they are made completely out of all purpose aka nutrient-less flour.

5. Take pics almost as soon as you've made them since they disappear real fast.

6. Make and eat them once in a rare while and you'll be fine :)

Monday, March 23, 2009

Espresso Brownies


Even for a tea drinker like me, it feels great to start Sunday morning (if waking up at 11:30 counts as morning) with coffee, especially when I've been Malibu-ed out from Saturday night. Yesterday while glugging down my coffee the thought of Espresso Brownies came floating into my head.

It had been such a long time since I made them. And since we've been drinking filter coffee mostly there was this pile of truly delicious super strong 100% (absolutely no chicory) instant coffee powder sitting around barely used. I just had to make some right away!


Espresso Brownies
Adapted from Jannequin Bennet's Very Vegetarian.

1/2 C very hot espresso or strong coffee (I mixed 2 heaping T of instant Nescafe 100% coffee powder in 1/2 C hot water)
1/3 C cocoa (the Cadbury's baking cocoa powder has a bit of something mmmmm to its flavor)
3/4 C sugar (original recipe calls for 1 C but the slight reduction in quantity of sugar brings out the mocha nuances better)
1 t vanilla extract (use pure extract and not essence if possible)
1/3 C coconut oil (it adds a mild, delicious flavor and goes really well with the coffee and cocoa combination).
1 1/4 C All Purpose Flour
1 t baking powder
1/4 t salt

Preheat the oven to 180 C / 350 F
Grease an 8 inch square baking pan

Seive together flour, baking powder and salt.

Put the coffee, cocoa powder and sugar in a blender (with the whisking blade attachment) and blend thoroughly. Add vanilla and coconut oil and blend again. (Everything can be whisked together with a spoon but I use a blender since it adds more air bubbles to the liquid which gives the brownies a better crumb).

Mix together the wet and dry ingredients in a bowl and stir quickly until just blended. Do not stir too much as over mixing will toughen the brownies. The way you mix decides the outcome so this is a very important step!

Pour the batter into the pan and bake for 35 minutes. And while it bakes, enjoy licking the remaining batter off the mixing bowl (it tastes a bit like Koffee Bite) :)

Let the brownies cool to room temperature before cutting. The way these smell, you'll want to dig into them right out of the oven but please be patient because cutting into the brownies while they're hot will spoil them.

These are really quick and easy to make and depending on how strong the coffee is they pack a lot of kick.

Thursday, February 19, 2009

Vegan White Chocolate Orange Almond Truffles


So this is where too much Vegan Blog hopping gets me!

Last morning, I came across these super yum looking White Chocolate Walnut Truffles on the VegSpinz blog and I was immediately overcome by the desire to stuff my face with them!

So I decided to create a variation of my own...

White Chocolate Orange Almond Truffles


All ingredients are in approximate values since I just throw stuff in without measuring. Feel free to modify the amounts to your liking.


1 C Vegan White Chocolate Chips
1/2 C Cashews
1/4 C Soymilk (use as required)
1/4 t Orange Essential Oil
1/4 C Almonds
1 C Vegan Dark Chocolate Chips

For the truffle mixture:

-Grind the cashews into a fine powder, add a dash of the soymilk and blend, add a little bit more soymilk if required and process into a very creamy paste.
-Melt the white chocolate chips (in a double boiler or in the microwave).
-Toast the almonds and crush them lightly into tiny pieces. If you have the patience you can chop them :oP
-Mix the cashew cream and orange essential oil with the white chocolate.
-Add in the almonds and mix well.
-Pop in the freezer for around 20 minutes or so, until it has hardened slightly.

How to proceed:

-Melt the dark chocolate chips.
-Make little balls of the truffle mixture and dip them in the melted chocolate.
-Drop them on parchment paper.
-Pop in the freezer to set again.


Note: I have used truffle molds for these. These can be used by coating the walls and bottom of the mold with the melted dark chocolate. Putting a bit of the truffle mixture in and covering the top with a layer of melted dark chocolate.

Enjoy! :)

Wednesday, January 14, 2009

A delicious Sankranthi vegan brunch


Sankranthi (aka Pongal) is an important Hindu festival which marks the beginning of the Sun's 'climb' into the Northern Hemisphere. In South India, we also celebrate Sankranthi as the beginning of the harvest season. Like most other Hindu festivals, we celebrate this one by having a bath (hair wash too) and then cooking the customary sweet and savory dishes meant for the festival. Then we place the food in front of the holy altar carrying pictures and idols of various Gods and Goddesses and light two oil lamps. We pray, offer thanks and request blessings. Then we offer the food to the Gods who get to 'taste' everything first (we don't taste them while cooking) and then... we dig right in! :)

In Karnataka and Andhra Pradesh States, women also exchange Vayanas with the relatives or neighbors. These contain various items representing a good harvest like Sugarcane, Sweet Potato, Pumpkin, Peanuts, Elachikai (a kind of sour berry) and also other traditional things like Turmeric Sticks, Kumkum Powder (the red dot we put on our forehead), Coconut, Fruits, Beetle Leaves and Beetle Nuts.

In the South the main traditional delicacy for the Sankranthi breakfast is Pongal. Two types of Pongal to be precise - the Sweet Pongal and the Savory Pongal. The main ingredients in these are rice and split mung beans (yep, my favorite moong dal :)). Today, along with the Pongals, we also made Vadas (deep fried black gram fritters) and a Tamarind Gojju (sauce) to have on the side with the Savory Pongal. The Vadas are normally doughnut shaped but we weren't able to shape them so instead we dropped little spoonfuls of the batter into the oil. So what came out was something which could be termed Vada Holes (like doughnut holes) :D

Sankranthi or not these are delicious, easy to prepare dishes. If you try these out, please do leave a comment here on how they turned out.

**********

Vegan Savory Pongal

1 C Moong Dal
1 C Rice
8 C Water (more if required)
2 t Olive Oil
1/4 t Turmeric

For the seasoning:

3 T any Vegetable Oil
1/2 t Mustard Seeds
1/2 t Cumin Seeds
1/4 t Asafoteida Powder
1/2 t Whole Black Pepper
10-12 Curry Leaves
1 t Ginger chopped into tiny pieces
Sea Salt

Lightly toast the moong dal in a dry pan for a few minutes, stirring continuously till it's slightly deepened in color.

Put the rice, moong dal, turmeric, olive oil and water with a pinch of sea salt in a pressure cooker and cook for 6 whistles. If you don't have a pressure cooker then you can cook them in a large pot on the stovetop on medium flame for about 45 mins till the dal is well cooked and soft, in which case it needs to be monitored and stirred occasionally.

In a small pan, heat the vegetable oil for about half a minute. Add the mustard and let it crackle, then add the cumin, asafoteida powder, whole black pepper, curry leaves and the ginger and stir for a few seconds and switch off the flame.

Add sea salt and the seasoning to the cooked rice/dal mixture and mix.

Serve hot.

**********

Vegan Sweet Pongal

1/2 C Moong Dal
1/2 C Rice
1/4 C Channa Dal (Split Gram)
2 C Water
2 C Soymilk or Almond Milk
2 T Olive Oil

Lightly toast the moong and channa dals in a dry pan for a few minutes, stirring continuously till they have slightly deepened in color.

Cook all the above ingredients in a pressure cooker or a large pan till the rice is cooked well and the dals have become soft.

Stir in:

1 1/2 C Jaggery or Molasses
1/4 t Cardamom Powder
Handful of toasted Cashew nut pieces and Raisins.
1/2 to 1 C water

Bring to boil while stirring continuously and simmer for a few minutes.

Serve hot or cold.

**********

Tamarind Gojju - as a side for the Savory Pongal

1 T any Vegetable Oil
1/4 t Mustard Seeds
1/4 t Cumin Seeds
Pinch Asafoteida Powder
1/4 t Whole Black Pepper
5-6 Curry Leaves
2 Red Chillies

Heat the oil in a small pan for about half a minute and add the mustard seeds (they should crackle immediately). Add the rest of the seasoning ingredients in the order given.

Take it off the flame. Then quickly mix in:

1/2 C Water
1/2 t Tamarind Paste
Sea Salt (to taste)

Put it back on the stove and bring to boil. Reduce the flame a simmer for a few minutes.

Note: If you desire a slightly thicker sauce then mix 1/2 t Gram Flour with a few spoons of water and make a liquidy paste. Stir in the paste into the Gojju while it's still simmering and keep stirring for a few minutes till the sauce has slightly thickened.


**********

Oh will you LOOK at the time! It's 11:30 pm and I need to get to bed. So I'll post the recipe for the Vada Holes some other time. Until then... enjoy the Pongal! :)

love and light,
Susmitha :)

Friday, February 15, 2008

Couscous Mousse Cake (Vegan)


It all stared with me buying a box of Couscous at the grocery store. I thought cooking with it would be just about the same as making pasta. No recipes. Just experiment. Bay was I about to find out otherwise!

I fist made a delicious pesto with green peppers and tomatoes. It was bursting with the flavors of garlic, herbs and olive oil. So far so good. Then I followed the instructions on the box and cooked the couscous as recommended. The texture came out right I guess. THEN I made the mistake of mixing the two! Gawd that was awful!! For some reason any kind of regular pasta sauce doesn't go well with couscous at all. Fortunately, I had prepared only a small amount of couscous. So I just stuffed my guinea pig aka husband with the mixture and dropped the matter.
(Had to dangle my special Vegan Chocolate Chip Walnut Cookie so he'd finish up dinner fast heheh)

Since the experimenting hadn't worked out as planned I decided to consult my favorite vegan site for a couscous recipe. That's when I came across this delicious dessert! Who would've thunk that desserts could be made out of pasta? And such a mouth watering one at that!!

What more, it's decadence completely masks it's ease of preparation :)

Of course, with my inclination to experiment, I tweaked the recipe a bit to suit my tastes.

Couscous Mousse Cake (Vegan)
(adapted from the original recipe Chocolate Cream Cous Cous Cake)

      Couscous Layer

    • 1 1/2 cups water
    • 3/4 cup sucanat/brown sugar (1/2 cup if using sweetened cocoa like I do)
    • 1/4 cup cocoa (preferably Dutch processed, my favorite is )
    • 2/3 cup couscous
    • 1 T vanilla

      Chocolate Mousse Layer

    • 1 cup dairy-free chocolate chips
    • 3 T sugar/maple syrup/date syrup
    • 1 boxes firm silken tofu
    • 2 T soy milk
    • 1 t vanilla
    • 1 T rum (more if you like:) )

In a medium saucepan combine water, cocoa, sugar and couscous. Bring to a simmer, stirring occasionally and cook until thickened (10 to 15 minutes). Remove from stove. Add vanilla and stir. Spread mixture into spring form pan (I just use a 6" square box) and press it down.

Melt chocolate chips in a double boiler. If unavailable, add water to a saucepan and place a metal bowl over the steam to create a homemade version. (Melting chocolate directly over an electric stove or microwaving it will not work-the chocolate will crystalize).

Blend tofu, soymilk, sugar, rum and vanilla till the mixture is smooth. Take a scoop full out and keep aside. Add the melted chocolate to the mixture in the blender and blend again till it's all thoroughly blended. Pour evenly over couscous. Put the scooped out 'white mousse' over this and spread gently, then swirl lightly with a spoon (or your finger) in a circular motion to marble the chocolate and white mousses.

Refrigerate for at least 2 hours to give it time to set and chill. I usually make this a day in advance and hide it in some corner of the fridge. I love how this tastes after sitting in there for a whole day. Serve cold.