It's been a bloody hot summer this year!! And this coming from a girl who normally basks in comfortably toasty tropical weather. Through the worst days in March, I held onto the hope that April showers would bring with them some soothing temperatures, but alas, we are yet to have any April showers at all. *sigh*
But every cloud has a silver lining, or in this case, the lack of clouds. :oP My spotting of the said lining occurred when I saw a cool (or should I say 'hot'?) photo album demonstrating the process of sun drying tomatoes by SaffronTrail. Boy was I inspired!
I got down to it right away. I also created a Sun Dried Tomatoes album on my Veganosaurus Facebook page and documented the process as it happened.
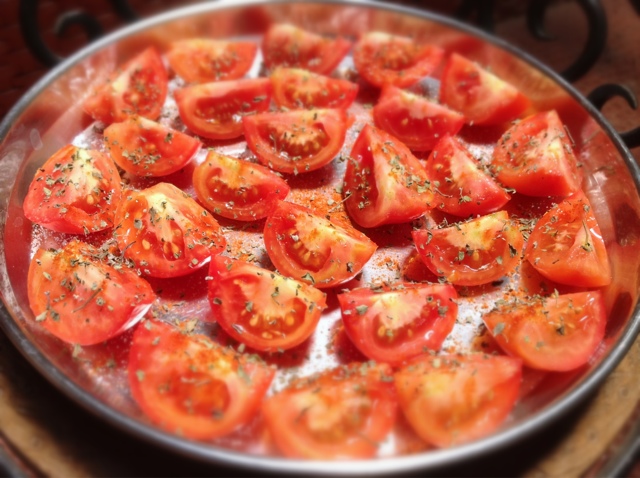
I decided to use our local Nati Tomatoes for this one. Even though they have a high juice content and would take longer than others to get done, I feel that their flavor is unmatched. I quartered them, placed them on a plate and sprinkled on salt, red chill powder and dried oregano.
Here they are, just about to begin their journey...
At the end of Day 2, a very small amount of drying can be noticed.
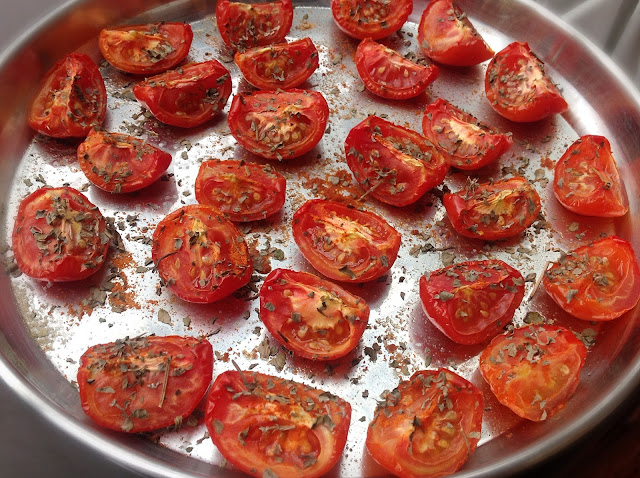
On the evening of Day 3, the drying is more apparent. The juices have reduced considerably. I've been putting them in the sun all day and popping them in the fridge at night.
No photos for days 4 and 5 because I was busy with the weekend and by the time I was able to get to them on both evenings the sun had set. And I surely wasn't about to click pictures in poor lighting!
On the night of Day 5, the tomatoes seem to be about 70% dry. Just the parts around the seeds seem moist now. So instead of putting them into the fridge I decide to leave them out all night, covered with a cheesecloth. I believe that the little bit of salt I'd originally sprinkled on top would keep them safe.
I am wrong! The salt content is nowhere near enough to protect.
On the morning of Day 6, I hit a roadblock. Some of the tomatoes have developed a layer of fungus/mold on top. :( Look how beautifully they were drying, if it hadn't been for the mold, they'd be perfect!!
Thankfully, I am able to salvage most of the tomatoes. I remove the seed portion which contains the maximum amount of the remaining moisture and carefully wash them. Then I toss them in salt and turmeric (plus some chill powder and oregano because the original stuff is now washed away) and place them in the sun again to dry all day. They go straight into the fridge at sunset. Taking no chances this time!
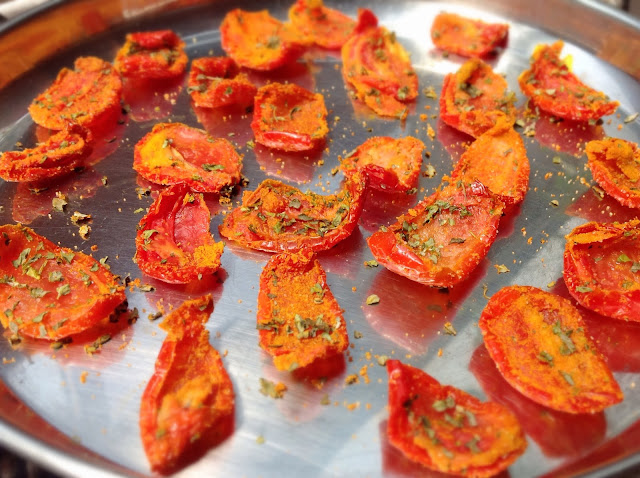
7 days and 7 nights of drying and finally here they are all bottled up and ready on the morning of Day 8. :)
Aren't they just beautiful? I am totally proud of them and of myself for taking full advantage of this hot, sunny summer. You know what they say... "make sun dried tomatoes while the sun shines". :oP (I bet I'm not the first person to have cracked that lame joke. Hehe).
And now, on to vegan curd chillies. A South Indian speciality. I've just started off the soaking process and the sun drying begins tomorrow. Once they are ready I'll share a recipe with you all. Until then, keep an eye on my Facebook page for continuous updates and pictures.
Now go make your own Sun Dried Tomatoes. They are totally worth the effort! :)
Friday, April 13, 2012
Thursday, March 29, 2012
Vegan Hazelnut Butter Chocolate Ice Cream
I admit that I am verrrry partial to the combination of toasted hazelnuts with chocolate over other flavours so my claims here might seem like they're coloured by this favoritism, but believe me when I say that is not the case.
This ice cream starts tasting amazing even before it becomes ice cream! Each step of the recipe process is more delicious than the previous one - the simple nut butter, the sweet chocolate hazelnut cream, the heavenly pre-ice cream mylk... OMG the things they did to my tongue!!
I took a lot of will power on my part for this thing to actually reach its goal of becoming ice cream. But I am so glad I pushed through because this is THE BEST ice cream that I have ever made. Period.
And the kicker? It is dangerously simple to make!
So without further ado, I present to you...
Vegan Hazelnut Butter Chocolate Ice Cream
3/4 C Hazelnuts
3/4 C Cashew Nuts
6 T + 2 tsp Sugar
2 T Cocoa Powder
Pinch of Salt
Pinch of Soy Lecithin (optional)
Handful of Ice Cubes
3 C Filtered Water
Toast the hazelnuts to bring out their flavor and set aside until they are cooled completely.
Rub them between your fingers to remove as much of the skin as possible.
Grind the hazelnuts and cashews together, with breaks in between to scrape down the sides of the jar, until they start releasing oil and turn buttery.
Add the sugar, cocoa powder, salt and soy lecithin (if adding) and blend again.
Add 1 C of water, a little at a time and bring to a creamy consistency. Throw in the ice cubes and blend well. Add the remaining water and blend and whip for a minute or so until it's a nice, frothy mixture.
If you have the patience, let this chill in the fridge for a few hours and then pour into your ice cream maker. I didn't have the patience nor the confidence in my resistance to glug, therefore I skipped the chilling step and went straight to the ice cream making step.
In the ice cream maker, it will reach a soft-serve consistency. After it's ready, transfer to an airtight container and freeze for an additional hour or two to get a scoopable consistency.
If you don't own an ice cream maker, don't worry. Just pour the pre ice cream mylk in an airtight container and freeze. Every half an hour, take it out of the freezer and whip vigorously with a spatula. Repeat this step 3-4 times. Then finally freeze for an hour and you have your ice cream ready.
After a day or so in the freezer, I've seen that home made ice creams become slightly hard/icy. For the perfect consistency, transfer the container to the fridge and let it thaw for half an hour before serving.
Enjoy!! :)
Labels:
Desserts,
Ice Creams
Tuesday, March 13, 2012
Macaroni Potato Salad
I love eating fresh, vegetable salads as a meal in themselves but hubby prefers to have some carbs involved. He says that if he eats just a salad for lunch, it fills him up quickly, but then he gets hungry again very soon. So I've started adding a bit of pasta into my salads to add body to them and that's been a nice compromise.
I used macaroni here because I'd run out of penne but it worked out nicely enough for me to try again even when I have regular pasta around. The texture of the macaroni goes well with this soft and filling salad.
Macaroni Potato Salad
Here are the ingredients, the quantities are completely up to you.
Macaroni - cooked, drained and rinsed in cold water.
Potatoes - boiled and cubed
Fresh Mint - chopped
Carrots - scrubbed clean and grated
Green Chillies - crushed to a paste
Red Chilli Powder
Lime Juice
Agave
Salt
Toss everything together and serve with freshly crushed pepper and nutritional yeast sprinkled over it.
Enjoy! :)
Labels:
Pastas & Noodles,
Salads
Friday, February 24, 2012
Steamed Ragi Sweet, my guest post on Tongue Ticklers.
Want to know what that is and how to make it? Check out my guest post on Tongue Ticklers (that website has unfortunately disappeared now).
Tongue Ticklers is a vegan blog run by Harini. It's filled with beautiful food photography, interesting recipes and lots of handy tips on vegan and gluten free cooking and baking. I'm super happy to have a guest post featured on it. :)
Labels:
Desserts,
Indian Sweets,
South Indian Cuisine
Monday, February 20, 2012
Vegan Tofu Scramble Salad Rice Paper Wraps.
I disliked eggs (aka hen periods) even during my pre vegan days. I only ate them when they were hidden in cakes and mousses and such desserts. If by mistake I put anything with the slightest eggy smell into my mouth, I immediately gagged and discarded it. So it's no surprise that after I turned vegan, I never really went out of my way to try out savory vegan egg-style dishes. The only time I had one was the Tofu Akuri made by Dr.Nandita Shah of SHARAN at the Reversing Diabetes with Dr.Neal Barnard seminar a few years ago. I liked it but not enough to inspire me try making it myself.
But last month, my friend Heather of Worceatsveg wrote a post about Vegan Eggless Salad and it got me curious enough to attempt a version of my own. I decided to turn it into rice paper rolls along with a few fresh veggies and the result was simply delicious!!

For the tofu filling:
2 200gm packs Tofu (rinsed, drained and patted dry)
1 Small Onion (finely chopped)
1 Medium Tomato (finely chopped)
3 T Nutritional Yeast
Turmeric (a pinch)
1/4 tsp Chilli Powder
1/4 tsp Pepper Powder
1 T Lemon Juice
1 tsp Apple Cider Vinegar
Agave (small splash)
Salt (Black Salt works best but I didn't have any so I used regular salt)
In a large bowl, crumble the tofu.
Add the rest of the ingredients and mix well.
Taste and adjust the seasonings.

To proceed:
Sliced Vegetables - carrot, capsicum, cucumber.
Tapioca Sheets
Dip a tapioca sheet in warm water and place it carefully on a flat surface.
Place some tofu mixture in the middle of the sheet.
Top with sliced veggies.
Carefully roll up the tapioca sheet by folding the bottom half over the filling, then the sides and then the top half.
Enjoy immediately!
But last month, my friend Heather of Worceatsveg wrote a post about Vegan Eggless Salad and it got me curious enough to attempt a version of my own. I decided to turn it into rice paper rolls along with a few fresh veggies and the result was simply delicious!!
For the tofu filling:
2 200gm packs Tofu (rinsed, drained and patted dry)
1 Small Onion (finely chopped)
1 Medium Tomato (finely chopped)
3 T Nutritional Yeast
Turmeric (a pinch)
1/4 tsp Chilli Powder
1/4 tsp Pepper Powder
1 T Lemon Juice
1 tsp Apple Cider Vinegar
Agave (small splash)
Salt (Black Salt works best but I didn't have any so I used regular salt)
In a large bowl, crumble the tofu.
Add the rest of the ingredients and mix well.
Taste and adjust the seasonings.
To proceed:
Sliced Vegetables - carrot, capsicum, cucumber.
Tapioca Sheets
Dip a tapioca sheet in warm water and place it carefully on a flat surface.
Place some tofu mixture in the middle of the sheet.
Top with sliced veggies.
Carefully roll up the tapioca sheet by folding the bottom half over the filling, then the sides and then the top half.
Enjoy immediately!
Labels:
Appetizers Starters Snacks,
Wraps
Subscribe to:
Posts (Atom)