Saturday, September 11, 2010

Vegan Polenta Pizza


Well it isn't exactly like regular pizza but it is sooo yum and super easy to make too. I only have access to a microwave right now so I baked this pizza in it but once I get back home I'm definitely going to try this out in a real oven.

Polenta Pizza close upCrust:
1 C polenta corn grits
Olive Oil
Salt
2 C water

Bring the water to boil. Add salt and a dash of olive oil. Slowly add the corn grits while stirring continuously with a fork. Reduce the heat and keep stirring until all the water is absorbed. Close the pan and let it sit.

Topping (you can use any combination of veggies of course but here's mine):
Tomatoes sliced into circles
Onions sliced thin and long
Rice Vegan Cheese Slices cut into little pieces

Marinade:
Tamari
Ground Black Pepper
Sugar or Agave (teeny bit)
Tabasco Chilli Sauce

Max the marinade ingredients together in a bowl. Place the chopped onions in the marinade and toss well. Let it sit for 15-20 minutes.

Oil your pizza tray (I directly used my glass microwave turn table) and transfer the polenta onto it. Dip your palm in a generous amount of olive oil and pat the polenta down into an even base. Bake on high power for 5 minutes.

Take the onion slices out of the marinade and spread them evenly over the base. Place the sliced tomatoes over this and top with the rice vegan cheese pieces.

Bake on medium power for 5 minutes and then on high for 2 more minutes.

Slice and serve hot. Enjoy! :)

Polenta Pizza

Wednesday, September 01, 2010

Go Max Go Vegan Candybars Giveaway


Who wants to win chocolates? Yes, I said CHOCOLATES! :)

Go Max Go Bars Pile

The kind people of Go Max Go Foods have sent me these awesome Vegan Ricemilk Chocolate Candybars.

I received three sets of bars. One set for myself and two sets to giveaway. Two winners will be picked and each one will receive four bars - one each of Mahalo, Buccaneer, Jokerz and Twilight.

This giveaway is open to everyone! Yippee!! You can enter no matter which part of the world you live in and if you win I will ship the candybars right to you. :)

BuccaneerAmong the four, Buccaneer has got to be my most favorite Go Max Go bar! It's a thick layer of delicious chocolate with a really decadent nougat filling. Mmm mmm mmm. The best part is that it has just the right level of sweetness so you can eat multiple bars and enjoy every single bite. Honestly, it's scary how quickly one can go through one bar after another of Buccaneer without even thinking about it! Arrrr.

JokerzThe Jokerz bar has been designed with the peanut connoisseur in mind. It is full of rich peanutty delight mixed in with chocolate and caramel. The flavor and texture of the peanuts meld well with the chocolate taste in a perfect balance. And it doesn't have that overpowering saltiness that the peanut-chocolate combination often does! This is quite a filling treat. Perfect for when you're hit by those mid-morning munchies! Or the late afternoon munches. Or the midnight munchies... you get the idea.

TwilightAnd now we come to the Twilight bar. This little guy is basically the same as Buccaneer except that, apart from the fluffy nougat and creamy chocolate, it also has a super-thick layer of caramel in between. I'm not normally into caramel but Twilight is definitely an exception for me. It reminds me of the 5 Star bars that we used to enjoy while growing up but like a zillion times better! I think it's that ricemilk chocolate which makes a world of difference here. For people who can't resist the marriage of caramel and chocolate, this bar will be pure heaven for you!

MahaloFinally, we have the Mahalo bar! *Hawaiian music* Mahalo is a Hawaiian word for gratitude and when a coconut lover bites into this bar, gratitude is exactly what they'll be feeling! This delectable goody is made primarily of coconut with a thin layer of chocolate and roasted almonds for added taste. So if you're not that into coconuts then move on please, nothing here for you to see. To those of us from India, Mahalo would taste pretty much like Coconut Barfi dipped in a delicious chocolatey coating. Tempted yet? :D A word of warning though, this bar is a tad higher on the sweetness compared to the rest of them so only if you have a real strong sweet tooth are you totally ready for Mahalo!

You can easily find the Go Max Go bars at various locations within the USA and also internationally. Not available in your country? Not to worry, there are plenty of online stores which will ship the bars to you. My favorite online vegan stores which ship worldwide are Pangea - The Vegan Store and Vegan Essentials. Sure, the chocolate will melt a little during transit but the little packs are sealed well so all you need to do is pop them into the fridge for a bit and they'll be ready to enjoy! :)

Now let me tell you about how you can win these bars for yourself...

There are various ways to participate (listed below) and each thing you do counts as an entry. The first one is mandatory but the rest of them are completely up to you! But make sure you leave a separate comment for every entry.

1. Tell us which Go Max Go candybar is closest to your heart (or if you haven't tasted them which one do you imagine you would like most). And more importantly, what flavor/style of chocolate candybar would you like Go Max Go Foods to create in the future?

2. Follow Go Max Go Foods on Twitter.

3. Follow Veganosaurus and/or Art by Susmitha on Twitter.

4. Follow this blog.

5. 'Like' Veganosaurus and/or Art by Susmitha on Facebook.

6. Write on your blog about this giveaway with a link to this blog post.

7. Post about this giveaway on facebook with a link to this blog post.

8. Tweet to @veganosaurus about this giveaway with a link to this blog post. (This can be done as many times as you like throughout the giveaway and each time will be considered as an additional entry. Just make sure you come back and post a comment here every time you tweet).

Just remember, leave a separate comment here for every entry. Also, leave your e-mail id or etsy id in your first comment for me to be able to contact you in case you win.

This giveaway will be open until Wednesday, 15th September 2010 (exactly two weeks from today). After that, TWO winners will be chosen with the help of a random number generator. I will post the results here on my blog.

Winners, I'll contact you by means of the contact details you have left me here, get your snail mail addresses and mail each of you one set of four candybars. (If you're in India, I'll carry the bars back home to Bangalore with me and post them to you in October).

All Four Go Max Go Bars

Good luck everyone! LET THE GAMES BEGIN! :D

----------------------------------------------------------

UPDATE: GIVEAWAY CLOSED. WINNERS ANNOUNCED HERE :)

----------------------------------------------------------

Saturday, August 28, 2010

Winners of the Coconut Bliss Giveaway!!!


Ladies and gentleladies (yeah I don't think any men participated this time) I now present the winners of the Blissfully Coconutty Coconut Bliss Giveaway....

*trumpets*

HEATHER and MEGHNA!!!

*applause*

CONGRATULATIONS ladies!! Send me your postal addresses on Etsy and your Coconut Bliss Ice Cream coupons will be on their way to you! :)

Wednesday, August 18, 2010

Sweet, Sweet, Sweet V Confections


I originally wrote this review for the awesome Vegan Cupcake Thursday blog which is run by my dear friend Roni of Daisywares (my TOP FAVORITE store for amazing vegan bath and body products!! She makes gorgeous vegan jewelry too).

Even though this Sweet V Confections review has already been posted on Vegan Cupcake Thursday, I wanted to share it here on my blog too because this is a store which deserves to be featured many times at multiple places. :)


Sweet V Confections Banner

So there it was, a pretty, pink, striped bakery box. I was thrilled that it had arrived in the mail so quickly after the order had been placed! The packaging was so lovely that I almost didn't want to open it right away... almost. But the thought of the goodies inside overtook my power of restraint and before I knew it, I was looking at a delectable collection of tempting concoctions from Sweet V Confections.

Sweet V Cookies and Chocolates

I know this is a cupcake themed blog, but first I must speak of the most delightful surprise treat in the package... The Puppy Chow! "Peanut buttery, chocolatey goodness with a crunch!" that's what the description claims and I most definitely concur! Just talking about these little bursts of glee is making me crave some right now so please bear with me while I run to my fridge and pop some into my mouth.

*crunch* *munch* There! That hit the spot. :)

Now, where were we? Oh yes, the cupcake. The variety I got the was the Red Velvet Cupcake. These cupcakes are a sight to behold! Such a beautiful, rich, deep red color (obtained by using natural, beet based food coloring). The fluffy icing came in a little box on the side. I just scooped up spoonfuls of it and piled it onto the cake before wolfing it down. These cupcakes are delectably moist and could be thoroughly enjoyed even without the icing.

Sweet V Red Velvet Cupcake

The other goodies I ordered were the Vanilla Shortbread Sandwiches and the Fudge Filled Sandwich Cookies. I can't decide which one I like more. They're so darned good! Each bite is like a little piece of heaven. I highly recommend them!

Kristen (the awesome lady behind Sweet V Confections) also included some extra surprise goodies in the package, like the Peanut Butter and Jelly Cups (SO much better than plain peanut butter cups!) and the Vegan Chocolate Fudge. Both of them exceptionally yummy!

Fudge, Puppy Chow

If you're anything like me, I know what you're thinking now... there are so many options at this store, it's hard to decide which one to pick. Well don't you worry about that. Just go for the Sinfully Sweet Vegan Variety Sampler and you will *not* be disappointed! If there's anything particular that you want included in the sampler, all you need to do is send Kristen a convo about it. She is really friendly and approachable.

Sweet V Confections has been included in the Vegnews Mag's 2010 Veggie Awards Poll under the "Best Online Bakery" category. I'd request you to vote for her, but once you have tasted these delicious baked goods, I'm confident you will want to do so without having to be asked at all. :)

Signing off,
- Susmitha :) (Veganosaurus)

Thursday, August 12, 2010

Blissfully Coconutty Coconut Bliss review and giveaway


Coconut Bliss Logo

I've been having a hard time writing this review and it's not for the lack of words to describe the delectable goodness of Coconut Bliss organic coconut milk ice creams. It's just that each time I've begun to write this blog post, I've had the overwhelming urge to run to the freezer and help myself to large dollops of these scrumptious drops of heaven!! (Imagine my plight when I was in the process of clicking these pictures)!

Coconut Bliss... what a perfect name Luna and Larry (the blessed souls behind this brilliant idea of turning coconut milk into ice cream) have come up with. In my opinion, adding a couple more 'S'es at the end would've better expressed the true effects of these ice creams... Blissss. *Ahhhhh*

My Precious Pints of ice cream

When I wanted to do this review, the kind people at Coconut Bliss sent me coupons for four free pints of their ice creams. Two for me and two to share. :)

***

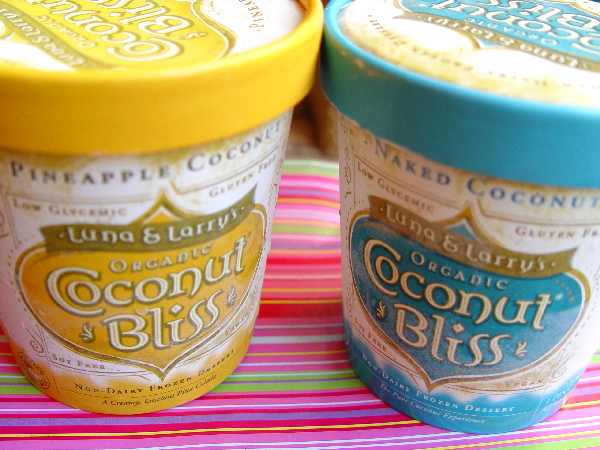
For myself, I decided to get the Naked Coconut and Pineapple Coconut flavors. I even shared some with DH, purely out of the kindness of my heart (any coconut karma points I happened to gain in the process were purely unintentional *blinks innocently*).

Naked Coconut PintFirst, let me tell you about the Naked Coconut flavor.

I tasted it for the first time when I was here in the US last year and fell in love immediately! Normally, when I get a chance to try something out for free, I pick a flavor I've never tasted before. But Naked Coconut is sooooo awesome that I couldn't help but get one this time too!

When you open the cap of a new pint of Naked Coconut, the fresh, untouched ice cream looks just like snow. Sweet, delicious snow. I suggest that you do not bend over the container while opening the cap, you'd risk droolifying the ice cream.

Let the ice cream sit outside for a few minutes before you start eating it to truly experience the optimum level of creaminess and flavor.

Ice Cream ScoopsDelicious organic coconut milk is blended with pure organic agave nectar to give it just the right level of sweetness. And it's loaded with dry coconut flakes for a delightful texture! Each spoonful is simply divine.

Coconut Bliss ice creams come in many flavors but Naked Coconut is hands down the best of the lot! Last week I noticed in the freezer section of the nearest grocery that they have Coconut Bliss bars now and Naked Coconut is one of the two flavors!! Boy am I buying me some of that action the next time I'm at the store. :D

Pineapple Coconut PintNow, let's move on to Pineapple Coconut.

Even though I love fruits, I'm generally not a fan of most fruit flavored ice creams. They're either too tangy or too essence-y for my tastes. But I decided to be adventurous and grab the Pineapple Coconut this time. And it turned out to be an excellent decision. :)

Pineapple with Ice CreamHere's the beauty of this ice cream, it contains only pure, organic pineapple fruit and juice. Absolutely no artificial ('artificial' almost feels like a dirty word in this post) pineapple essence! This makes a whole world of difference to the taste. It's like Naked Coconut with just the slightest hint of pineapple in it. A very palatable combination.

Pineapple Coconut is quite a yummy flavor so I do recommend it. But make sure you get the Naked Coconut before all else. :D

Coconut Bliss ice creams might seem a tad on the expensive side when you compare prices with the regular vegan ice creams out there, but they are worth every single penny! And this is not only because they taste so good but also because they are made of completely organic, natural and healthy ingredients. They're vegan, soy-free, gluten-free and have a low glycemic index. And what's more, they're committed to sustainability and fair trade to the maximum extent possible.

***

Finally, let's get to the juiciest part of this post... The Giveaway! :)

This giveaway applies to people in the USA ONLY (my apologies to international readers) because Coconut Bliss is available only in the US and Canada but they are unable to generate coupons for Canada yet.

Here's how YOU could win yourself a free pint of Coconut Bliss:

There are various ways to participate (listed below) and each thing you do counts as one entry. The first one is mandatory but the rest of them are completely up to you! But make sure you leave a separate comment for every entry.

1. Tell me which is your favorite Coconut Bliss product (or if you haven't tasted any yet, which flavor you would like to try the most).

2. Follow Coconut Bliss on Twitter.

3. "Like" Coconut Bliss on Facebook.

4. Follow this blog.

5. Follow Veganosaurus on Twitter.

6. Follow Art by Susmitha on Twitter.

7. Write a blog entry on your blog about this giveaway with a link to this blog post.

8. Post about this giveaway on your facebook with a link to this blog post.

9. Tweet to @veganosaurus about this giveaway with a link to this blog post. (This can be done as many times as you like throughout the giveaway and each time will be considered as an additional entry).

Just remember, leave a separate comment here for every entry. Also, leave your e-mail id or etsy id in your first comment for me to be able to contact you in case you win.

This giveaway will be open until the 26th of August (exactly two weeks from today). After that, TWO winners will be chosen with the help of a random number generator. I will post the results here.

Winners, I'll contact you by means of the contact details you have left me here, get your snail mail addresses and mail you one coupon each for a pint of Coconut Bliss ice cream. You can claim the coupon at a grocery store near you which sells these ice creams (I got mine from Whole Foods). You get to pick any flavor you like.

So wish you all the very best! LET THE GAMES BEGIN! :D

***

GIVEAWAY CLOSED. WINNERS ANNOUNCED HERE! :)

Wednesday, July 28, 2010

Red Quinoa Pilaf


I just tasted red quinoa for the first time and I must say that it is a gazillion times more delicious than regular quinoa, in terms of flavor AND texture! I fell in love with it at first crunch! When they coined the term "manna from heaven", I have no doubts that this delectable, nutrient-rich South American seed-grain is precisely what they were talking about.

I've put together this dish with red quinoa and vegetables and for the lack of a better term I'm referring to it as Pilaf (apparently the most commonly prepared quinoa dish by people all over the net world).

Red Quinoa Pilaf

1 C Red Quinoa
2-3 C Mixed veggies - Edamame, Zucchini, Broccoli florets, chopped Carrots (an exotic grain such as this is deserving of only the finest vegetables)
2 Serrano Peppers (or Green Chillies) halved lengthwise
2 T Peanut oil (preferable the unrefined, expeller pressed variety if available)
1/2 t Garlic paste
Mixed spices - Turmeric powder, ground Coriander, ground Cumin, crushed Pepper
Salt
Freshly squeezed lime juice from half a large lime or one small lime.

Rinse the quinoa well through a finely meshed sieve or a cheesecloth.
Bring 2 C of water to boil in a wide pan, add a large pinch of salt and the washed quinoa.
Reduce heat to its lowest, cover the pan and cook for about 15 minutes, until the quinoa has absorbed all the water (lift the lid and check only after the 15 minutes, otherwise precious steam will escape and slow down the cooking process).
Turn off flame, fluff the quinoa with a fork and let it sit covered for a few more minutes.

Meanwhile, place all the vegetables (including the chillies) in a microwave safe glass dish.
Splash in the peanut oil and toss well.
Cook uncovered in the microwave for 5 minutes on high.
Add the spices, garlic paste and salt and mix well.
Cook uncovered for 3 minutes on high.

Transfer the cooked quinoa over the veggies and mix together with a fork.
Cook covered for 2 minutes.
Uncover and cook for 1 more minute.

Squeeze the lime juice over everything and mix well with a fork.
Serve this crunchy and delicious Red Quinoa Pilaf hot.

Red Quinoa Pilaf

Tuesday, June 29, 2010

Winner of the Name the Monsters Giveaway.


When I started this giveaway I thought I'd be choosing a winner myself but all the entries are so clever and cute, it was really difficult to just pick one as the best. So I assigned each monster name a number in the order of entry, and let an online random number generator do the job for me.

screenshot of random number generated

And the winner is... *trumpets*

Lazlo by Kala of Vegancraftastic!

Congratulations Kala!! :)

Please send me a convo at my main etsy store with your mailing address. Your surprise Tiny Terrarium Cyclops Monster will be on his/her way to you soon. :)

Friday, June 25, 2010

Name the Monsters giveaway.


Monsters

Making monsters is as easy as pie because they're so much fun to make! Once I get my fingers into the clay, I just keep going and all these little characters take shape. But when it comes to naming them, that's where the flow of creativity sometimes faces hurdles. Most of my monsters have names as loud and clear as their personalities. But there are those who, despite their innumerable traits, just don't seem to attract a perfect name. And that's where I need your help.

So I've decided that I'm going to have a Name the Monsters giveaway! :)

It's very simple, all you need to do is leave a comment on my Veganosaurus Page on Facebook (under the photo of the above monsters) with your ideas for Monster Names. On Monday, the 28th of June, I will pick a winner. And the prize? A surprise Tiny Terrarium Cyclops Monster of course! :)

So what're you waiting for. Start spinning out those monster names! :)

Wednesday, June 09, 2010

Crunchy Coconut Biscuits


Crunchy Coconut BiscuitsCoconut biscuits (cookies are called biscuits here) were one of my top favorites while growing up. Particularly the ones sold at local bakeries. Sadly they are not vegan at the bakeries so I don't buy them anymore. Needless to say, I couldn't resist putting together my own recipe for them and am highly pleased with the results.

If you have the ingredients on hand, this is one quick and easy easy recipe. I find that these biscuits taste best when freshly out of the oven. So it's a great idea to mix together all the ingredients (except water) and store them in the fridge in an airtight container. Then whenever the craving hits you, just pull out as much as you like, mix in the water and bake.

Crunchy Coconut Biscuits

1 C all purpose flour
1 C dessicated coconut (dry coconut powder)
1 C brown sugar
1/2 C coconut oil (yes it must to be coconut oil)
1/4 t salt
1 t baking powder

Mix all the dry ingredients together. Rub the oil into the mixture. Add a little cold water, just enough to form a dough. Knead the dough a little.

Pinch off balls, lightly flatten on your palm and place on a cookie sheet.

Preheat oven to 180 C/ 350 F. Bake for about 20 minutes, until the edges brown.

Let them cool for a couple of minutes on the sheet and then transfer them to a cooling rack.

The sugar caramelizes in the oil and gives a special crunch to these biscuits. When you eat them warm they will be slightly chewey. After cooling completely, they become fully crunchy. Both ways are yum! :)

Sunday, May 23, 2010

VSPCA needs our help.


VSPCA Banner

As some of you might know, VSPCA - Visakha Society for Protection and Care of Animals is the chosen charity at Art by Susmitha. Each month, a portion of the sales from my store goes to their Cow Sanctuary.

Cow Showing AffectionThe people at VSPCA do some amazing work to help the animals in the surrounding areas. And now that they are faced with Cyclone Laila, they need all the support and help they can get.

Here is an excerpt from the message sent out by Eileen Weintraub - VSPCA Volunteer for Global Outreach.

"Dear friends and supporters of VSPCA,

As you may know VSPCA collects funds to go out and rescue stranded and sick animals in distress when there are natural disasters.

First the shelter report:

We are worried about the front and the back stream – when there are rains (we have been experiencing heavy rains for the past three days) these are dangerous streams that can flood us.

We have shifted all the star tortoises to a higher place; all the birds to higher areas; all the ducks to higher ground and also the rabbits. The dogs have been all kept indoors in the kennels. Cats are OK and can climb up. We have asked at least ten workers on extra payroll to stay overnight.

Our shelter managers (Raj and Sarada) are staying overnight while Pradeep is taking care of this area and meeting and communications and materials . We purchased 20 raincoats and another 10 for the workers. The rest of the workers (40) have rain gear from other disasters.

Old BuffaloThe biggest problem is the 300 loose cattle who have no sheds (another 350 cattle and buffalo have sheds). If these 300 are brought in during the day there will be no possibility to clean and give them food. Therefore alternative feeding is going on. It is still raining very hard and we are doing our best to remove water logging, etc. Given the experience with past cyclones the shelter has also been built on five feet high structures with strong metal with good drainage to resist the water rush from the hills and streams.

We have kept all feed and medicines in the natural disaster rooms.

Feed Storage at VSPCAThe only upsides of the cyclone are that we now have more water in our wells and borewells which were quite dry. The shelter plants and trees (although we lost several in the storm) are intact. The severe heat has come down considerably. It is only because of past planning and new drainage systems – and your support – that our shelter has survived!

Aside from our ongoing needs for food, medicine and animal birth control, currently our urgent needs for the shelter include: one genset, a new vehicle (another one is down due to old age) and a new submersible pump.

Now for our disaster outreach work:

We are concerned for the animals in the 400 km area surrounding us. This is a hurried note to inform you all as we cannot sit by while animals need our help. Kindly consider donating any amount for our efforts.

Donate Button

Please see our ongoing updates on Facebook (you do not have to be a Facebook member to view them).

On behalf of all at VSPCA,
Eileen Weintraub
VSPCA Volunteer for Global Outreach"

Wednesday, May 19, 2010

Bille Kadubu - South Indian Steamed Delicacy


I have a nice book in Kannada called Paakadarshi which is filled with recipes of wonderful traditional dishes from Karnataka. My mom took it out of her collection and gave it to me soon after I got married and was about to move away from Bangalore for a long time. As a new cook it acted like the Gita to me in the kitchen. :)

I later bloomed into an experimental cook who rarely follows recipes to a tee. But even after all these years, when it comes to the very traditional recipes, the kind of wonderful stuff that my mom makes, I still fall back on my Paakadarshi. And it has always caused great results!

Here's a quick and easy recipe for this delicious dish called Bille (pronounced Bil-lay) Kadubu.

Bille Kadubu

2 C Rice Semolina (sold as Idli Rava at Indian stores)
3/4 C fresh coconut (I use half grated and half cut into tiny pieces)
2 t Channa Dal (soaked)
1 t Jaggery
Salt

For the seasoning:
Black mustard seeds, Curry leaves, Oil (canola, coconut... anything)

Heat a few spoons of oil in a wok/pan. Add mustard seeds and let them crackle. Turn off the stove and add curry leaves. Add 5 cups of water, jaggery and salt and turn on the heat once again. Bring the water to a boil. Lower the heat and gently pour in the rice semolina while continuously stirring. Once the water has been absorbed completely, take the pan off the stove and stir in the coconut. Mix well.

Let the mixture cool slightly (but not too much). Lightly oil your palms and make little balls out of the dough. Steam them for 8-10 minutes.

Serve hot with Coconut Cilantro Chutney. (Just posting this recipe here is making me want to eat some right now! :oP)

Bille Kadubu

Wednesday, May 12, 2010

Whole Grain and Seed Khara Bread


I've been meaning to post this recipe here for a while now but every time I've made the bread, it's been finished so quickly that I never had a chance to catch a picture! I figured I might as well share the recipe and the picture can be added the next time I bake it. It's one of the most delicious breads I've tasted till date (even if I say so myself)!! It would be a crime to delay sharing the recipe any longer.

(Update: Baked it again on 16th May and clicked pics which got added here on 17th May.)

Whole Grain and Seed Khara BreadWhole Grain and Seed Khara (Spicy) Bread


2 1/2 C whole wheat flour
1 C okara (optional)
1 1/2 t active dry yeast
3 t organic jaggery (you can use sugar instead but it won't be as great)
1 - 1 1/2 t salt
1/4 C olive oil

1 medium onion (chopped finely)
handful of fresh cilantro (chopped)

Crushed Together:
3-5 spicy green chillies
5-7 small cloves of garlic
1/8 t asafoetida

Further ingredients: (add whichever of these you have on hand)
2-3 T wheat berries (soaked overnight, drained and chopped roughly)
1 T sesame seeds
1 T flax seeds
1-2 T pumpkin/sunflower/melon seeds
2-3 t mixed dried herbs - chives, thyme, oregano, parsley...

Heat a cup of water and add salt and jaggery to it. Let them dissolve and then strain the water (to remove fine sand particles from the jaggery). Let the water cool a little until it's slightly hotter than lukewarm.

Place the whole wheat flour in a large bowl and make a deep well in the center. Add the water and sprinkle the yeast over it. Let this sit for 10-15 minutes. The yeast should froth well.

Pour in the oil, add the okara (helps make the dough extra soft) and form a rough ball of dough, adding warm water as required. Add the rest of the ingredients and do some preliminary kneading. Then transfer the dough to a flat, floured surface (I use my cleaned counter top) and knead well for about 10 minutes, until the dough is soft and flexible in texture. The kneading is the most important part of bread making and a wetter dough is always preferable to a drier one.

Coat the mixing bowl with olive oil and swirl the ball of dough in it so it's coated with oil on all sides. Cover with a wet cloth and let it sit in a warm/sunny spot for 2 hours. The dough should have at least doubled in volume after sitting like this.

Punch down the dough, gently shape it into a loaf and place it in a loaf pan. Cover with wet cloth and let it rise again for another hour.

Preheat the oven to 390 F/ 200 C. Place the loaf pan in the oven and let it bake for 45-50 minutes. Once the oven goes off, let it sit in the oven for 5 minutes. Then take the pan out of the oven and let it the bread cool in the pan for about 20 mins. Turn the bread over onto a wire rack and let it cool completely before cutting it with a serrated knife.

This is a soft, thick and moist bread and tastes absolutely heavenly dipped in herbed extra virgin olive oil or lathered with Earth Balance buttery spread. I also like to cut it into thick cubes and serve it with a hearty stew.

Whole Grain and Seed Khara Bread

Friday, April 09, 2010

Beet Hummus


When they invented the words "manna from heaven", THIS is what they must've taken a lick of. Beets take Hummus to a whole new level of orgasmic delight! I normally reserve the term "orgasmic" for only chocolate based foods, so you can see how serious I am about Beet Hummus.

It's just as simple to make as regular Hummus, so try it out for yourself and you'll know what I mean.

I want to shower a thousand blessings upon Julia for sharing the link of the original recipe with all of us at the EtsyVeg group. Until that moment, I had not fathomed the addition of Beets into Hummus. And now, my Hummus making days have changed forever!

As always, I tweaked the recipe a bit to suit my tastes. I've served it over organic red rice and topped it with a herb chutney (the green of the chutney looked so pretty with the deep pink of the hummus, I couldn't resist placing them together for the picture hehe). All of them tasted yummy together, but believe me when I say, the hummus tasted quite heavenly by itself too! You can just keep eating it in spoonfuls, straight from the container (like ice cream). So just be warned before you make some. :)

Beet Hummus

2 Medium Sized Beets - peeled, diced and cooked
2 Cups Cooked Chickpeas (I recommend starting with dry chick peas, soaking them using the Quick Soak Method* and then cooking them)
5-10 small cloves of garlic (depends on how garlicky you like it)
2-3 Shallots (Sambar Onions)
1 t Tahini (or dry roasted sesame seeds)
1/4 C Extra Virgin Olive Oil
1 T Nutritional Yeast (optional)
To taste - red chilli flakes, coriander powder, salt, freshly squeezed lemon juice

Grind/Process everything together (except the olive oil). Use enough of the cooking liquid from the beets/chickpeas and blend everything to a smooth paste. With the food processor running, drizzle in the Olive Oil and continue to blend until it gets incorporated completely. Taste and adjust the seasonings. Use more of the cooking liquid and blend until desired consistency is reached. Put into an airtight container and store in the fridge.

Hummus tastes delicious soon after it's made but it tastes best after a day of sitting in the fridge because the flavors develop well by then.

Beet Hummus

*Quick Soak Method (can be used for all beans) - Bring a pot of water to boil. Wash beans and put into the boiling water. Turn off the heat and cover the pot. Let it sit for 1-4 hours. Drain and throw out the soaking water completely and wash the beans. This removes 80-90 % of the flatulence causing properties inherent in most beans, hence making them even more healthier. The beans are now ready to be cooked, either in a pressure cooker (much quicker) or in a pot of boiling water (takes a couple of hours depending on the type of bean involved).

Wednesday, March 31, 2010

Vegan Craft Samples - Earth Day 2010


Vegan themed pendantsMy friend from the Vegan Etsy and Etsy Veg teams Heather Snogles started up Vegan Craft Samples a while ago and it's been a huge success ever since! Each year has about 4 Vegan Craft Samples Bags getting released to which various artists and crafters contribute their wonderful creations. When you purchase a bag, not only do you get a mix of beautiful stuff made by various talented people, you also help out an animal charity to which all profits from the bags go.

EarringsWhile there are many sample bags of this sort being run, Heather is the only one who runs an all Vegan bag and also donates 100% of the profits to an animal sanctuary.

The next bag is the one for Earth Day 2010 and they go on sale on the 4th of April 2010 (only a few days away!!). The chosen animal charity for this time is Carolina Pet Rescue.

Wire BookmarksThe bags will be available in 3 sizes - small (8-10 items), regular (17-20 items) and large (22+ items). They will be up for sale at the Vegan Craft Samples Website and Etsy Store.

Once these babies come out, they sell like hotcakes so make sure you grab them quickly! :)

MonstersCurrently, the Etsy Store also has a yearly subscription for all 2010 bags up for sale. If you buy this, you'll receive all the 3 remaining bags for 2010 without having to worry about remembering to grab them in time.

MonstersAbout 2 weeks ago, I sent in my goodies for the bags from both my stores - Art by Susmitha and Veganosaurus. This morning, I logged in to find an e-mail from Heather, saying that my box has reached. :)

My packaging for the Vegan Samples BagsWhile I had been making my creations to send in, I had been hunting for a fun packaging idea, particularly for the monsters. I really wanted it to be whimsical yet different. Then one day, while I was doing my normal chores and basically feeling thoughtless, the idea just hit me... Comic Strips! :)

Monsters peeking out of the packagesSo I spent a couple of days, snipping comics from the daily newspaper and used them to wrap the monsters and a few of the other goodies. It took a bit of effort but it was totally worth it!

EarringsKeep an eye out for the Veganosaurus Monsters or the Art by Susmitha Jewelry and Wire Book Marks in your Vegan Samples Bag. And if you find one, I'd love to hear from you about it! Please drop a comment right here to let me know what you think. :)

Necklaces

Pendants

Monsters

Thursday, February 25, 2010

A Carnival of Vegan Decadence - Namma Bengaluru


Call Carnival Bakery and a lady with a sweet voice is the one who's likely to answer the phone. After you ask her if their baked goods have eggs or dairy, she calmly assures you that she knows what Vegan means and politely waits while you first gasp and then recover from this delightful news. Then she proceeds to spring upon you the information that they have a separate special Vegan menu!! I'm guessing that by now she's well enough trained to immediately move the receiver away from her to protect her ear drums from the high pitched screech which emanates from your mouth.

It was K, my sister in Veganism, who stumbled upon this rare pearl (let me clarify that I'm referring to a Vegan Swarovski glass pearl here) while on a hunt for the perfect bagels. When she called me to share this news, I nearly did the Nakka Mukka. I vaguely recall registering the life-changingness of this information while my head swam with innumerable possibilities.

Sure, I'm quite capable of whipping up some fabulous Vegan desserts of my own at anytime. But now, when the craving hits me and I'm feeling lazy, the delicious treats are just a phone call away. And the BEST part is that I don't have to bake my own Birthday cake ever again! :D

My first order with them was a Black Forest Cake. No surprises there because that was my favorite gateau from my evil pre-Vegan days. It had been 7 years since I'd had a bite of the perfect Black Forest. Well I must admit that this wasn't the perfect Black Forest, but it sure was a delightful sight and pretty yummy too! Particularly after soaking in the fridge for a day (I've seen that cakes always need ripening time of at least 24 hours, ideally 48, before they reach their peak). The sponge didn't seem to have any cocoa so I did ask them why the weren't doing the traditional chocolate cake base. They said that they do use cocoa powder but in a limited quantity and that's why the chocolate cake wasn't of a chocolate color. Plus they claim that other bakeries use brown food coloring to enhance the look of the chocolate cake but they don't. That is definitely a good thing!

Then last week I succumbed to temptation once again and ordered a Rum Ganache Cake and some Doughnuts with various frostings (sorry no pics of the doughnuts). OMG the Rum Ganache was amazing!!! I was totally blown away by the presentation as well as the pure decadent taste! And the middle layer was soaked and moist to perfection!


THIS is what I recommend as your very first order from Carnival Bakery! Then you can follow it up by ordering the delightfully soft, moist and creamy 7 Fruit Cake (the birthday cake featured above which K ordered for her DH).

Carnival Bakery offers home delivery. Within a 2 kilometer radius of their premises the minimum order is Rs. 200 and the delivery is free. But hey, it's likely that you, like me, live no where near Sarjapur Road. And so for kindly traveling through the horrible Bangalore traffic in the sweltering heat, it is only fair that your order makes it worth their while. The minimum order in this case starts at Rs. 1000 and the delivery charges would depend on your order. Rs. 50, Rs. 100 and so on.

I must mention here that the person who delivers is a polite, professional guy called Karthik. And judging by my last order, where he was really nice after I made him wait for about 10 minutes, he seems to be quite patient too.

So here are the details of Carnival Bakery for you. Enjoy! :)

Carnival Cakes
Manager: Mr Sadhish Kumar
No.65/3, Nr Shoba Onyx,
Agara Post, Sarjapur Main Rd,
Sarjapur Road,
Bangalore – 560034
Tel. (80)-25723148 / 9916754689
Email: cakecarnival@gmail.com

They will e-mail you their Vegan Menu or if you'd like to see it online you can find it on the Vegan Bengaluru Blog.


Apple Crumble Pie (a tad sweet for my liking but nice enough).

Friday, February 05, 2010

Spicy Hummus Whole Wheat Ravioli in Mint Coconut Milk Sauce


One of those things I invented as I cooked and OMG were the results amazing! It has Italian, Mediterranean, East Asian and Indian flairs all mixed in. I think I outfusioned myself with this one. :D

Spicy Hummus Ravioli in Mint Coconut Milk Sauce

For the Spicy Hummus:

Quick-soaked, drained and cooked Chickpeas
Toasted Sesame Seeds
Smoked Chipotle Tabasco Sauce
Asian Super Spicy Chilli Paste
Olive Oil
Coriander Powder
Raw Garlic
Lime Juice
Nutritional Yeast (if available)
Salt

Blend everything together adding a little water at a time until it reaches a creamy consistency. I determine ingredient quantities by the "taste and add and taste and add" method.

For the Whole Wheat Ravioli:

2 C Whole Wheat Flour
1/2 t Salt
3 t Oil
Water

Mix the flour and salt together. Rub the oil into the flour. Add a little water at a time and knead well into an elastic-y dough. Cover and keep aside.

Bring a large pot of water to boil, add salt and let it continue to boil. Start preparing the ravioli on the side.

Pinch off large balls of dough and roll them out thin like tortillas/chapatis. Use a circular cookie cutter (or the edge of a steel tumbler) and cut out rounds. Take one circle and spoon a bit of the hummus into the centre, cover with a second circle. Carefully seal the edges. You can make little twists all around the side for extra safety.

Prepare all the ravioli and then put them into the boiling water gently. Cook for about 20 minutes on a medium flame. About 5 minutes into the cooking, stir carefully so that they don't stick together or break. Do this a few more times through the cooking process. And start preparing the sauce on the side as the Ravioli boils.

If a couple of the Ravioli's break during the boiling process try not to fret. I used the cooking water as a stock to make soup the next day. :)

For the Sauce:

Big bunch fresh Mint Leaves
Thick Coconut Milk (about 1 Cup)
Green Chillies
Pepper
Salt

Blend everything together into a creamy sauce consistency.

How to proceed:

Pour a bit of the sauce into a glass baking dish. Place the ravioli in layers and pour the sauce between each layer. And top it off with the rest of the sauce.

Bake in a regular oven at 200 C/ 400 F for about 40 minutes or in a microwave in the convection+micro mode for 20 minutes.

Serve hot, garnished with grated carrot.

Enjoy! :)