Sunday, October 09, 2011

Week 1 Flashback and Some Food Porn - Vegan Mofo Post 8


After a successful and fun first week of Vegan Month of Food 2011, I've decided to take it a little easy today. So in this post I'll do a quick recap of all my posts from Vegan Mofo Week One and then share some of my vegan food photography pictures.

Day 1 - A short video clip from our local Vegan Bengaluru potluck.

Day 2 - A recipe for fluffy idlis and a pic of my awesome idli batter grinder.

Day 3 - All about ice creams and my 'method' of making them.

Day 4 - Pizza with Daiya. Ooooh yeah!


Day 5 - Dessert that I concocted out of almonds.

Day 6 - Fluffy corn bread.


Day 7 - An exotic twist on curd rice.


And now on to the random food porn...


Chocolate Cake with Raw Almond Frosting

Burger Guacamole

Chocolate Ganache Cake

Khara Avalakki Dosa

Poori Saagu

Vegan Benne Masala Dosa

Chocolate Cake with White Frosting

Chocolate Ganache Cake Inside


Wish you all a wonderful and relaxing weekend! :)

Saturday, October 08, 2011

Seasoned Peanut Yogurt Black Rice - Vegan Mofo post 7


We've come to the end of the first week of Vegan Mofo and I've successfully managed to post every single day! Woohoo!! :D

Over the past few months, I have found two great local sources of organic produce and grains. One was Pristine Nature, an online store I spoke about on my blog a few weeks ago and the other is In The Pink, a restaurant and bazaar which I will be featuring on my blog very soon.

At both these places, I have been able to obtain black rice which I have gotten addicted to. Pristine Nature sells Burmese black rice and In The Pink has a slightly different variety. But both of them taste equally delicious!

The rice cooks to a beautiful deep grape colour and a sticky texture. It's perfect to be mixed and had with liquidy stuff like sambar, rasam or dal and it works fantastically in stewy dishes like Bisi Bele Bath and Pongal. But my most favorite way to eat it is in the form of Seasoned Curd Rice made of Peanut Yogurt.

This is an exotic twist to a very traditional South Indian dish. :)


For the curd rice, mix together:

1 C Cooked and cooled Black Rice
1 C (or more if you like) Peanut Curds
1/2 t Vinegar/Lemon Juice
Salt

For the seasoning:

1/2 t Coconut Oil
1/4 t Black Mustard Seeds (Sasive)
1/4 t Cumin Seeds (Jeerige)
1 t Split Black Gram Dal (Uddina Bele)
1 t Split Bengal Gram Dal (Kadale Bele)
2 Green Chillies chopped into little circles
Asafoetida Powder (Ingu)
Curry Leaves (Karibevina Soppu)

Heat oil in a small, heavy bottomed pan for half a minute. Add mustard and cumin seeds. They will crackle so cover lightly for a few seconds. Add the dals and stir for a few seconds until they are lightly browned. Add the asafoetida, curry leaves and green chillies. Stir for a few seconds, turn off the heat and stir some more.

Add the seasoning mixture to the prepared curd rice. Mix well and serve.

Enjoy! :)


Notes:

Curd rice is traditionally eaten at the end of a spicy meal.

It tastes great after sitting around for a couple of hours because the curds will ferment and develop a light tangy taste.

You can add grated or finely chopped coconut, pomegranate, fresh grapes or raisins to this according to your taste preferences.

Friday, October 07, 2011

Maize Bread - Vegan Mofo Post 6


Maize is the term we use to refer to the locally available variety of corn in India. Ever since I tasted corn bread for the first time at Angelica Kitchen in downtown Manhattan, I knew I'd wanted to add the recipe to my baking repertoire. After returning to Bangalore, I searched in vain for corn meal here. Then one fine day I saw broken maize at the grocery store and even though it had more of the texture of corn grits as opposed to corn meal, I knew it would do the trick! :)

I adapted this recipe from the very first vegan recipe book in my collection, Very Vegetarian by Jannequin Bennett. A beautiful hard cover with recipes ranging from simple to gourmet and pictures ranging from super delicious to droolalicious! To this day, the book continues to give me guidance and inspiration.

Corn bread a very simple and quick bread with the right balance of moistness and crumbliness. Hubby and I enjoy it best with vegan chilli (as you can see in the picture). The crumbs soak up all the flavors from the chilli and combine to create a delicious burst of flavors and textures in the mouth.

Corn Bread and Chilli

1 C Broken Maize or Yellow Cornmeal
1 C Maize Flour or Corn Flour or All Purpose Flour
1 1/2 t Baking Powder
1/2 t Baking Soda
1/4 t Salt
1/4 C Maple Syrup or Sugar Syrup
1/3 C Soymylk or Almond Mylk or Cashew Mylk*
1 T Lemon Juice or Vinegar (I prefer Apple Cider Vinegar best)
3 T Warm Olive Oil or other Vegetable Oil
3/4 C Warm Water

Preheat oven to 190 C / 375 F.

Keep a 9 inch square baking pan ready.

Pour the warm water over the broken maize and keep aside.

Sift together the dry ingredients.

Beat together the wet ingredients.

Mix everything together.

Pour into the baking pan and quickly and lightly spread to make a more or less even layer.

Bake for 25 minutes.

Serve warm.

Enjoy! :)


*Note: I tried using water instead of Vegan Mylk and it really messed up the texture. I think a certain amount of protein/fat is required in the liquid for the crumbs to come out perfect.

Wednesday, October 05, 2011

Saffron Infused Almond Dessert - Vegan MoFo post 5


As this highly addictive veganmofo madness continues, I have been feeling extremely grateful for my prior procrastination! Over the last few months, I had created a bunch of stuff in my kitchen and taken pictures, but I hadn't updated my blog with all of them. So now, during vegan mofo, since blog hopping and commenting has taken over my online life, I'm able to keep my blog up with the activity because the yummy food pictures are already waiting to be linked here. Phew! See, being lazy has its benefits. :D

This is an almond cream based mousse like dessert I concocted a while ago. It's raw, except for the little bit of agar agar (which needs to be cooked to work well). Pretty simple to make too! It would also have been a super quick dessert if it weren't for the slightly painful almond skin peeling step. But hey, even that is something you get a hang of over time. I've become a lot faster at it now than I used to be during my initial attempts.

Saffron Infused Raw Almond Dessert

1 C Almonds
2 pinches Saffron Strands
Raw Agave Nectar (to taste)
2 T Agar Agar flakes

Soak almonds overnight in filtered water to start the sprouting process.

In the morning, throw out the water and rinse the almonds thoroughly. This step ensures that your body absorbs the enzymes in the almonds better.

Now the part which involves effort. Patiently peel the skin off the almonds. You can pour more water over them so they stay moist through the peeling process, making it easier and quicker.

Blend the peeled almond into a smooth, creamy paste adding a wee bit of of fresh, filtered water.

Add the saffron and agave nectar and blend again. Taste and adjust the level of agave. Keep aside in the blender jar.

Boil 1/2 C water and add the agar agar flakes. Stir and cook on medium flame until the flakes have dissolved. Let it cool for a few minutes until slightly warmer than room temperature.

Pour this agar agar mixture into the blender jar with the almond paste in it and blend for a few beats just to get everything mixed well and whipped up.

Pour the almond cream into individual dessert bowls and chill in the fridge for a few hours.

Serve cold and enjoy! :)

Tuesday, October 04, 2011

Daiya Pizza - Vegan MoFo post 4


Day 4 of Vegan MoFo. I seriously should have scheduled a lot more posts (I just had 3 lined up) well in advance. Now, instead of writing up blog posts, I've been spending all my online hours MoFo blog hopping!

It's too hard to resist. I'm discovering all these awesome blogs and with all the criss-cross interactivity happening between mofoers all over the interwebs (blogs, twitter, facebook...), I feel like I'm a part of this large, global community of warm and friendly people and I wish veganmofo would last forever!

Today's post is going to be quick and simple. But not without a back story of course. :oP

In my pre vegan days, I was never a fan of cheese. When our parents took us to Wimpy (a pretty nice UK based fast food restaurant that existed here in Bangalore before the icky US fast food chains flooded India and wiped Wimpy out), sis and I always asked them to put very less cheese on our pizzas. And that was only because they claimed they couldn't make them cheese-less because the toppings wouldn't stay on then. So when I went vegan, 8 years ago, I never even gave a second thought to cheese.

Then last year, when DH and I visited the US for a few months, we got to taste Daiya vegan cheeze for the first time at Sugar Plum Vegan Café at Sacramento. I never knew cheeze could be so delicious!!

So a couple of months ago, when my cousin's friend was visiting here from the US, we asked her to please please please bring a pack of Daiya for us (packed safely between ice bags of course) in her luggage and she very kindly did so. :)

Needless to say, I've been using it very sparingly to make it last and thankfully, a little does go a long way.

The other day I made this pizza. Looks yum, huh? :D

Daiya Pizza

I'm still working on getting a perfect pizza crust (mine's pretty yummy but it's more like bread than crust) so I won't post the recipe for that here. But here's how I made the topping:

Daiya
1 Pack Tofu - pressed gently to squeeze out water, patted dry and cubed
3 Ripe Tomatoes - quartered
3-4 cloves Garlic - chopped roughly
Nutritional Yeast
Balsamic Vinegar
Jaggery (or other sweetener)
Tabasco Sauce or Chilli Powder (or a bit of both)
Dried Oregano
Pepper
Salt

Put everything, except Daiya and Tofu, into a blender and liquefy.

Add Tofu cubes and toss.

Pour the sauce over olive oil coated, partially baked pizza base.

Sprinkle Daiya over everything and bake for about 20-25 minutes.

Slice and serve hot.

Enjoy! :)

Monday, October 03, 2011

I Scream You Scream We All Scream For Ice Cream - Vegan Mofo post 3


Today's Vegan Mofo post is a photo blog of a few vegan ice creams I've made in the recent past and my ice cream making process.

I never follow exact recipes while making anything (except in my baking) and ice creams are no exception. I just have a method that I stick to and have developed a 'feel' over time for attaining the right texture.

For the base, I usually use a combination of a nut and a creamy fruit or a vegan mylk and vegan whipped cream. To this I add any flavor that hubby and I are in a mood for - coffee powder, melted dark chocolate, pure vanilla extract, saffron, cardamom, rum (any alcohol is to be added only in the last minutes of the freezing process)...- and a sweetener of some sort - sugar, raw agave nectar, maple syrup... - et voila, the vegan ice cream mix is ready! :)

Pointers:

*Tasting and adjusting is of course a must.
*Make it a wee bit sweeter than you might like because after the freezing process the level of sweetness reduces.
*Add a tiny pinch of salt to enhance the taste.
*Chill the mix for over a day before freezing - either in an ice cream maker or by following the whipping and freezing method.

The latter involves whipping and freezing and whipping and freezing and so on once every half an hour for the first two hours of the freezing process. And then once an hour for the next two hours (or until the consistency feels about right). The way to achieve a good ice creamy texture is to use a blender (hand blender would be more convenient than transferring the ice cream into a jar each time) but you can also use a wire whisk, a spatula or a fork.

Without further ado, here are my droolalicious, creamy, scoop-able vegan ice creams. :)

Very Vanilla Cashew Mylk Ice Cream

- recipe for the vanilla cake in the background here
Very Vanilla Cashew Mylk Ice Cream

Cashew Mocha Rum Ice Cream


Cashew Mocha Ice Cream

Raw Pistachio Mango Ice Cream

- recipe here
Raw Pista Mango Ice Cream

Mango Ice Cream


Mango Ice Cream

Sunday, October 02, 2011

Idli the fluffy South Indian Rice Cake - Vegan MoFo post 2


Idlis are a staple breakfast food in South India. These fluffy rice cakes are made by soaking, grinding and fermenting a combination of a specific type of rice and urad dal (split black gram). Adding a handful of methi (fenugreek) seeds in the mix makes the Idlis extra soft and fluffy.

AWESOME KITCHEN GADGET ALERT!!! :)

Idli Grinder

I use my trusty Kailash Tilting Wet Grinder to make a super smooth Idli batter. It has a motor unit over which the grinding vessel is placed. The inner base of the vessel has a granite layer. There is also a grinding attachment made of three granite stones which is placed into the vessel where it is held in place. When the machine is turned on the vessel starts to rotate which causes the stones to rotate in the opposite direction. No grain or lentil can hold the hope of staying whole under the pressure of those awesome stones. ;)

The tilting mechanism in my grinder makes it very convenient to pour out the batter without having to carry the weight of the heavy vessel.

For those who make Idlis just occasionally, a good blender with sharp blades will do fine. You just have to remember to soak the urad dal and rice separately and make a very smooth paste of the dal before grinding the rice (the methi seeds are soaked with the rice). But for someone who is looking to be a regular Idli pro, a wet grinder is would make for a very nifty gadget. It's been a truly worthy investment for me! :)

Idlis

Ingredients:

1 C Whole or Split Black Gram
5 C Short Grained Idli Rice (I also like to use Mulleri Red Rice for my Idlis sometimes)
2 T Fenugreek Seeds
Salt

Soak everything (except salt) together in plain water overnight.

Drain the soaking water into a vessel and keep aside.

Set up the idli grinder according to instructions, pour some soaking water into it and switch it on.

With the motor running, slowly add in the rice, dal and methi mixture.

Pour in some more of the water to ensure the steady movement of the grinding stones.

Cover the vessel with the lid and get online and blog for the next 20 minutes.

Look in on the batter and add more water if required (the batter should have a fairly thick but pourable consistency) and let the grinder run for another 15 minutes or so.

Once the batter is completely smooth turn it off and pour it into a large container (batter should fill it only halfway to allow it to expand while fermenting).

Add salt and mix lightly with your hand, cover and keep aside in a warm place for about 12 hours (more if you live in a cold climate).

Once the batter has risen well and attained a slightly sour smell, it is ready for use.

Ladle the batter into Idli mold trays.

Meanwhile, bring water to boil in a steamer and once it begins to boil place the Idli trays into the steamer.

Cover and steam for 8-10 minutes on medium heat.

You should be able to smell the cooked Idlis in the steam wafting out of the steamer.

Carefully remove the Idly trays out of the steamer and let the Idlis cool for a few minutes.

Gently unmold the Idlis using a wide, flatish spoon.

Drizzle sesame oil over the Idlis and serve them hot with Sambar or Coconut Chutney.

Enjoy! :)

Saturday, October 01, 2011

My first Vegan MoFo post. A short video clip.


Thought I'd start off my very first Vegan MoFo post with a video. I didn't film it but I am featured in it. :)

Last Saturday we had our monthly Vegan Bengaluru potluck at Jaaga - Creative Common Ground. We hold these potlucks and keep them open to vegans and non-vegans alike. The idea is to have anyone who is interested in veganism come share the vegan food and clarify any questions they might have which might make it easier for them to get on the vegan path. The atmosphere of these events is very relaxed and chilled out.

Jaaga is a beautiful, airy structure and was a perfect space for our local vegan group to enjoy the delicious food and interesting conversation. The people who run the place are very friendly and welcoming. They even joined us at our potluck for some time.

While we were there, Clemence Barret (one of the founders of Jaaga) asked to shoot a video clip of our vegan event and we were more than happy to oblige. Here's the result:


And here are some drool worthy images of the food we ate that day.

Bruchetta Bread

Bruchetta Topping

Pasta Salad

Mysore Pak

Semiya Sweet

To see more goodies and snapshots of the Vegan Bengaluru potluck, visit my original post about this event on the Vegan Bengaluru blog.

Monday, September 05, 2011

Ganesha Chaturthi and Yummy Kadubus


I love a good, filling festival feast! But then, who doesn't? No matter what religious festival it is that one is celebrating, the love for the associated food is commonly shared. :)

It's probably because of a combination of the joyous childhood memories we have associated with festivals and the amount of care and hard work which always goes into making food fit for celebration.

Kadubu / Kozakottai

Being a strong believer in the power of spiritual vibrations, I feel that food when it's made with the intention of a offering to a deity as neiveidhya first before being eaten is most sublime.

Among all the festival we grew up celebrating, my fondest memories are of Gowri and Ganesha (not even Diwali with all its fire crackers matches up). For the first half of my life, I lived in a big, happy joint family. We were fourteen of us in one huge bungalow. All festivals were celebrated together, as a family.

On the first day was the Gowri pooja followed on the next day by the Ganesha pooja. The story is that Gowri comes down to Earth on that day to visit her mother and Ganesha (Gowri's youngest son) accompanies her to stay at his grandma's place. And grandma spoils him with all kinds of delicious goodies. After the festivals are done, a few days later Ganesha safely takes his mother Gowri back up to Kailasa (heaven). That's when we leave the clay idols in water as a send off until the following year.

A few days before the festival, when the adults purchased the larger Gowri and Ganesha clay idols for the ritual, they always purchased smaller ones for us kids.

Me, my little sister and our two little cousin brothers used to willingly and enthusiastically wake up at the ungodly hour of 4 am on both festival days, get dressed in traditional clothes and sit at our mini altar to do the ritual to our little Gowri and Ganesha. The girls did the Gowri ritual and the boys did the Ganesha ritual. We even had miniature silver vessels, aarthis and all the other stuff required for the ceremony. And at the end of the ritual, the feast was brought out and placed in front of the deities as an offering. This marked the end of the ceremony. After this, we could commence wolfing down the yummy goodies! :D

Those were such utterly joyful days!!

Ganesha after the pooja

Now hubby and I bring home only the Ganesha (I visit my mom's place and all my aunt's places on the day of the Gowri festival) and perform a simple, short pooja. But we do make sure to cook a whole bunch of the traditional delicacies for the neiveidhya offering so we can stuff ourselves later to our tummies' content. :D

This year we made three types of kadubus/kozakottais, unfermented idli with coconut cilantro chutney, sundal out of small, brown channa and these miniature steamed snacks (don't really know what they are called).

For the three kadubu fillings - coconut jaggery, sesame jaggery, savory urad dal - we followed the recipes from Subbu's Kitchen. For the outer rice dough covering we used a slightly different method.

Kadubu Dough

1 C rice flour
1 C water
2 tsp oil
a pinch of salt

Mix everything into a paste in a heavy bottomed pan and place on medium heat. Stir continuously (will take maybe 5-10 minutes) and let it cook until the paste starts coming together into a ball of dough.

Take the pan off the stove and once the dough cools a bit, dip your palm in cold water and knead the dough until it's smooth. Follow instructions to make various fillings, stuff and steam.

Kadubus / Kozakottais inside

Fun Little Savory Steamed Snacks

These are usually made out of leftover kadubu dough but I like them so much that I always make extra dough just for these. :)

Kadubu dough
1 tsp moong dal and 1 tsp channa dal (soaked together for half an hour)
2 fresh green chillies, asafoetida and salt (crushed well together)
2 tsp chopped fresh cilantro

Mix everything together.
Form into fun little shapes - ball, stick, ring, disk etc...
Steam along with the kadubu for 5-8 minutes.


Another Ganesha Chaturthi dish that I truly relish is Kandundes (didn't make them this time around though). They are made of four kinds of lentils soaked together and ground to a thick paste along with spices, shaped into balls and steamed. Then they are dunked in a yogurt based gravy and served. I make these on non festival days too because then I get to add onion (a festival no no) and also a bunch of chopped veggies. I either serve those in a vegan yogurt based gravy or just plainly spiced vegan yogurt. I'll share a recipe for those the next time I make them.

What goodies do you prepare for Gowri Pooja and Ganesha Chaturthi and which ones are your favorites?

Wednesday, August 24, 2011

Featured on The Students Mag August 2011 issue.


I'm pleased to share that I have been featured in The Students Magazine in a 3 page interview by Satya Kandala (Sub Editor). She framed the questions around my creative journey, my art, my cooking and how my veganism has woven itself into all these parts of my life. I have answered them in detail.

The August issue of the magazine, in which my interview has been published, hit the stands a couple of weeks ago and is available in leading book stores in Bangalore. Since their website is not completely up and running, they don't have an online version of the magazine available yet. Satya was kind enough to send me a couple of physical copies of the mag for my collection.

I've taken digital images of the 3 pages and have posted them below if you'd like to read. :)

You can click on each image to be taken to a slightly larger version for clearer viewing if you like.

The Students Mag interview page 1

The Students Mag interview page 2

The Students Mag interview page 3

Thursday, July 21, 2011

Mediterranean Sun Dried Tomato Bread


Mediterranean Sun Dried Tomato Bread

1 1/2 C soymilk
2 T sugar
4 T olive oil
2 t active dry yeast
2 T raw flax seed powder
1 t salt
1 C all purpose flour
3-4 C whole wheat flour

sun dried tomatoes (soaked in warm water and re-hydrated)
chilli powder
herbs - oregano, rosemary etc...

Heat the soymilk until lukewarm (test the temperature with your knuckle). Pour into a large mixing bowl and whisk in the sugar, oil and yeast. Leave for 15 minutes for the yeast to dissolve. It should be all bubbly and frothy by the end of this time.

Add the salt and flax seed powder and beat a little. Slowly whisk in the 1 C all purpose flour and 2 1/2 cups of the whole wheat flour a little at a time while continuing to beat it as much as possible. Once the dough gets too thick to beat, add just a little more flour and mix with your palms to obtain a rough dough.

Form this dough into a ball and transfer it onto a flat, floured surface (I use my cleaned granite counter top). Knead well for about 10 mins at least (add a little more whole wheat flour while kneading if the dough is sticky but make sure it doesn't get too dry) until it reaches a smooth, elastic consistency.

An effective way to knead is to press the dough away from you with the base of your palms, then fold the dough over towards you and then it press again.

Form the kneaded dough into a ball. Grease the mixing bowl with a little bit of oil. Place the dough ball into the bowl and swirl it around until it's coated with the oil. Cover with a clean plastic bag and let it sit in a warm spot for about 2 hours, until doubled in volume.

Punch down the dough and give it a quick knead for a few seconds. Divide it into two balls. Roll the balls out into large rectangles about 1 centimeter (a little less than 1/2 inch) thick and place them flat. Lightly coat these rectangles with a very thin layer of olive oil and spread the sun dried tomatoes and sprinkle the chilli powder and herbs over them (you can add sliced olives too but I didn't have any when I made the bread so they're not in there). Gently roll up the sheets and form them into loaves. Place them in loaf pans, cover again with the plastic bags and let them sit for 1 1/2 hours to double in volume.

I actually made one bread with this rolling up method and the other with bits of the sun dried tomatoes and herbs and spices kneaded into the loaf. Both were nice but I personally preferred the taste of the rolled up style bread better.

Preheat the oven to 190C/375F. Bake the loaves for 50 minutes.

A great way to get a nicely browned, crusty top is to spray the bread with water every 15 minutes or so while it is baking.

Cool for some time in the loaf pans. Transfer to a cooling rack and cool completely. Slice with a serrated knife and serve.

Tastes great with Hummus!

Mediterranean Sun Dried Tomato Bread with Hummus

Mediterranean Sun Dried Tomato Bread with Hummus

Wednesday, July 06, 2011

Lazy Pizza


Though I normally prefer to bake my own pizza base, sometimes I get lazy and look for the easy/quick way out. Thankfully Nilgiris carries pretty decent whole wheat flattened bread which works. Well, when commercial products say 'whole wheat', it means they have some amount of whole wheat in there along with the usual lot of maida (all purpose flour), but at least it's a little better than getting breads made blatantly of white flour! Or so claims my slothful side. :oP

I concocted a nice, thick, fairly healthy and more importantly quick pizza sauce last night so all I needed to do is slather it onto the pizza base, bake it for 15 minutes in a hot 200C oven, sprinkle on some herbs, crush some pepper et voila! A super yummy dinner done in less than half an hour. :D

Simple Pizza

Here's what went into the pizza sauce:

4 Tomatoes
1/2 C Sun Dried Tomatoes
6-7 Cloves of Garlic
1/2 C Pecans
1/4 C Balsamic Vinegar
3 T Nutritional Yeast
1/2 t Jaggery
Chilli Powder
Salt
1/4 C Olive Oil

Rehydrate the sun dried tomatoes in 1/4 C warm water. Blend everything, except olive oil, together (including sun dried tomato water) into a smooth, creamy, slightly thick sauce.

Transfer to airtight container and add the olive oil on top. Mix well. Close lid and store in fridge for up to a week and use as required.

As always, I made this instinctively by throwing in handfuls and splashes so the quantities mentioned are indicative. Taste and adjust as you blend. Follow your tongue. :)

Friday, July 01, 2011

Raw Vegan Hazelnut Cheese


Raw Vegan Hazelnut Cheese


The first time I tasted nut 'cheese' was at VegFest 2010 at Portland, Oregon. I can still remember the explosion in my tastebuds when I put that delicious cheese made of Hazelnuts by Heidi Ho Organics into my mouth! Mmmm mmm!

It's such a pity they were only giving out samples that day. DH and I wanted to buy loads to stuff our faces with. Needless to say, the next time I'm at Portland, Ima gettin' me some Heidi Ho hazelnut cheese.

Heidi Ho Organics Hazelnut Cheese at VegFest 2010

Since nut and seed cheeses are made of raw nuts and seeds which have been put through a fermentation process, they are rich in enzymes, nutrients and lactobacilli (the good kind of bacterial cultures). A most delectable way to put probiotics into your system! :)

I've been wanting to experiment with nut cheese making for a while now but I was under the impression that it is a difficult task and that it needs some 'exotic' ingredients like miso or dulse. That was until I saw this recipe by Dr. Nandita Shah on the Sharan India website. From the first step until the cheese is ready for consumption it takes a few days so it is time consuming process, but the effort which you need to put into it is hardly much. With patience, anyone can make raw, vegan cheeses right in their home. And as we already know, homemade is always the tastiest and healthiest option. :)

So couple of days ago, on a whim I decided to attempt making nut cheese. Luckily, I already had a little bit of rejuvelac on hand and it was enough for the small, experimental quantity I intended to begin with. I decided to go for hazelnuts. Firstly because I was out of cashews and almonds and secondly because hazelnut cheese is the only kind I'd ever tasted (and loved!).

I pretty much followed Dr. Nandita's recipe except that after the cheese was ready, I pressed out the water from the it by putting it into a cloth bag inside a colander and placing a weight over it overnight. I preferred the taste and texture of the pressed version more than the softer kind.

For flavoring, I used nutritional yeast, salt, oregano, a pinch of turmeric for color and a dash of chilli powder (hey, come on, I had to Indianize it at least a wee bit).

So here it is, my very first batch of Raw Vegan Hazelnut Cheese! :)

Raw Vegan Hazelnut Cheese

It's the first of many more to come. I wouldn't call it perfect but it was gosh darned scrumptious! Notice that I say 'was' (past tense)? It's because we gobbled up almost the whole batch during lunch. :D

Next time I'll be tweaking things. I plan to use a combination of nuts and seeds. I'll be blending them into a more creamy finish. And I'll be adding the spices before the fermentation process begins.

Earlier today I was reading up more about making home made raw, vegan cheeses in this amazing, highly informative post. I found the part where it speaks of cheese 'seasons' and moon cycles extremely interesting. I already try to do certain things based on the moon cycle in my day to day life and it makes complete sense to me that the behavior of the lactobacilli would be dependent upon them too.

After having read that post, I'm all riled up and really looking forward to more successful adventures in raw, vegan nut and cheese making. Can't wait to get the next batch started! :)

Wednesday, June 29, 2011

Pristine Nature and Lettuce Tomato Pecan Salad with Pudina Red Rice


My friend K recommended an online site called Pristine-Nature when I was looking for fresh, organic vegetables. They source a good variety of organic produce, grains, beans, lentils, spices and oils from mainly local (in and around Bengaluru) farms and offer a once a week home delivery service.

Inspired by the founders of Adi Naturals (a community service organisation aiming at connecting the farmer directly with the consumer to lower costs), this is what they have to say about themselves...

"Pristine-Nature does not offer any goods or services of its own, and neither do we buy or sell any products. We only provide an online presence and voluntary service at no-charge, to like-minded community service organizations who work for no profit or minimal profit for covering their expenses. These organizations purchase from marginal organic farmers and retail their wares. Our idea is to enable such organizations to reach wider audience / customer-base over the internet and enable them with IT services with the help of volunteers, to streamline their operations."

In less than half an hour of me registering at the site, I got a call from their customer service representative (a very nice, polite lady) who patiently explained all about Adi Naturals and Pristine Nature to me. The call really encouraged me to go ahead and avail of their services without feeling hounded in any way.

DH and I decided to place an order with them over the weekend. We ordered a variety of red rices along with a few vegetables, some yelakki bananas and turmeric powder. After much excited waiting, today the stuff arrived! :)

I was very happy to note that they didn't use unnecessary plastic bags to pack the things. Except for the red rices, all items were without packaging. The young man who was delivering my order carried everything into my kitchen in a crate and transferred them onto the counter. The produce was very fresh and healthy looking. The rice seemed clean and in very good condition. He informed me that the chou chou (chayote) I'd ordered was in a slightly poor condition so he voluntarily asked me to subtract the amount for it from the payment even before I could take a closer look at the vegetables and he left the single chou chou behind anyways. I found that to be very professional.

Veggies on my kitchen counter

The prices of the products are slightly on the higher side compared to inorganic products (which is to be expected) but compared to the prices of organic products at some other stores, Pristine Nature seems fairly competitive. They used to be a lot more expensive last year but according to what they told me, the prices are lower now in comparison because they've stabilized more. I believe that as more and more people switch to organic food, the prices will come down further.

The only issue I have with Pristine-Nature is that they charge 20% of the total bill as the delivery fee (with a capping meter of Rs.150). That in my opinion is a tad high. It discourages one from buying too many things because each time the total increases, so does the delivery fee. In fact, I had originally added a few more items to my shopping cart but ended up removing them simply because they were high priced items and would run up the delivery fee too much. Gingelly (sesame) oil for example is around Rs. 165, which by itself is a pretty good price for organic gingelly oil, but the thought of the price going up another 20% discouraged us from buying it. I think if they had fixed delivery charges of Rs.50 to Rs.100, depending on the distance of the house from their place, it would surely encourage people to add more items to their cart.

Overall though, I was very happy with the transaction and very much intend to continue ordering from them on a regular basis. All this time I had not made the change to organic simple because I didn't have an organic store close enough to me to walk to but now with everything coming right to my door, I have no excuses.

I recommend Pristine-Nature to everyone in Bengaluru who is looking to switch to a partial or full organic diet.

***

Now lets come to my lunch...

There is nothing more inspiring to a cook than a fresh batch of produce spread out on the kitchen counter. Greens, herbs, vegetables... my mind was whirring on high speed with all kinds of ideas! Do I make quinoa tabbouleh with the fresh mint, coriander and country tomatoes or do I make capsicum stuffed with rice and beans with a pasta salad on the side? Or better yet, a hummus and pita bread sandwich stuffed with loads of cruncy, munchy lettuce?

I finally settled on making a simple lettuce salad with red rice on the side. That would meet my objective of making a large portion of our meal raw and yet have a cooked dish in the mix to make it more filling.

Organic Lettuce Tomato Pecan Salad with Mint Red Rice

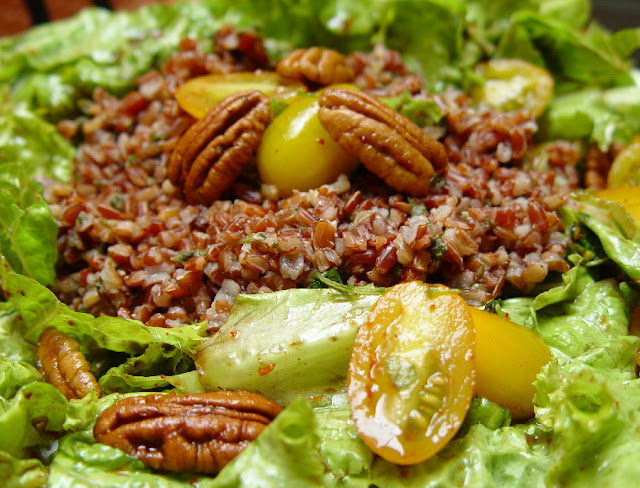
For the Lettuce Tomato Pecan Salad with Balsamic Sambar Powder Dressing:

Lightly Shredded Organic Lettuce
Halved Organic Yellow Cherry Tomatoes
Pecan Halves
Splash of Tamari
Splash of Balsamic Vinegar
Sprinkle of Sambar Powder

Mix the lettuce, tomatoes and pecans together and keep aside. Just before serving, add the remaining ingredients, toss well and serve.

Note: If you mix the dressing ingredients to the salad in advance then the lettuce will lose its texture and taste lousy.

For the Pudina Red Rice:

1 C Organic Red Rice
2 C Organic Pudina (Spearmint Leaves)
2 Spicy Green Chillies
Allspice Powder
Salt
Lemon Juice
Nutritional Yeast
Freshly Crushed Pepper
Small Splash of Agave

Wash the red rice well. Bring 4 C of water to a rolling boil and add the rice. Reduce the flame to the lowest, cover and cook.

Meanwhile, chop the mint leaves and the green chillies and add them to the boiling rice along with the allspice powder. Cover and continue to cook for about 40 minutes. Check once after 30 minutes and add salt at this point. Cook till all the water is absorbed and the rice has split.

Turn off the flame and take the pot off the stove. Add the lemon juice, nutritional yeast, agave and mix well. Crush pepper on top.
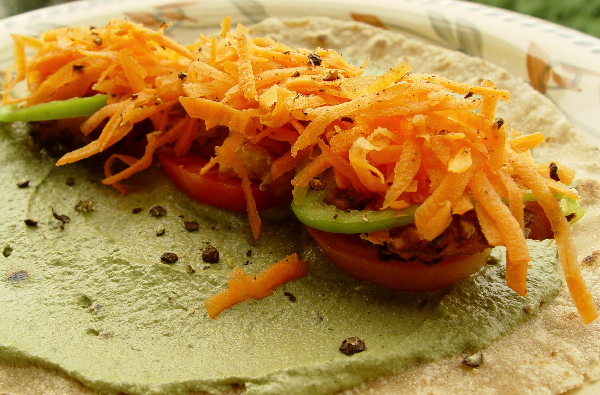
How to proceed:

In a plate, spread the salad all around the sides and leave a small space in the center. Place the rice in this space. Top with a few pieces of pecans and tomatoes. Enjoy! :)

This was a very satisfying, delicious and filling meal. The tomatoes were the best part. Bursting with flavor and so juicy! If you place a order with Pristine Nature Organics, be sure to get some of them.

Tuesday, June 28, 2011

Raw Vegan Mango Pistachio Ice Cream


This one is soooooo easy peasy to make! Doesn't look like it and definitely doesn't taste like it. It's so delicious that you'd think it took hours of labor. Well, I didn't even need to make the effort of pulling out the ice cream maker for it. :oP

When you start with just plain fruits you can get a sorbet out of it. Well sorbets are light and slightly icy and can be nice sometimes, but they are just not ice creams! However, by adding a nut into the mix, you can achieve the kind of rich, creamy texture that all ice creams should have.

The beauty of this raw ice cream is that it has only healthy ingredients and you can eat as many scoops as you like without guilt (unless you're allergic to nuts).


Raw Vegan Mango Pistachio Ice Cream


3 very ripe mangoes (I used large Alphonsos)
1/4 cup plain, raw pistachios (without the shells) + 1-2 tsp (chopped/sliced)
Raw agave nectar to taste

Peel, cube and chill the mangoes in the fridge for a day.
Soak the 1/4 C pistas in filtered water for 5-6 hours.
Drain the pistas completely and chuck the water away.
Place the pistas in a blender/grinder/food processor and grind well.
Add the mangoes and blend some more, until you get a creamy mixture (it'll have the color of avocado).
Squirt in a little bit of the raw agave nectar and blend again.
Taste, add more agave if you desire and blend more.
Transfer to a freezer safe container, add sliced pista and whip with hand whisk for a few minutes.
Freeze overnight.
Transfer to fridge and leave for about an hour to soften it. Serve with an ice cream scoop. Enjoy! :)

Note: You can refreeze it after you've had your fill and then leave it in the fridge again for a while before eating each time.

Thursday, June 23, 2011

My EtsyVeg team needs your vote.


So I might have mentioned to you before that I'm an active member of a few, really great street teams on Etsy. Amongst these, Team EtsyVeg is one of the kickass-est teams eva! My fellow teamies are group of vegans and vegetarians who are compassionate and fun-loving. Not to mention highly talented! When you do a search on Etsy.com using the keywords EtsyVeg Team, you'll be totally blown away by the many fabulous offerings.

We are an incredibly active group with many enthusiastic members who are willing to jump at an opportunity to get involved in team events. It is for one such event that I'm asking for YOUR help. Handmadeology.com is running an Etsy Top 10 Teams challenge and Team EtsyVeg is participating.

Members submit items to be rated on a scale of 1 to 10 and each day people can stop by and rate the creations. The team with the largest number of rated items and the highest ratings wins!

So please take a few moments to drop by our EtsyVeg list, admire the many items and rate the listings. You can rate one item or multiple items. Of course, if you rate ALL the items on out EtsyVeg list, we'd be very, very grateful. :)

Wednesday, May 18, 2011

Vegan Pineapple Pastry


Since my very vanilla cake recipe was such a hit, I thought I'd share the pineapple pastry recipe too. When we say 'pastry' here in India, we refer to a form of extra succulent cake. The main way this decadence is obtained is by dousing the cake with flavored sugar syrup to add moistness. Another thing that makes a pastry what it is, is the inclusion of fresh or canned fruits to enhance the richness of the flavors and textures.

Vegan Pineapple Pastry

1 Basic Yellow Cake made by replacing the pure vanilla extract with 1/2 t of pineapple essence
1 small can of Pineapple Slices in Syrup
Vegan Whipped Cream like Rich's Non-Dairy Whip Topping or Merry Whip

After the cake has cooled completely, slice it horizontally to form two layers.
Place one layer of cake in a large container and pierce randomly with a fork.
Pour half the syrup from the pineapple can over this layer of cake.
Cover with a thin layer of vegan whipped cream.
Spread most of the pineapple pieces over this saving some for the final topping.
Cover with the second layer of cake and pierce it randomly with a fork.
Pour the remaining syrup evenly over this.
Spread vegan whipped cream over the top and sides of the cake and cover it completely.
Place the remaining pineapple slices on top of the cake in an aesthetically appealing way.

Cover the container and place the pineapple pastry in the fridge. Let it sit for at least a day to soak up the syrup and some of the whipped cream. Serve cold and enjoy! :)

Will last for a minimum of one week when stored in a tightly closed container inside the fridge.

Vegan Pineapple Pastry

Note: Pastries and cakes taste more delicious as the days go by. Especially chocolate flavored ones. I personally prefer them most two days after they've been made.

Wednesday, May 11, 2011

Vegan Very Vanilla Cake


Basic Vanilla Cake:

1 3/4 C all purpose flour
2 t arrowroot powder (optional)
1 t baking powder
1 t baking soda
1/4 C brown sugar
3/4 C white sugar
3 t pure vanilla extract
1 t vinegar or lemon juice
5 T oil (canola or sunflower)
1 C cold water

Preheat oven to 180C/350F.

Lightly oil a 9 inch baking pan and keep it aside.

In a large mixing bowl, sieve together the flour, arrowroot powder, baking powder and baking soda about 6-7 times (the more number of times you sieve, the fluffier the cake will be).

Mix the remaining ingredients separately and beat well to dissolve the sugar to some extent.

Pour the wet ingredients over the dry ingredients and whisk together with a few quick strokes just until no lumps remain (too much mixing is not advisable). Pour the cake batter into the baking pan and immediately pop into the preheated oven.

Bake for about 35 minutes. Test by inserting a toothpick into the center of the cake and see if it comes out clean. If so, the cake is done. If not, then bake for a few more minutes.

Remove the pan from the oven and keep it aside. Let the cake cool completely before you remove it from the pan.

This cake is delicious eaten as it is but it can also be enjoyed layered with vegan whipped cream.

Vegan Very Vanilla Cake

Vanilla Cream Cake:

Prepare vegan whip topping by carefully following the directions on the package. Rich's is the most well known brand of non-dairy whip topping in India. I also like to use the Merry Whip brand which is available at the Institute of Baking, Bangalore (these guys also carry another non-dairy brand called Gold Top but stay away from that one because it tastes too artificial essence-y!)

Slice the cooled cake horizontally to form two layers. On a large plate, place the bottom layer. Cover it with some of the whipped cream. Place the top layer over this and cover the whole cake with whipped cream with the help of a spatula.

Chill in the fridge for a couple of hours before serving.

The cake is best stored in a closed container in the fridge. It will last at least a week IF it hasn't been finished well before that. :)

Tuesday, May 03, 2011

Pecan Pesto Cabbage Patty Wraps


It's always fun to walk into the kitchen clueless as to what I'm going to cook for dinner, just grab a few ingredients and then invent a dish as I go along. As I've mentioned before, I'm a huge fan of stuffed/wrapped meals. Multiple layers and textures are a great way to make any dish interesting.

It all started with a cabbage. I first thought I'd be making stuffed cabbage rolls but because it was raining, I had a hankering for deep fried goodies. So I decided to make cabbage patties and then make them healthier (I say 'ier' because deep fried or not, veggies are healthy to begin with) by turning them into whole wheat wraps with raw veggies and a nice pesto.

Pecan Pesto Cabbage Patty Wraps

Pecan Pesto Cabbage Patty Wraps

For the Cabbage Patties:

1 Small Cabbage chopped finely
1 Large Onion chopped finely
1/4 c Rice Flour
1/2 c Besan Flour (aka Gram Flour)
1 t Red Chilli Powder
1/2 t Cumin Powder
1 1/2 t Coriander Powder
Salt to taste
Pinch of Baking Soda
Sesame Oil for deep frying (Canola or Sunflower Oils are fine too)

Heat the oil in a wide pan or wok.

Place the rest of the ingredients together in a large bowl. Add a little bit of water and mix to form into a rough ball of dough. It should hold its shape (add a little more fried gram flour if required) Pinch off little bits, form them into balls and flatten them into a patty shape.

Deep fry them, a couple at a time, on medium flame until golden brown and keep aside on a plate layered with tissue paper so any oil can get absorbed.

For the Pesto:

Spinach
Baby Mustard Greens (I grow them at home in a little pot and pick them while they're tender)
Cilantro
Pecans
Salt
Green chillies
Nutritional Yeast (optional)
Extra Virgin Olive Oil

Blend everything, except for the olive oil, together into a smooth paste using a little bit of filtered water. After it's smooth, keep the blender running and drizzle in the olive oil so it gets incorporated well. Transfer to an airtight container and keep aside.

This pesto will keep well in the fridge for at least a week when stored properly.

Other ingredients:

Whole Wheat Chapathies (any other thin flat breads like Pita or Tortillas would work too)
Tomatoes sliced into rounds
Capsicums (Green Bell Peppers) sliced into strips
Carrots grated
Black Pepper freshly crushed

How to proceed:

Place a chapathi on a flat surface and spread the pesto on it evenly in a thin layer. In the center, place three slices of tomatoes in a vertical line. Place the cabbage patties on the tomato slices. Top with green bell pepper strips and grated carrot. Crush pepper over everything and roll up the chapati snugly to form a wrap.

Bite into it and enjoy the burst of flavors in your mouth. :)

Pecan Pesto Cabbage Patty Wraps

Friday, April 29, 2011

Vegan Whole Wheat Cinnabuns


Last year I had the pleasure of tasting a gourmet cinnamon roll at Cinnaholic and I was absolutely blown away by it! Ever since then I've been craving a cinnabun as perfect in taste and texture as that particular roll. Now if it were up to me, every time I craved a cinnabun, I'd just teleport right on over to Cinnaholic and stuff my face to my heart's content. Heck, I'd even be happy to be their employee just so I could be constantly enveloped in the smell of cinnamon rolls baking. And that says a lot because if you know me, you'd know I'm not into 'work'. But let's face it, it's going to be at least another year before I perfect my teleportation powers and Berkley is too far away from Bangalore to risk it. Imagine if I apparate in some remote island in the middle of the Indian Ocean where no one's heard of cinnamon rolls?? *shudders*

So my only option has been to bake and bake with the aim to arrive at the recipe for an amazing cinnabun. Something to keep my happy until the next time I'm able to experience a heavenly Cinnaholic cinnamon roll once more.

I first took a non vegan clover leaf rolls recipe and then tweaked it and tweaked it some more to not only veganize it and make it healthy with whole wheat in the mix but to also get the perfect, fluffy texture. Then when those rolls turned out great, I finally decided to take the leap and adapt that recipe into one for cinnabuns. And FINALLY, these delicious Vegan Whole Wheat Cinnabuns came into being. :)

Vegan Whole Wheat Cinnabuns

Baking bread takes a bit of effort and a LOT of patience. But both these things pay off ten fold when your house is filled by the smell of bread baking and your mouth delighted with the amazing taste of artisan bread which you had the satisfaction of making with your own two hands.

So plan in advance, assign a day to make an event out of it and enjoy the process!

Vegan Whole Wheat Cinnabuns

1 1/4 C soymilk
1/2 C agave nectar or maple syrup or sugar syrup
4 T olive oil
2 t active dry yeast
1/4 t sugar
1 1/2 T raw flax seed powder
1 t salt
1 C All Purpose Flour
3-4 C Whole Wheat Flour
1/4 C or more Cinnamon powder

Heat the soymilk until lukewarm (test the temperature with your knuckle). Pour into a large mixing bowl and whisk in the agave nectar, oil and yeast. Sprinkle the sugar on top. Leave for 15 minutes for the yeast to dissolve. It should be all bubbly and frothy by the end of this time.

Add the salt, 2 T of the cinnamon powder and flax seed powder and beat a little. Slowly whisk in the 1 C all purpose flour and 2 1/2 cups of the whole wheat flour a little at a time while continuing to beat it as much as possible. Once the dough gets too thick to beat, add just a little more flour and mix with your palms to obtain a rough dough.

Form this dough into a ball and transfer it onto a flat, floured surface (I use my cleaned granite counter top). Knead well for about 10 mins at least (add a little more whole wheat flour while kneading if the dough is sticky but make sure it doesn't get too dry) until it reaches a smooth, elastic consistency.

An effective way to knead is to press the dough away from you with the base of your palms, then fold the dough over towards you and then it press again.

Form the kneaded dough into a ball. Grease the mixing bowl with a little bit of oil. Place the dough ball into the bowl and twirl it around until it's coated with the oil. Cover with a clean plastic grocery bag and let it sit in a sunny spot for about 2 hours. It should rise and double in volume by the end of this time.

Punch down the dough and give it a quick knead for a few seconds. Roll it out into a large rectangle about 1 centimeter (a little less than 1/2 inch) thick and place it with the long side towards you. Lightly coat this rectangle with a very thin layer of agave nectar and sprinkle generously with cinnamon powder. starting from your side, gently roll up the dough to form a long, log shape. Cut this log into 1 inch slices and place them on a baking sheet covered with parchment paper about 1 inch apart. Cover again with the plastic bag and let them sit for 1 1/2 hours to double in volume.

Preheat the oven to 180C/350F. Bake the rolls for about 35 minutes. Enjoy the smell of cinnabuns wafting through your home.

Cool slightly on the baking sheet. Transfer to a cooling rack. Serve warm and be transported to another dimension.

Vegan Whole Wheat Cinnabuns