Friday, March 03, 2023

Tofu Neat Balls


Vegan food is a cuisine in its own right!

Yes, it’s absolutely possible to make all kinds of vegan alternatives that perfectly mimic their animal versions. More power to the awesome brands proving this each day.

But the beauty of vegan cuisine is that you don’t *have* to mimic a damn thing if you don’t want to! ๐Ÿ˜ƒ

You can just make completely new plant based food that’s unlike anything else. Simple mindset shift. Huge game changer.๐Ÿคฏ

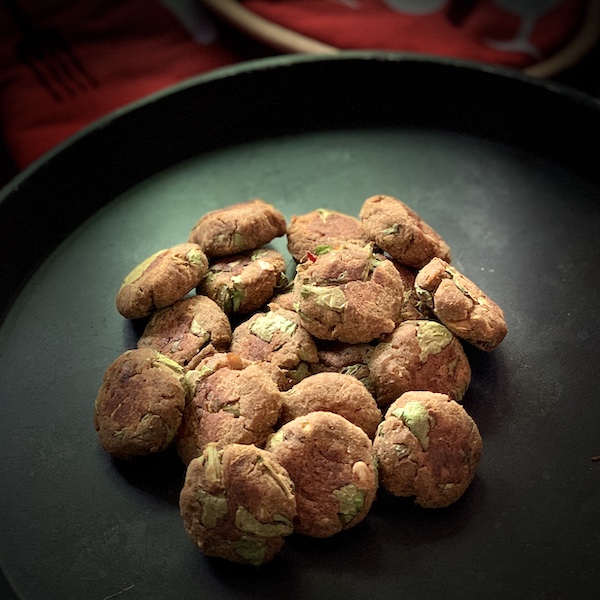
I didn’t develop the recipe for these Tofu Neat Balls with any intention to make them taste like meatballs. ✨๐ŸŒฑ They shine with their unique texture and flavours without trying to be anything but themselves. (I don’t need to spell out the life lesson metaphor in there for you, do I? ๐Ÿ˜œ)

Here’s how I made them. Use the recipe as a starting point and modify it to suit your tastebuds and ingredient availability.


Bowl of spaghetti, half peasto, half aglio olio, and vegan tofu neat balls in front. Tofu balls on a baking tray at the back.
 

Tofu Neat Balls

Main ingredients:
3 blocks tofu – gently pressed to squeeze out as much water as possible and then mashed
3 T chickpea flour
2 T oats
1 tsp arrowroot powder
1 tsp psyllium husk

Flavouring ingredients:
tomato paste
tamarind paste
garlic paste
nutritional yeast
dried orange peel powder
chilli flakes
dry herbs
salt

  • ☄️Mix everything together 
  • ☄️Taste and adjust the flavours 
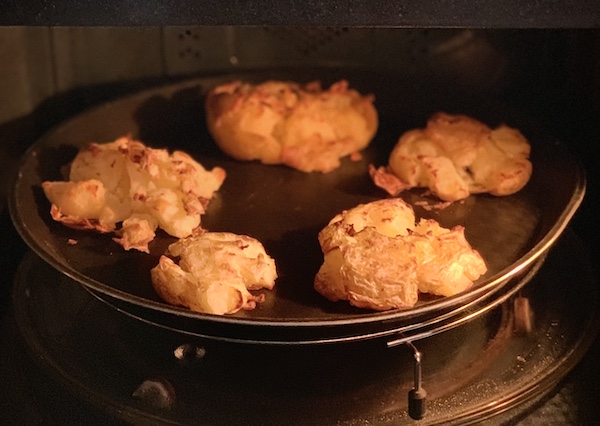
  • ☄️Shape into balls and place on a baking tray 
  • ☄️Bake in an oven at 200°C (400°F) for 20-25 mins until they’ve firmed up a bit 
  • ☄️Gently flip them over 
  • ☄️Grill for 10 mins

Close up image of green pesto spaghetti with vegan tofu neat balls.

 Notes:
๐Ÿ“ These balls are on the softer side. They’ll break if you mix them with the spaghetti ๐Ÿ , so serve them on top.
๐Ÿ“ They make a yummy snack by themselves, dipped in hot sauce and enjoyed.
๐Ÿ“ Here's a different version of the Spaghetti and Neat Balls (a recipe post from over a decade ago inspired by my friend Karol).

Wednesday, January 04, 2023

Marinaded Baked Tofu and Beetroot Salad Bowl


A quickie post today. No backstory for you. hehe It's so yummy, I had to share! The recipe isn't written out, it's on video. But here's a handy ingredients list:

Marinade Sauce

  • Dried Orange Peel Powder
  • Freshly Crushed Black Pepper
  • Bhut Jholokia Hot Sauce
  • Tamari Soy Sauce
  • Nutritional Yeast Flakes
  • Condensed Almond Mylk (from Jus’Amazin)
  • Soy Curds (from Carrots)

Main Ingredients

  • Tofu Cubes
  • Beetroot Slices
  • Cherry Tomatoes
  • Watercress
  • Green Lettuce
  • Salt
  • Pepper
  • Lemon Juice

 Video


Enjoy! :)


Monday, June 27, 2022

Best way to Bake Potatoes ever!


Step aside potato wedges, shove off hasselbacks, we have a new baked potato dish in town, and it is daaaamn yummy.


Golden baked, gently crushed potatoes in an oven tray still in the oven.


Last week, my friend Smitha Hemadri shared her method for steamed and baked potatoes. ๐Ÿ˜ฑ The moment I saw it I knew I HAD to make it RIGHT AWAY!

The simplicity of this recipe just blows my mind. It has literally ONE ingredient – Potatoes.

  • Scrub and clean potatoes very well, and remove the eyes
  • DO NOT peel them (you’ll see how the skin turns out to be the *tastiest* part by the end)
  • Pierce all over with a clean needle or toothpick (but be careful that the toothpick doesn’t break off into the potato ๐Ÿ˜‚)
  • Steam the potatoes whole for 20-30 mins, depending on the size
  • Preheat oven to 250C (450F)
  • Line the steamed potatoes on a baking tray and then, this is the most important bit, gently press down on each one using something flat and heavy (I used a rock). They should get crushed lightly and open up, but not mashed completely. If they fall apart a bit, it’s okay (the larger potatoes do this), very gently squish the bits together into one crumbled mass.
  • Bake for 30 minutes
  • Serve hot


That’s it! No salt, no oil, no garlic, no herbs. Nothing else required.


If you like, you can drizzle a little hot sauce over it and serve (Bhut Jholokia FTW ๐Ÿ”ฅ), but you won’t believe how freaking scrumptious it tastes just on its own.


The gentle crushing is the KEY here. It creates multiple textures while baking. Soft in some parts, crispy and crunchy in some. Like seriously, I can’t even explain it in words. You have to try it to get what I mean.


Oh and as a chef, you might get very tempted to add things into the crevices before baking – crushed garlic, vegan butter, olive oil, salt, herbs, pepper, nooch... I really wanted to! But resist the temptation. Just make these potatoes plain, at least the first time.


You need to experience the pure potato flavours and textures in all their glory. ๐Ÿ˜ƒ


If you try this, let me know how you like it. Also, Smitha is the queen of highly creative, super healthy recipes. Check out more of her Insta posts if you’re into eating clean.

Friday, May 27, 2022

Vegan Hobnobs Style Biscuits


My first attempt at homemade Hobnobs. They turned out reaaaaally yummy and crunchy, though not exactly like the packaged ones.

I did quite a bit of research online to find a recipe to work off of. Among them all, the one from Wendy Finn was the most appealing to me because she's simplified it beautifully.

I modified that recipe considerably to incorporate ingredients that are more accessible in India. I also switched the measurements from weight to volume because I know a lot of casual bakers here don't own food weighing equipment. And of course, in my usual lazy style, I had to make it even easier to make and clean up after. Haha

Commercial Hobnobs are often vegan too, but these are slightly healthier. Only because they don’t contain unpronounceable/numbered/chemically ingredients. There’s plenty of sugar and oil in there though. ๐Ÿ˜›

Vegan homemade hobnobs biscuits lined up on a wire rack. Oven mitt in the background.


I fully intend to develop a much healthier version of these biscuits at some point. But for now, here’s the recipe if you’d like to try your hand at them.

Dry Ingredients

1 C Rolled Oats (I used the gluten free rolled oats from Jus'Amazin*)
1/2 C Whole Wheat Flour (use the slightly rough kind)
1/2 C Maida
Little more than 1/2 C Powdered Sugar (brown and white mixed)
1 tsp Baking Soda
1/4 tsp Salt

Wet Ingredients

Little more than 1/2 C Coconut Oil
1 T Maple Syrup
1 T Plant Based Mylk (a little more if needed)


Preheat oven to 180C/350F

  • Whisk together dry ingredients 
  • Add coconut oil and rub it in until the mixture is crumbly
  • Mix in the maple syrup and mylk and form into a soft dough 
  • Shape into balls, lightly flatten and place in a baking tray 
  • Leave a decent amount of gap because these babies expand big time 
  • Bake for 15-18 mins until golden 
  • Cool completely and enjoy {crunch} ๐Ÿ˜


*Use my code “VEGANOSAURUS10” during checkout on Jus’Amazin if you plan to order the rolled oats from them. They have many other absolutely delicious products too. When you use my code, you get 10% off on every order you place. This is above the already discounted prices on the website. And they offer free pan India shipping.

Affiliations Disclosure Page

Thursday, March 03, 2022

Bite Sized Okara Patties – What's Okara, and how to use it?


"What do you do with your Okara?"
“Wait, did you mean Okra?”
“No, no. I meant Okara only.”
“What’s that now?” ๐Ÿคจ

When you make plant mylks, some of them need straining right? The leftover paste is Okara. It refers to soy pulp, but the term can loosely be used for other mylk pulps too.

When I make peanut curds, I don’t strain the mylk. I feel the pulp gives the curd a more thick and creamy texture. Plus the fibre is a good prebiotic. (Also I’m too lazy to strain it).

But the designated peanut curd maker in our house is way too particular about the texture. He claims that the pulp makes the curd pasty and insists on straining the mylk every single time. ๐Ÿ™„ And since peanut curd is made at home at least once a month (curd rice is a staple at our monthly Bengaluru Vegans Potluck), there's a constant supply of Okara at home.

A bit of the pulp can be mixed into chapathi/bread dough, gravies, sambar, etc. But there’s always more pulp than can be used this way. So more often than not, it sits in the fridge getting old and then we have to compost it.

Dry and tasteless as it is, Okara's still full of healthy fibre and easily digestible proteins. I always feel guilty about wasting it.

In my pursuit of using it up creatively, I made Okara Choco Chip Cookies last year. The recipe was a combination of this one from The Okara Project, and my signature Chocolate Chip/Chunk Cookies. They were daaaammmmmnnn yum! ๐Ÿคค

But my tummy flab quavers in dread at the thought of cookies appearing every time we have Okara at home. ๐Ÿ˜‚

So lately I’ve been making savoury snacks with it instead – patties, cutlets, neat balls…

You mix a bunch of stuff into the paste, shape and bake. Once you get the hang of it, it’s quite flexible to experiment with.

The three key things to keep in mind are – textures, flavours and binding.

๐ŸŒบ Since Okara is bland (all the tasty stuff goes into the mylk), it needs super strong flavouring. Be verrrry generous with the spices and seasonings you put in!

๐ŸŒบ Good binders are important to counter the moisture. I’ve tried random combinations of corn starch, arrowroot powder, psyllium husk, flaxseed powder, Banamin's gota/vada mix*, etc.

๐ŸŒบ The Okara by itself doesn’t have an enjoyable mouthfeel, so mix in some crunchy/chewy ingredients for texture. I’ve done chopped mushrooms, seeds/nuts, crumbled tofu, leafy greens…

Then it’s just a matter of shaping and baking. I usually do 200-220°C for 15 mins, gently flip them and then bake for another 15 mins. The temperature and baking time depends on the size of the patties/balls, and how wet your mixture is. So adjust accordingly.

Here's a recipe for you. Use it as a guideline and do your own thing. There's plenty of potential for variety. :)


Dark background, black tray with small, bite sized patties on it.

Monday, February 07, 2022

Creamy Broccoli Hazelnut Soup


Angled view of striped blue and white bowl with creamy broccoli hazelnut soup in it. It's on a wooden cutting board placed on a granite kitchen counter top. Reflection of the bowl on the counter top at the bottom of the photograph.


Have you ever tried soup with boondi sprinkled on it? Here's how that stroke of genius came about today...

I'd finished licking up my big serving of soup and was congratulating myself on a particularly healthy, nutritious lunch. ☺️ Soooo much broccoli in my tummy!

I rinsed the bowl and was just about to walk out of the kitchen, when I spied the khara boondi pack on the counter looking at me with its smug little face. ๐Ÿ˜

Its voice in my head sounded like a bunch of tiny squeaky imps in chorus, "healthy lunch, you say? Muhuhahaha." ๐Ÿ˜ˆ

I'd like to claim that my willpower was strong, but traitor that it is, it went, "the lunch was healthy, so what harm could a bit of boondi do, really?"

I succumbed. ๐Ÿคท๐Ÿป‍♀️

As I was guiltily munching on the boondi, I was struck by a thought... "boondi on soup". Wait, what?! I had to try it right away.


Spoonful of hazelnut broccoli soup held up to the camera with boondi sprinkled on it. Silly imp faces digitally drawn on to the boondis.

I was too full, so I only tasted a spoonful of soup with some boondi sprinkled on. What an awesome combination it was! The creaminess and crunch complimented each other perfectly.

Soup's a rare event in our house. I don't know why, because it's such a healthy, deeply satisfying meal. But I have a feeling that the next time I buy boondi (which is also rare), I'm totally going to be making soup to have with it.

Aha! Take that evil boondi! You're only going to inspire more healthy choices in me.๐Ÿ˜›

Anyway, on to the recipe. As always, feel free to switch flavours around to suit your tastebuds and ingredient availability.

Creamy vegan soup being ladled into a bowl. Top view, close up.

Creamy Broccoli Hazelnut Soup


To blend:
500 gms Broccoli (florets and stems)
3 T Hazelnuts
1 T Nutritional Yeast (optional)
3 small cloves of Garlic
1/4 tsp Jaggery
Salt (I used a mix of regular and pink)
Water

To stir in later:
Freshly crushed Black Pepper
Dried Orange Peel Powder
Lemon Juice

  • Steam the broccoli for 20-25 mins and allow to cool slightly
  • Grind hazelnuts, nooch, garlic, and salt into a powder*
  • Add the steamed broccoli and a bit of water and blend into a creamy paste
  • Pour in more water as required and blend into desired thickness of soup
  • Transfer to a vessel, crush pepper on top and sprinkle dried orange peel powder
  • Warm up the soup for a few minutes on medium heat while stirring
  • Take it off the heat and stir lemon juice into it
  • Serve warm (possibly with boondi sprinkled on top hehe) and enjoy! :)


*This powder makes for a damn yum Parmesan alternative!

Note: All khara boondis are not created equal. The one I had today happened to be from Adukale (very tasty), but Maiyas and MTR boondis are super delicious too. Only thing, make sure to check the ingredients every single time! Stupid ghee gets added to boondi sometimes. Grr. ๐Ÿ˜ก

Thursday, January 20, 2022

Gluten Free Banana Flour Chocolate Hazelnut Cake


generally don’t venture too much into gluten free baking. My fortรฉ is vegan baking, and I tend to stick to it.

But recently I scored some highly nutritious allergy friendly flours from Banamin Health Care and I wanted to see if I could come up with a completely GF cake with the Green Banana Flour. I was totally surprised by the results!

 
The texture is on the crumbly side and also more fudgy than cakey. But overall a very yummy thing.


GF Banana Flour Chocolate Hazelnut Cake

Dry Ingredients:

1 C Banamin Green Banana Flour

3 Tbsp Cocoa Powder

1/2 tsp Baking Sada

1/2 tsp Baking Powder

1 tsp Arrowroot Powder

1/2 tsp Salt


Wet Ingredients:

1 Cup Brown Sugar

2 Tbsp Jus’Amazin Crunchy Hazelnut Spread

2 Tbsp Coconut Oil

1 Tbsp Apple Cider Vinegar

1/4 tsp Pure Vanilla Extract

1 tsp Psyllium Husk

1 C Warm Water


  • Whisk together wet ingredients & allow to cool completely in fridge
  • Preheat oven to 180 c/350 F
  • Lightly grease a cake pan and line it with baking paper
  • Mix together dry ingredients
  • Quickly mix wet & dry mixtures (don’t overmix)
  • Pour into cake pan
  • Bake for 35 mins and test with a toothpick for doneness (bake for 5-10 mins longer if required)
  • First cool the cake in the pan for 15 mins, then gently transfer to a wire rack along with the paper and cool completely before slicing


For the Icing:


  • Whisk Jus’Amazin Crunchy Hazelnut Spread in a few spoons of Warm Water 
  • Pour over the cake 
  • Optionally layer with Strawberry Compote (made by cooking down chopped strawberries with sugar)


If you'd like some sweet discounts:


Use my referral* code "VEGANOSAURUS10" on Jus'Amazin or Banamin websites to get 10% off on all your orders, every time.


Jus'Amazin has free pan India shipping on all orders.

* I receive an affiliate commission when you use my code at no additional cost to you. Read my disclosure page for more details.

Monday, August 02, 2021

Chocolate Brown Rice Roasted Almond Mylk


Slightly angled top view, close up of chocolate brown rice almond mylk with ice

“Good lord! This tastes freaking delicious!!!” I said, as I slurped the smooth, light liquid delightedly. ๐Ÿฅ›๐Ÿคค


It was the first time I tasted rice mylk. I’d purchased it at a grocery store in the US. 


Initially I’d been skeptical to pick it up because the tetra packed almond mylk from the same brand had been an overwhelming disappointment.


But my curiosity won, and here I was, sipping on this incredibly soothing, vanilla flavoured beverage.


After that, I glugged down tumblers and tumblers of rice mylk on a daily basis while I could get my hands on it.


As soon as I got back to Bangalore, I wanted to try making it at home.


I did some research, cooked white rice, and blended it with water.


❗️What emerged was a thick, starchy, undrinkable mess! ๐Ÿ˜‚๐Ÿคฃ


It was nothing like the heavenly tetra packed goodness I’d fallen in love with. But I don’t give up easily. Certainly not after the first try.


It took a couple more experiments, but eventually I zeroed in on the perfect home made rice mylk recipe. ๐Ÿ‘๐Ÿฝ


๐Ÿš Use a variety of rice that doesn’t have all its fibre polished off – brown or red (Rajmudi) work great

๐Ÿ’ฆ Contrary to what you’d expect, the volume of water has to be higher in rice mylk than in nut mylks (like 1/2 C cooked rice to approximately 1 L water)


That’s it. That’s the big secret. ๐Ÿ˜‚


Blend well. Strain. Get ready to *glug glug slurp*.


Some bonus tips:


๐Ÿ“ Cook the rice very well, and cool it completely before blending.

๐Ÿ“ You can add any sweetener (dates, jaggery, maple syrup) and flavour (pure vanilla extract, cocoa powder, cinnamon) while blending and then strain the mylk.

๐Ÿ“ If you have a high powered blender, you might not have much stuff left to strain. But strain it anyway. This mylk is best enjoyed smooth and light!


If you enjoy these hacks that go beyond just recipes, join one of my Demystifying Vegan Cooking small group training sessions.


Rice mylk is very enjoyable when you drink it by itself (lightly sweetened if you like). But it also works well in:


๐ŸŒผ Cereal

๐ŸŒผ Payasam/Pudding

๐ŸŒผ Smoothie

๐ŸŒผ Fermented into Spicy Buttermylk

๐ŸŒผ In baking Cookies, Cakes and Bread

๐ŸŒผ Light, cold beverages


Chocolate Brown Rice Roasted Almond Mylk

2 T Well Cooked Brown Rice

3-4 Roasted Almonds

3 tsp Cocoa Powder

Date Syrup to taste (alternatives: Jaggery, Maple Syrup)

Dash of Pure Vanilla Extract (skip if you don’t have pure extract)

Pinch of Salt

2 Cups of Water


  • Add all ingredients (except water) into a blender jar
  • Pour in a little water and blend into a creamy paste
  • Add the rest of the water and blend until smooth
  • You could optionally strain this
  • Pour over ice and enjoy your refreshing beverage! ☺️


Tuesday, July 13, 2021

Beet Avocado Wasabi Salad


Close up of Avocado Steamed Beetroot Wasabi Salad in a stoneware bowl. Chapathi and Cutlets blurred in the background in the same bowl.

 ๐Ÿฅ‘ I wanted to make guacamole today to have with chapathi. But when I halved the avocado, it was so firm, I just didn’t have the heart to mash it!

So I peeled and cubed it, and stared at it lovingly, waiting for inspiration to flow.


The image of a fabulous salad rose up in my mind. It would be slightly on the sweet side, and carry a complex flavour profile that was worthy of this perfect avocado.


I didn’t know what flavours yet, but I knew without a doubt that steamed beetroot had to be in there! ๐Ÿ˜„


So I scrubbed, cubed and put the beets for steaming. They were organic, so I didn’t even need to peel them.


Then the dressing ingredients dropped into my head. Tak. Tak. Tak.


Balsamic Vinegar

Wasabi

Miso Paste


Oh my! ๐Ÿคค♥️


I carefully mixed them with the avocados. And as soon as the beets were nice and soft, I put them in and quickly tossed everything together one last time.


The avos held their shape well for the most part. Some of the edges got mashed, but that worked out well, adding a creamy coating to the beets.


I tasted it.


๐Ÿ˜ฒ๐Ÿคค


It was everything I imagined it would be.


So of course I had to tell you all about it! ๐Ÿ˜„ Try it.


Here are the approximate ingredient quantities:

1 medium sized Avocado

2 small Beets

1 heaping tsp Miso Paste

1/2 tsp Wasabi

2 tsp Balsamic Vinegar


Notes:

๐Ÿ“ Instead of Miso, you can use some Soy Sauce if you like.

๐Ÿ“ And Balsamic Vinegar can be replaced with a combination of Apple Cider Vinegar and a bit of Jaggery/Date Syrup.

๐Ÿ“  But there’s absolutely nothing that can replace the nose watering goodness of Wasabi!

Friday, June 18, 2021

Vegan GiNNada KaDubu (Jun KuDumulu)


Close up of a sweet called GiNNa in Kannada. This is the vegan, cruelty-free version. Rectangular slice, brown in colour, jelly texture. In an off white bowl and a bit of steel spoon showing.

 ๐Ÿฎ GiNNa เฒ—ಿเฒฃ್เฒฃ is a dessert traditionally made out of Jaggery and Colostrum. Let me describe these exotic ingredients to you...

Freshly extracted sugarcane juice is boiled for a long time in large, heated vats. It gets caramelised into a delicious sweetener. That’s Jaggery. ๐Ÿคค

A female is pregnant for a long time. Soon after she gives birth, an antibody rich secretion comes out of her mammary glands to feed her baby. That’s Colostrum. ๐Ÿ˜ณ

Now imagine what kind of a sick, twisted mind decided to put the two together and invent dessert.

Someone sees a cow give birth and says, “hey, let me push that wee baby calf aside, squeeze the very first milk out of his mother’s udders, and cook it with Jaggery.”

And then it just becomes a special, gourmet recipe, passed on from generation to generation.

It’s bloody scary how easy it is for us humans to commodify and normalise the use of things which we have absolutely no business taking! ๐Ÿคฏ๐Ÿ˜จ

Sadly, as a kid, GiNNa was one of my favourite desserts.

Usually I’m not the kind of vegan who feels guilty about my past food choices. What’s done is done. I’m just grateful I make better choices now.

But GiNNa is the one dessert from my past that breaks my heart. ๐Ÿ’”๐Ÿ˜ข

I can’t believe how casually my tastebuds could enjoy something that an innocent new born should’ve been eating. ๐Ÿฎ๐Ÿ„๐Ÿ‘ฉ๐Ÿฝ‍๐Ÿผ

If you still like GiNNa, you don’t have to wait for a cow to give birth and steal her baby’s first food.

Instead, make this Vegan GiNNa anytime you crave it!

Close up of a caramel brown, jelly like dessert being help up with a steel spoon. More dessert in the background. A vegan version of GiNNa (in Kannada), also known as Junnu (in Telegu).
 

1 1/2 L Soy Mylk
15 g Agar Agar Sheet – cut into small strips
1 1/2 C Jaggery

๐ŸŒปRinse the agar agar strips
๐ŸŒนAdd to soy mylk and bring to boil
๐ŸŒปReduce heat to low and keep cooking, stirring periodically, until the agar dissolves completely (takes 20-30 mins)
๐ŸŒนGently stir in the Jaggery and simmer on low heat for a couple of minutes until it dissolves (don’t let the mylk boil!)
๐ŸŒปTurn off heat and transfer to a tray or individual cups
๐ŸŒนAllow to cool, then let it sit in the fridge for at least 2 hours
๐ŸŒปEnjoy cold!

๐Ÿ“ Other plant based mylks work, but fresh, homemade soy mylk gives the best texture
๐Ÿ“ You can use agar agar powder instead of sheets

Saturday, June 05, 2021

Hazelnut Miso Dressing


It’s magic. Every single time. And even now after so many years I’m awed at the infinite possibilities!

Take any nut or seed, add a few flavourful ingredients, grind with a little water, and you have the best damn salad dressing (or dip or sauce or spread or or or...) in a matter of minutes! Ta-da! ๐Ÿงš๐Ÿผ‍♀️๐Ÿ‘ฉ๐Ÿป‍๐Ÿณ

I always harp on about how going vegan up-levelled my cooking skills in incredible ways. But when it comes right down to it, what it basically did was give me freedom.

When I learnt to use familiar ingredients in new ways (like making mylk out of sesame seeds or creamy pasta sauce out of beans), my mind blew open. ๐Ÿคฏ It suddenly felt like I had permission to mix anything with anything and prepare it in whatever way I liked. No. More. Rules. ๐Ÿ˜€

I never have to wait around to have specific ingredients at home when I’m in the mood to cook. Something ran out of stock? No biggie. Just try putting this in there instead of that and see what happens. More often than not, what happens is deliciousness. ๐Ÿ˜‚

If I were limited to animal based butter, cheese, sour cream and such, I’d never have ventured into scrumptious plant powered magic like the dressing in this salad.

Close up of bowl of Salad with cucumbers, lettuce and cherry tomatoes. Tossed in creamy vegan hazelnut miso dressing.


๐ŸŒฐ Hazelnut Miso Dressing ๐Ÿฅ—


1/4 C Hazelnuts
1 T White Miso Paste
1/2 Soft Date
1 tsp Apple Cider Vinegar
1 small clove of Garlic
Few drops Bhut Jholokia Hot Sauce
Large Splash of Crisp Vinous Brew (from @viazeme )
Water
Nutritional Yeast
(optional for additional kick)


Grind into a thick, creamy paste, using water as required. Toss salad veggies in it and enjoy! (Works great as a spread/dip too).

The salad has English Cucumber, Cherry Tomato, Spoon Lettuce, and Chives. I also mixed in a generous amount of freshly crushed black pepper and a sprinkle of dried orange peel powder.


Please read my Disclosure Policy about affiliate links.null

Saturday, October 24, 2015

Raw Fettuccine in Almond Bell Pepper Sauce


When it comes to making raw main courses, my go-to dish is zucchini fettuccine in a creamy cashew and basil sauce. It's a hugely popular dish among our raw food guests at Carrots and pretty much anyone who's tasted it.

People who're new to this kind of cuisine barely believe it's vegan, leave alone completely raw. :)

Last week, on my usual raw food Thursday, I became quite hungry in the evening after a bit of gallivanting with my boys. I wanted to have zucchini pasta but I wanted to push myself to create something new too.

So I switched up the ingredients in the sauce a bit and the result was GLORIOUS! You just have to taste this thing to believe it.

Raw Fettuccine in Almond Bell Pepper Sauce

You can also watch a video for the method of making Zucchini Fettuccine on an older recipe post: Raw Zucchini Fettuccine and Sun Dried Tomatoes in Cashew Sour Cream Sauce.

Here's the recipe for this one:

Raw Fettuccine in Almond Bell Pepper Sauce

1 small Green Zucchini
1 small Yellow Zucchini
1 small Red Bell Pepper
1/4 Yellow Bell Pepper
1/4 C Almonds
2 cloves of Garlic
2-3 pitted Dates
Juice of 1/2 Lemon
Pepper
Salt
Basil

* Wash the zucchinis well and using a vegetable peeler, scrape them into flat, fettuccine noodles (including the peel) and keep them aside
* When you reach the soft, seed part at the heart of the zucchinis, chop them up roughly and keep aside
* Into a dry grinder jar, add almonds, garlic, dates, pepper and salt grind into a fine powder
* Add the red bell pepper, zucchini and lemon juice and blend until creamy (happens very quickly)
* Place the zucchini noodles in a serving dish, pour the creamy sauce over it and mix well
* Garnish with chopped yellow bell peppers, shredded basil leaves and chopped almonds
* Enjoy! :)

Friday, October 09, 2015

Raw Vegan Superfoods Smoothie


Raw Vegan Superfoods Smoothie


I've decided that every Thursday, I'm going to go completely raw. I've already done this two Thursdays in a row and am feeling pretty proud of myself. Of course, it does help to be spending most of my waking hours at a restaurant where pure juices and fresh salads are our speciality. ;)

I started this mainly with the intention to get my creative juices flowing so I can delve deeper into making more raw foods. As a friend of mine who went raw for 21 days told me, the best way to push yourself to come up with more raw foods is to go raw yourself.

Though I currently don't think I have the will power or inclination to do this strictly for even one week, leave alone three, in a row, I believe once a week could be quite easy to keep up. :)

Though I haven't been hit with any sudden inspirations to create fancy, raw dishes, there are so many cool little things I've already learnt about how my body and my mind work. I'm sure that as I keep going, I'll have a few interesting ideas for raw dishes.

And while I'm on this journey, I'm hoping to find a bit of time to share some recipes here with you all.

Here's one for a fantastic, power packed smoothie I made myself for breakfast yesterday. It was amazing how it kept me going for a few hours!

Try it yourself and enjoy! :)

Raw Vegan Superfoods Smoothie

Monday, June 08, 2015

Tatziki Sauce and Creamy Pasta Salad


We already passed the first Sunday of June and here I am now, getting around to sharing the recipe video of our demo at Carrots from the first Sunday of May! Sheesh. Talk about delaying things. I'm not even going to say anything else. Here you go, enjoy. :P

Tatziki Pasta Salad

The video features our Second Chef Gokul and I sharing a recipe for making Vegan Tatziki Sauce. Then we use the yummy sauce to make a Creamy Pasta Salad.


We just finished another fantastic demo yesterday. But the way things are going, that video is probably not going to see the light of day for another month.

Until next time. See you! ;)

Thursday, April 09, 2015

Fermented Cheesy Dip Video


Running Bangalore's first vegan restaurant, Carrots, has taken over my life and I'm loving every minute of it! :)

But I do miss my blogging days. :( It used to be awesome to have time to post recipes and visit my blogging friends' spaces. There was a time when that was the biggest part of my online personality.

Even though I'm rarely posting new recipes and photographs here these days, I feel that it'll be really nice to have some activity happening on my blog.

So I've decided to share videos from the demos we've been having quite regularly at Carrots. :)

In most of these videos you'll see me and my bestie, Chef Ram doing the demo. But occasionally, our other talented chefs will be joining me too.

Besties

Today's video is a recipe for a quick and easy cheesy dip, along with some great ideas on how to use it in preparing a bunch of snacks and dishes. We did this demo last Sunday. I'll share videos from some of the older demos later.


Enjoy! :)

Wednesday, October 01, 2014

Tiramisu Ice Cream - Vegan MoFo 2014 Day 6


Tiramisu Ice Cream

It's the last day of Vegan MoFo. I can't believe I'm sharing recipe number six! I'm not sure if I should be surprised that I created only 6 ice creams or that I even managed to create that many at all. Ha!

I made this Tiramisu Ice Cream at Carrots a few weeks ago and it was quite a hit among everyone who tried it out. I've used our famous Almond Jowar cookies in the recipe. At the end of the post, I've shared a video of Ram and me making the cookies. They're really easy to make and super yum!

You're welcome to switch the cookies out with your favourite vegan cookies or biscuits too.

Tiramisu Ice Cream

Tiramisu Ice Cream

100 g Cashews
80 g Sugar
500 g Water
500 g Strong Black Coffee
100 g Vegan Whipped Cream
6 Almond Jowar Cookies (recipe video follows)

For the garnish:
Almond Jowar Cookies
Melted Dark Chocolate mixed with a splash of Soy Mylk

- Grind the cashews into a fine powder
- Add the sugar and coffee and blend to a creamy consistency
- Pour in the water and blend well
- Add the vegan whipped cream and blend until it's incorporated

- Pour into an airtight container and freeze for 8-10 hours
- Transfer to mixer jar and blend the frozen mixture once again
- Stir in crumbled cookies and re-freeze for 8-10 hours

- Scoop onto a plate and top with melted dark chocolate
- Crumble a cookie over the ice cream
- Serve and enjoy! :)

Here's the recipe for our Almond Jowar Cookies:


ENJOY! :)

Tiramisu Ice Cream

Friday, September 12, 2014

Boozy Raisin Ice Cream and Giveaway - Vegan MoFo 2014 Day 5


I started out with the idea of making the classic Rum and Raisin Ice Cream, but just when I had all the base ingredients blended and poured into the ice cream maker, I realised that we'd run out of rum! So I grabbed the bottle of brandy that was at hand and decided to make a Boozy Raisin Ice Cream instead.

Boozy Raisin Ice Cream

Before I move on to the recipe, I'd like to share that the good folks at Vegan MoFo are running a giveaway of one of my creations. Click on the pic below to enter to win my Vegan Superstar Handmade Pendant. :)


The pendant above will be shipped worldwide. I have a more localised giveaway coming up next week right here on my blog. It may or may not involve vegan ice creams. :D Keep an eye out.

Now on to today's recipe...

Boozy Raisin Ice Cream

Boozy Raisin Ice Cream

100 g Cashews
100 g Raisins soaked in 100 g Water
100 g Merry Whip Non-Dairy Cream
50 g Sugar
500 ml Cold Water
50 ml Brandy

- Place an airtight container in the freezer to chill
- Soak raisins in water for 2-4 hours in the fridge
- Grind the cashews to a fine powder
- Set aside a handful of the soaked raisins
- Add the remaining raisins, along with the soaking water and blend to a creamy paste
- Add the cold water and sugar and blend well
- Freeze in an ice cream maker according to instructions
- In the last few minutes of the freezing process, pour in the brandy
- Transfer the ice cream to the chilled container and stir in the raisins that had been set aside
- Place in the freezer for 1-2 hours
- Scoop and enjoy! *hic*

Boozy Raisin Ice Cream

Wednesday, September 10, 2014

Spicy Peanut Sauce Ice Cream - Vegan MoFo 2014 Day 4


Ack! It's the 10th already and I'm still on my 4th post. I have a lot of catching up to do.

When I decided to do the Ice Cream theme for Vegan MoFo this time, I knew I'd be experimenting with atleast a few "weird" flavours. I mean, where's the fun in just making predictable, sweet ice creams and leaving it at that? :P

So on Sunday I put together a crazy combination of peanuts, chillies, garlic, jaggery and tamarind and turned it into ice cream. It's sweet, spicy, tangy and meant for the adventurous soul. Dudes and dudettes, I present the...
Spicy Peanut Sauce Ice Cream!!! :D

Spicy Peanut Sauce Ice Cream

Spicy peanut sauce is the *best* dip in the whole wide world. I can never get enough of it!!! So it just made sense that my first savoury ice cream was based on it. :)

This ice cream is on the crunchy, icy side but the texture suits the flavours well. It is super easy to make too.

I've used just two chillies because the ones I grow in my Veganic Terrace Garden are super spicy. You can adjust the quantity depending on the kind of chillies you get your hands on.

Spicy Peanut Sauce Ice Cream!!!

100 g Peanuts
100 g Jaggery
1/2 t Salt
1/2 t Tamarind Paste
2 Chillies
4 Garlic Cloves
1 ltr Water

- Toast the peanuts and let them cool
- Grind all the ingredients together into a creamy paste, with a little water
- Add the remaining water and blend well

- Freeze according to your ice cream maker's instructions
OR
- Transfer to airtight box and freeze for 8-10 hours
- Blend again
- Refreeze for another 8-10 hours

- Scoop and enjoy! :)

Spicy Peanut Sauce Ice Cream

Before I signed off last Wednesday, I promised you pictures from my baking and cooking workshops at Carrots. Here they are...

On Thursday, 4th September I first had a Decadent Cakes baking class, followed by a session on cooking an Oil-Free Healthy Indian Meal:

Baking & Cooking Classes

On Friday, 5th September I had a workshop on Sweet Soulful Breads:

Baking & Cooking Classes

I love teaching and I find that I'm always in my element during my classes. I'm so grateful that I now have a beautiful space like Carrots to conduct these workshops. I don't have to be stressed out about the prep work. All I need to do is hand over a list of ingredients and my boys from the kitchen set things up perfectly for the class!

And having the service guys from downstairs nearby through the sessions is very helpful too. Anything I might need gets brought to me in a matter of minutes. At the end of a lengthy session of standing and talking, I'm about ready to crash. It's a huge blessing to be able to just sit down and relax while the clean-up gets done by my helpful team mates. :)

I'm looking forward to doing more and more of these one-on-one workshops and some group demos too. If you'd like to attend one of my Vegan Kitchen Ninja Series workshops, check out the list of classes here and schedule your private session.

I'll leave you now with a bonus recipe video that we shot at Carrots on Thursday. Here, Gokul and I show you how to make a quick, easy, healthy, oil-free Coconut Mint Rice. Enjoy! :)

Wednesday, September 03, 2014

Blueberry Ice Cream - Vegan MoFo 2014 Day 3


After making the first two ice creams for Vegan MoFo at Carrots, today I decided to make some at home because my Ice Cream Monster wanted a whole batch of ice cream just for himself! :p

I started the day by digging around in the kitchen to see what ingredients I could use in today's recipe and was delighted to find a long forgotten pack of dried blueberries at the bottom of the dry fruits drawer in the fridge. I'd purchased them a while ago from Manak Mewa (just off Commercial Street). Those people have all kinds of awesome dried fruits and nuts...local, exotic, what have you! And their prices are pretty decent too.

I decided to make plain blueberry ice cream. Turned out to be a great decision! Pure blueberry goodness with no other flavours getting in the way. It's a really simple 5 ingredient recipe (well, 6 if you count the pinch of salt). You can blend up the mix really fast and it's ready to be frozen.

I made this one with an ice cream maker. Turned out a lot creamier and quicker this way. But you can use the freeze-blend-freeze method to make it too.

On a side note, shouldn't blueberries actually be called purpleberries? Just look at the gorgeous colour!

Blueberry Ice Cream

Before I move on to the recipe, I wanted to give a quick shout out to RandoMoFo - the bestest way to blog hop throughout the Vegan Month of Food! Take him for a ride and you'll see what I mean.

I won't be blogging tomorrow or the day after because I'm swamped with a bunch of Vegan Kitchen Ninja Classes on both days. I'm really looking forward to teaching cooking and baking, and there's a lot of prep work to do. I'll be back here at some point over the weekend with pictures from the classes. And more ice cream recipes of course. :)

Blueberry Ice Cream

Blueberry Ice Cream

100 g Cashews
100 g Vegan Whipped Cream (Rich's or Merry Whip)
50 g + 50 g Dried Blueberries
50 g Sugar
500 g Cold Water
Pinch of Salt

- Grind the cashews and half the blueberries into a fine powder
- Add the sugar, salt and a bit of water and blend to form a creamy paste
- Pour in the remaining water and blend well
- Now add the whipped cream and blend on low speed for a few minutes
- Your ice cream base mixture is ready
- Freeze this in your ice cream maker according to the instructions
- Transfer to an airtight box and stir in the remaining blueberries
- Freeze for another hour or two
- Scoop and enjoy! :)

Blueberry Ice Cream