Wednesday, March 30, 2011

Carrot and Radish Stuffed Chapathis


Simple enough to make but OMG are these babies deeeelicious. Serve with a splosh of ketchup and a dash of Tabasco on the side and it's pure heaven! :)

Carrot and Radish Stuffed Chapathis

For the stuffing:

Grated Carrots
Grated Radish
Finely Chopped Onion
Crushed Green Chillies
Chopped Cilantro
Salt

Mix everything together and keep aside.

For the chapathi:

2 C whole wheat flour
2 tsp vegetable oil
salt

Mix everything together with a little water to form a ball. Knead till it reaches an elastic consistency. Pinch off equal sized balls and roll out into circles.

Stuffed Chapathis rolling and filling

Place one rolled out chapathi on a flat surface and spread some of the stuffing mixture on it leaving a little bit of space around the edges. Place a second chapathi over it and seal the edges by pressing together gently.

Roasting the stuffed chapathi

Roast both sides of the chapathi on a pan over medium flame until golden brown.

Serve hot and enjoy! :)

Well actually, I love these at room temperate too after they've sat around for a few hours because the layers soak up the flavors and get a little soggy. So these make a great lunch box dish!

Carrot and Radish Stuffed Chapathis

Friday, March 18, 2011

Roasted Garlic and Cilantro Hummus


I just concocted this hummus a short while ago and it turned out so perfect that I just had to note the recipe down before I forgot the ingredients. Yeah, it's happened before. So many delicious, made up recipes lost forever simply because I was too negligent to write them down immediately. Well, ain't gonna happen this time! :)

As usual, the quantities of the ingredients were my usual "splash of this dash of that", but I've tried to put down proper measurements for your benefit. So make sure you taste and adjust as required.

Hummus tastes best after sitting for a day. But if you must serve it on the same day, make sure you give it at least an hour in the fridge before serving.

Roasted Garlic and Cilantro Hummus served over fresh, homemade Corn Bread

1 C Quick Soaked and Cooked Chickpeas (throw out the soaking water and use fresh water to cook)
1/4 C Chopped Cilantro
2-3 bulbs Oven Roasted Garlic
1 medium Oven Roasted Onion
1/2 t Sesame Seeds
1/4 t Tamarind Paste
3/4 t Red Chilli Powder
1/2 t Amchoor Powder
1 T Nutritional Yeast
1/8 t Cumin Powder
1/4 C Extra Virgin Olive Oil
Salt

To roast the onion and garlic, rub them with olive oil and salt. Place them in a baking tray lined with aluminum foil. Cover them tightly with foil. Preheat the oven to 200C/400F. Bake for about an hour. Let them cool. Peel the onion and cut it into large cubes. Separate the garlic cloves and peel them.

For the hummus, cool and drain the chickpeas and keep the cooking liquid aside. Place all the ingredients, except olive oil, in a blender jar. Grind to a smooth paste by adding as much of the chickpeas cooking liquid as required, a little at a time. Taste and adjust seasonings. When it's a fluffy, liquidy paste, keep the grinder running and slowly drizzle the olive oil into the jar. This will emulsify the oil and give the hummus a creamier consistency.

Transfer to an airtight container and chill in the fridge to let the flavors get incorporated. Tastes great in the traditional falafel and pita wrap, but besides that the serving options are endless! Serve as a dip for vegetables, a spread or topping for breads (I've served it over home made corn bread in the picture) or eat straight out of a bowl. Enjoy! :)

Wednesday, March 09, 2011

Special Vegan Chocolate Mousse


I prefer to make this with freshly home made tofu when possible. Since I make soymilk at home anyways, making tofu is just another step. Turns out sooo creamy and soft!

If you can't make tofu at home, then use silken tofu. In India, the only silken tofu we get commercially is Mori-Nu (yeah, the terribly expensive imported brand.... but hey, for special occasions, this mousse is TOTALLY worth it!)

Most local tofu brands use vinegar to break the soymilk and that makes the texture and taste of the final tofu suitable only for savory dishes. You could try asking at an Asian restaurant if they make their tofu in house and if you can buy some off of them. They'll most likely be using gypsum aka calcium sulphate or nigari aka magnesium chloride to break the milk to get that soft and creamy texture.

Special Vegan Chocolate Mousse

1 Package/block firm silken tofu
1/2 C Vegan semi sweet dark chocolate chips or bar broken to small pieces
Pure vanilla extract
Maple Syrup (Sugar can also be used)
Soymilk
Small dash of olive oil
Rum - the good kind

Melt chocolate chips by tempering on a double boiler.
Bring down to room temperature.
Blend melted chocolate, tofu and maple syrup (according to taste) until completely
smooth.
Add vanilla, olive oil and rum and blend again.
If required, add a splosh of soymilk and blend again until creamy and
fluffy.
The consistency should be like a very thick smoothie.
Transfer into little bowls and place in the fridge (not freezer).
Let it set for at least 2 hours (more if you have time).

Enjoy!

The simplest, most delicious vegan mousse eva!! :)

Special Vegan Chocolate Mousse

Monday, January 31, 2011

Refreshing Spicy Chickpea Salad


This vegan salad is delicious and filling. And apart from the chick pea cooking process, quite a jiffy to put together.

Chickpea Salad


2 C Cooked Chickpeas (I always recommend the quick soak method to cook beans of any kind)
4 Tomatoes (diced)
1 Small, Tender Cucumber (sliced into tiny pieces)
1 Green Bell Pepper (sliced into small pieces)
3-4 Carrots (grated)
1 Medium Onion (chopped finely)
2 Spicy Green Chillies
1 Garlic Clove
Salt (Black Salt tastes yummiest but some people might not like the smell)
Turmeric (small pinch)
Red chilli powder
Asafoetida
Juice of 1 large Lime/Lemon


Crush together the green chillies, garlic, salt, turmeric and asafoetida. Mix in with the rest of the ingredients. Toss everything together well. Serve and enjoy! :)

This salad tastes delicious when freshly made but on hot days it makes an amazingly refreshing lunch or mid-morning treat after being chilled in the fridge for a couple of hours.

Refreshing Spicy Chickpea Salad after chilling in the fridge overnight with all the juices flowing

Friday, January 28, 2011

Vegan Wholewheat Lasagna Type Thingies


I use the word 'thingies' here because these aren't exactly traditional Lasagnas, but rather a bunch of dishes I invented based on the same basic principle - sheets of pasta layered with an ensemble of sauces and fillings and then baked.

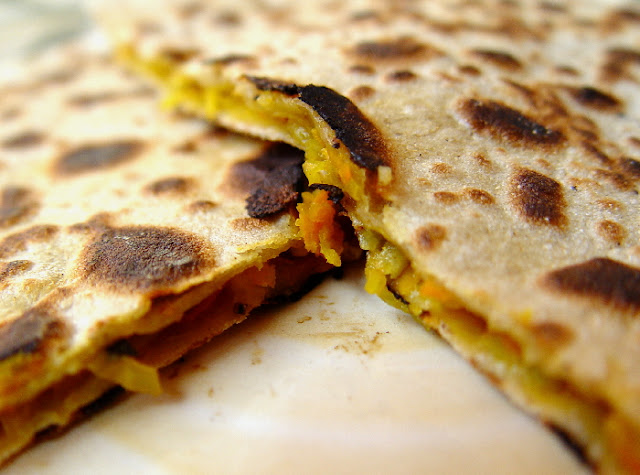
Homemade Whole Wheat Pasta Sheets layered with Spinach Babycorn Béchamel Sauce, Spicy Tomato Mint Sauce, Grated Carrots, Sliced Green Bell Peppers and topped with Sesame Seeds and Rosemary

For the Homemade Whole Wheat Pasta Sheets:


2 C Whole Wheat Flour
1 t Oil (olive oil or coconut oil work best but any other plant based oil should be fine too)
Salt to taste

Mix together the above. Add a little water at a time and knead into a soft, pliable dough. Keep aside.

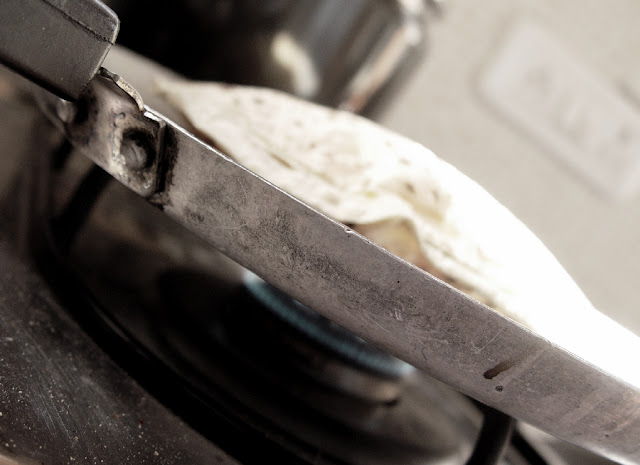
When the fillings are ready, pinch off large balls of this dough and roll into thin sheets. Cut to roughly fit the baking tray that you're using.

The sheets are the only common factor between these Lasagna dishes. All the other components are flexible. You can use the recipes below for the fillings and sauces or use your imagination and create your own combination. :)

Whole Wheat Homemade Pasta Sheets layered with Basmati Rice, Mint Béchamel Sauce, Grated Beets and topped with Sliced Tomatoes with Nutritional Yeast sprinkled on

For the Vegan Spinach Babycorn Béchamel Sauce:


Wash and chop as much spinach as you like (I do about 3/4 C).

Blanch and slice 8-10 babycorns into thin circles.

Finely chop 2-3 cloves of garlic (can use more or less depending on your taste).

Lightly toast 1/4 C wheat flour in a dry pan until very slightly browned. Keep aside.

Place 2 C plain, unsweetened soymilk (or other vegan milk) in a pan and heat it on a low flame.

Add a few spoons of soymilk, a little at a time, to the toasted wheat flour and make a smooth paste. (You can optionally mix a dash of olive oil into this paste for an extra creamy end result).

Pour the paste into the soymilk slowly and keep stirring constantly. Continue to stir and heat on a low flame (sauce should not boil) until it thickens. The continuous stirring is very important to keep it smooth and distribute the heat evenly.

Add the chopped spinach, sliced babycorn, chopped garlic, freshly crushed pepper and salt and mix. Heat for another minute or so (still stirring) and turn off the flame.
Your creamy, vegan béchamel sauce is ready! :) (I love to eat spoonfuls of this thing just on its own!)

Note: If you're using this sauce for pastas or any other dish where it's not baked, then cook the baby corn well rather than blanching and lightly fry the garlic in a little olive oil before mixing them into the sauce.

PS: I found out much later that coconut mylk is an even better thing to use in this same sauce in place of soymylk.

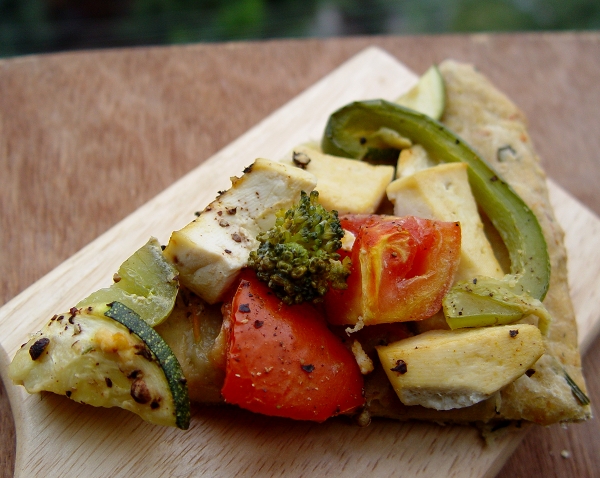
Homemade Whole Wheat Pasta Sheets layered with a mix and match of Plain Béchamel Sauce, Special Mashed Potatoes, Small Chick Peas, Coconut Milk and Marinated - Tofu, Tomatoes, Broccoli, Zucchini, Green Bell Peppers

For the Spicy Tomato Mint Sauce:


3 large, ripe Tomatoes diced
1 C chopped Spearmint leaves
3-4 cloves of Garlic
1/2 C raw cashews
2-3 spicy Green Chillies
1 T Nutritional Yeast
Salt to taste

Blend everything, except the tomatoes, together into a paste. Add the tomatoes and blend again to reach a saucy consistency.

Pour into a pan, bring to a boil, reduce the flame and simmer for about 3 minutes while stirring continuously.

For the Baked Beans Sauce:


1 1/2 C White Butter Beans - washed, quick soaked, cooked, drained (water kept aside) and cooled
2 large, ripe Tomatoes
2 cloves of Garlic
Red Chilli Powder/Flakes
1 t Olive Oil
Spicy Green Chillies chopped
Whole Spices - Cinnamon, Cloves, Bay Leaf
Tamarind Paste
Nutritional Yeast
Salt to taste
Ketchup

Place half the cooked beans, tomatoes, garlic, tamarind paste, red chilli powder/flakes and salt in a blender and blend into a smooth paste using some of the beans cooking water as required.

Heat the olive oil in a skillet, add the whole spices and green chillies and stir fry for about 30 seconds. Add the remaining cooked beans and stir fry.

Add the tomato/bean paste and mix well (adding more of the beans cooking water if required). Stir and simmer this sauce on medium heat for a few minutes.

Turn off the heat. Add a splosh of ketchup and the nutritional yeast and stir.

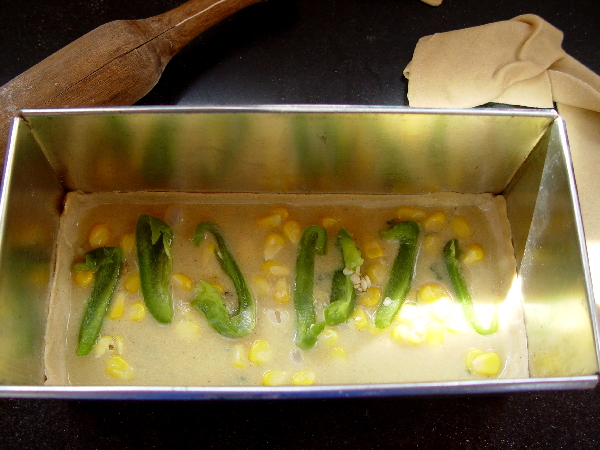
Homemade Whole Wheat Pasta Sheets layered with Mint Béchamel Sauce, Baked Beans Sauce, Sweet Corn, Sliced Green Bell Peppers and topped with Sliced Tomatoes with Nutritional Yeast sprinkled on

For the Special Mashed Potatoes:


5 medium sized Potatoes - boiled and peeled
Olive Oil
Marinade Liquid leftover from the Marinated Tofu/Veggie Topping
Coconut Milk (small splash)
2 T Nutritional Yeast
Dried Herbs - Thyme, Chives, Rosemary etc...
Salt to taste

Mash the potatoes, add the remaining ingredients and mix well.

Building the Lasagna:


Layer your home made whole wheat lasagna sheets with your choice of sauces and fillings - crumbled tofu, grated carrots, grated beets, sliced tomatoes, sliced bell peppers, sweet corn, marinated tofu/veggie mixture, coconut milk, cooked small chick peas etc...

Building the LasagnaBuilding the Lasagna

Bake at 400F/250C for 45-50 minutes. Let it cool for half an hour. Serve and enjoy! :)

(Tastes even better on the next day because all the flavors get incorporated really well!)

Vegan Chocolate Chip Coconut Pecan Cookies


My chinni wanted chocolate chip cookies and my DH wanted coconut ones. The happy compromise? My favorite vegan chocolate chip cookies with a coconutty twist. :)

Vegan Chocolate Chip Coconut Pecan Cookies

1 C Whole Wheat Flour
1 C All Purpose Flour
1 T Baking Powder
1 t Pure Vanilla Extract (if you don't have the pure kind, then don't bother using it at all)
1/2 C Agave Nectar
3/4 C Chopped Pecans
1 C Vegan Dark Semi-Sweet Chocolate Chips
1 C Cold Ricemilk or Water
Dessicated Coconut Powder

Preheat oven to 180C/350F

Spread as much coconut powder as you like on a small plate.

Put the rest of dry ingredients (except pecans and chocolate chips) in a large bowl and mix. Make a deep well in the center. Pour the wet ingredients into the hole and mix everything. Stir in the pecans and chocolate chips.

Form cookie dough into little balls and roll them around in the coconut powder and press gently. Place on cookie sheets 1-2 inches apart.

Bake for 20 minutes. Cool for 5 minutes on the sheet. Transfer to cooling rack.

Serve hot or cold. Enjoy! :)

These cookies were so yum that the Veganosaurus monsters loved them too! They had a big munching party and there was plenty to go around. They ate and they ate and they ate and in the end they fell over backwards, patted their tummies and fell into a deep, chocolate-y, comatose sleep.

Monsters Eating Cookies

Friday, January 07, 2011

Vegan Masala Crust Pizza with Marinaded Toppings


The most important advice I can give you about this pizza is MAKE LOTS!! I wish I had done so because it melted away into thin air in no time!

Vegan Masala Crust Pizza with Marinaded Tofu, Capsicum, Tomato, Broccoli and Zucchini

For the Masala Crust Pizza Base:

1 C Whole Wheat Flour
1 1/2 C All Purpose Flour (Maida)
1/2 C Oatmeal
2 T Flax Seed Powder
1 C Grated Veggies - Carrots, Radish...
1 t Freshly Chopped Cilantro
1 t Seasame Seeds
1 t Flax Seeds
2 t Mixed Dried Herbs - Chives, Thyme, Dill...
2 Spicy Green Chillies crushed (could be replaced with Serrano Peppers)
1/4 C Sugar
2 T Oil (I used coconut)
2 t Active Dry Yeast
1/2 C Soymilk
Salt

Heat the soymilk, add the sugar and stir until dissolved. Let the soymilk cool down till it's a little hotter than lukewarm (you should be able to dip your index finger in and keep it there for a few seconds at least). Mix in the yeast and keep aside for about 15 minutes to let it froth and rise. Add the oil and stir vigorously.

Warm up 1 C of water to lukewarm temperature.

Place the rest of the ingredients in a large mixing bowl and mix together lightly. Make a deep well in the center and pour the yeast mixture into it. Use your hands and start mixing everything. Add enough of the warmed water, a little at a time and keep mixing until a rough ball of dough is formed. A wetter dough is always preferable to a dry one.

Transfer the ball to a floured surface (I use my cleaned granite counter top) and knead well, for at least 10 minutes, until it's soft and elasticky.

Form into a ball, place back into the mixing bowl and cover with a warm, wet cloth. Keep it aside in a warm/sunny spot to let it rise.

Meanwhile, prepare the topping...

For the Marinade (use whatever's available and feel free to switch things around):

1 C Peanut Yogurt (any vegan yogurt can be used as a replacement but peanut yogurt tastes most delicious!)
2 Spicy Green Chillies crushed (could be replaced with Serrano Peppers)
1/8 t Powdered Black Pepper
1/8 t Kitchen King or Garam Masala Powder (available at Indian stores)
1 t Nutritional Yeast
1 squirt of Agave Nectar
1 splosh of Tamari
Salt

Whisk everything together until well blended.

Topping Ingredients:

1 Zucchini (sliced into thin rounds)
Florets from 1 small head of Broccoli
4-5 Tomatoes (cubed)
1 Green Bell Pepper (sliced into thin strips)
1 Block of Tofu (cubed)

Place the above in a wide bowl or marinade box and pour the marinade liquid over everything. Toss well. Cover and keep aside.

How to proceed...

After the dough has risen for 1 hour, punch it down and let it rise again for another 40 minutes.

Preheat the oven to 200C/400F.

Divide the dough into two and form two pizza bases out of it. They could be rolled out but I prefer to tap them flat with my palms (about 1/4 inch thick) directly onto oiled cookie sheets.

Pick the veggies and tofu out of the marinade liquid and spread them over the pizza bases equally. (The marinade liquid can be reused with other veggies or more tofu for another recipe).

Bake for 25 minutes until the tops of the tofu and the sides of the pizza crust have slightly browned.

Serve hot with pepper freshly crushed over it. Enjoy! :)

Vegan Masala Crust Pizza with Marinaded Tofu, Capsicum, Tomato, Broccoli and Zucchini

Thursday, January 06, 2011

Creamy Peanut Milk Curds/Yogurt


A quicky post just to explain the process of extracting milk out of peanuts and turning it into yogurt. Peanut milk by itself does NOT taste good. I put it in my tea this one time and ended up having to pour it down the drain! Highly painful for someone like me who does not like to waste food. But OMG how it changes in yogurt form!! Simply delicious!

I've been using this in more and more recipes lately so figured I'd share how it's made. It's my favorite kind of yogurt to date!

Vegan Peanut Curds

Creamy Peanut Milk Yogurt


Soak half a cup of plain, raw peanuts overnight. Grind them into a fine paste with some fresh water (the soaking water should be thrown out).

Transfer to a large pot, add lots of water (about 2 1/2 litres), bring to a boil, reduce the heat to medium and continue to simmer for about 30-40 minutes (stir once in a while). Once it has cooled down to room temperature, strain through a fine sieve. The peanut milk is ready! (The peanut grounds left in the sieve can be used in soups and curries or kneaded into chapathi or bread dough).

Heat the milk to a lukewarm temperature, add a wee bit (just 1-2 tsp will do) of soy yogurt and stir it in lightly with your fingers to introduce the cultures.

Cover and keep aside in a warm spot (a turned off oven or microwave is a great place!) and in about 6-8 hours, you'll have thick, creamy peanut yogurt. :)

It can be stored in the fridge for at least one week (maybe more but it's never lasted that long at our home because we finish it up really quickly! LOL). As the days go by, it gets even thicker and creamier.

Vegan Peanut Curds

A note about Starters:

While making vegan yogurt, if you don't have soy yogurt on hand to use as a starter, then take half a cup of soy milk, heat it to lukewarm, squeeze in a little bit of fresh lime/lemon juice, stir and keep aside. This will turn into yogurt after 6-8 hours but the texture isn't perfect. That's why you make this yogurt in a small quantity and then use that as a starter to make more vegan yogurt. Always make sure to save a few spoonfuls of yogurt in every batch to use as a starter for the next batch. I've noticed that when an old line of starter is used like this for 'generations', the texture and taste of the yogurt gets more delicious over time.

Alternately, you can also use rejeuvelac made out of soaked wheat berries.

I have also tried using chilli crowns as a starter as described on Tongue Ticklers and that worked well too.

Update on 23rd April 2013: New blog post showing the step by step process of making peanut curds using Howdo.

Monday, January 03, 2011

Potato Buttermilk Bread


Before I post the recipe, I'd first like to say that as much as it might look like it, the bread doesn't have whole potatoes in it. The top just looks that way because it's just been shaped accordingly. *grin*

Normally, I prefer to use 100% whole wheat (or other whole grains) in my bread recipes. But this time, I gave in and used partly whole wheat flour with mainly white flour. The 100% whole wheat bread is delicious when there are inclusions in the dough like herbs and grated veggies to add interesting textures to the final product. But with plain, untextured breads, just whole wheat makes it too dense.

Well sometimes, I don't mind giving into taste over wholesomeness. Besides, this being a vegan bread, white flour is the only less-than-perfectly-healthy ingredient in there. So indulge away! :)

Potato Bread

2 t active dry yeast
1/2 t sugar
2 large potatoes (peeled, cubed and boiled until soft)
1/2 C cooking liquid from the potatoes cooled a little bit
1/2 C lukewarm soymilk
1/2 t apple cider vinegar (regular, white vinegar is also fine)
1 T oil (I used olive in this one)
2 t salt
2 C all purpose (white) flour (maida)
1 - 1 1/2 C whole wheat flour (chapathi atta)

Mix the flours together and keep aside.

Combine the potato cooking liquid (should be slightly warmer than lukewarm), sugar and yeast and keep it aside for about 15 minutes. It should froth and bubble and rise a bit by the end of this time (very important).

Combine the soymilk and the apple cider vinegar and keep aside for a couple of minutes to allow the soymilk to curdle well. This acts as the buttermilk.

In a large mixing bowl, mash the boiled potatoes. Add the oil, salt, soymilk mixture and frothed yeast mixture and stir well.

Now slowly add one cup of flour at a time and keep mixing until it forms into a stiff ball of dough.

Transfer to a floured surface and knead very well until it's smooth and elastic (very important).

Form into a ball and place it back into the mixing bowl. Cover it with a warm, wet cloth and keep it aside in a warm place or sunny spot for 1 1/2 hours to let it rise (it should at least double in size).

Punch down and again let it rise for 40 minutes.

Form the dough into 12 balls. Place 10 of these balls in two rows in a 9 X 5 inch loaf pan. Break the remaining 2 balls into 4-5 pieces, roll them into little balls and place them randomly on top any way you like.

Cover and let it rise until the dough has risen above the well over the rim of the pan (about 30-40 minutes).

Preheat oven to 205C (400F).

Dust the dough lightly with flour and place the pan in the middle of the oven.

Bake for 10 minutes and then reduce the temperature to 190C (375F) and bake for another 40 minutes.

Once the oven goes off, leave the loaf in there for another 10 minutes and then remove immediately.

Let the bread cool in the pan for half an hour, remove from the pan, transfer it on to a cooling rack and let it cool completely before cutting with a serrated knife.

Tastes great served with a big bowl of soup or spicy bean chili.

Enjoy! :)

Potato Bread

Thursday, December 02, 2010

Pretty Pink Vegan Beet Wheat Bread


She looked outside her window and saw the dull and dreary clouds. "Hmm", she said. "It looks like a home baked bread kind of day". And off she disappeared into the kitchen with thoughts of dough kneading in her head while Facebook looked on sadly at the momentary lapse in its addicting powers...

That's how it started. I was right in the middle of my facebooking (it warrants its own verb by now, don't you think?) and suddenly I upped and walked into the kitchen with the strong desire to bake bread (but not before updating my status message to reflect this). The exercise from the dough kneading, the smell as the bread bakes, the warmth of the oven... perfect activity to cheer one up on a cold, cloudy day!

I started off with my basic khara bread recipe and then modified a bit... just because I felt like it!

Since I've been improving upon the khara bread over time (and it sure has gotten yummier!), I figured I would share this beet bread recipe as a separate one instead of just referring people to the original post.

As always, the spices, herbs, seeds, nuts and even the vegetables used for that matter can be switched around to suit your taste. Personally, every time I make it, I use a different combination.

Today, this is what went into my bread.

Pretty Pink Vegan Beet Wheat Bread


Yeah, the final bread isn't all that pink. But the dough surely is! Besides, the name sounds so poetic this way. :oP

Pretty Pink Vegan Beet Wheat Bread

4 C whole wheat flour (chapathi atta)
3 C okara (soybean paste after the milk has been extracted)
1 large beet - peeled and grated
1 onion - chopped
1 T sugar
3/4 T active dry yeast
2 T raw flax seed powder
1 T white sesame seeds
1 T poppy seeds
3 T roasted sunflower seeds (without skin)
1/4 C extra virgin olive oil

crushed together:
5 green chillies
9 cloves garlic (the garlic cloves in India are quarter the size of the US ones)
3/4 T rock salt
pinch asafoetida powder


Place 1/2 C water in a small pan and heat it for a minute or so. Switch off the flame and add the sugar. Stir until the sugar has dissolved. Cool the water a bit. It should be hotter than lukewarm but not burning hot. (I know the temperature is right when I can dip my finger in it and keep it there without needing to scream).

Sprinkle the yeast over the water and keep aside for about 15 minutes.

Meanwhile, place the flour and okara in a large mixing bowl and prep the veggies and spices - grating, chopping, crushing etc...- and add them to the flour. Add the nuts and seeds too.

By this time the yeast should have frothed well and risen. If it hasn't frothed, it means the water is either too hot or too cold. In which case you'll need to start again and get it right! It's very important that the yeast mixture has frothed before it can be used.

Pour the olive oil and flax seed powder into the frothed yeast mixture and beat with a spoon until it's all gooey and well blended. Add this to the bowl which has the other ingredients in it.

Now the kneading begins. This is THE most important part of baking bread. A well kneaded dough is the key to the final result. The dough should be moist but not sticky. I like to first mix everything lightly in the bowl and once they come together I form it into a rough ball and transfer it onto my clean counter top (which has been dusted with wheat flour) to continue the kneading.

Keep kneading with both palms for at least 15 minutes. Take it easy, go slow and enjoy the process. Press the dough away from you with the bottom of your palms and then fold the outer edge over the inner side. Keep repeating this. Press down, fold over, press down, fold over. Keep dusting your palms and the dough with flour if it's too sticky as you knead. If the dough is on the slightly dry side then rub your palms with olive oil and pat some on the dough as you knead. Remember that a moist dough is always better than a dry one (keep that in mind when you mix the rough dough in the bowl and add water if required). The final result after kneading should be soft and elasticky.

Now rub oil on the whole inside of the mixing bowl. Make a ball of the dough and place it in the bowl and swirl it around to coat with the oil all over.

Pretty Pink Vegan Beet Wheat Bread Dough just after kneading

Cover with a warm, moist cloth and keep in a warm place to let it rise for a minimum of 2 hours (you can leave it up to 4 hours if you like).

After 2 hours the dough would have risen a lot and doubled in size (at least). Punch it down, shape into a loaf (this forms one super sized loaf!) and place it in a bread pan. Cover with the moist cloth once more and let it rise for at least another 1 hour (not more than 2 hours).

Pre heat the oven to 450F/230C.

Remove the cloth and pop the pan into the oven. Let the bread bake at this temperature for 15 minutes. If you'd like a crispy crust, open the oven door halfway and carefully spray a few light squirts of water on top of the loaf a couple of times during this period.

After 15 minutes, reduce the temperature to 400F/200C and bake for 45 minutes (do not open the oven door during this time for any reason).

Once the oven goes off remove the bread (check to see if it's done by tapping the top of the loaf and sides of the pan lightly and ensure it sounds hollow-ish). Let the bread cool in the pan for about 15-20 minutes. Then gently remove from the pan onto a cooling rack and let it sit there to cool completely.

Cut with a serrated knife and enjoy! :)

Pretty Pink Vegan Beet Wheat Bread

Wednesday, December 01, 2010

Marinated Herbed Baked Potatoes, Beets and Carrots


Baked potatoes are yum of course, but I love the taste of carrots and beets in the mix! They add a special sweet flavor. You won't even need ketchup on the side! :oP

I made this for dinner last night and by the time I clicked a photo of it in the daylight this morning, we'd finished the carrots. That's why you only see potatoes and beets in the pic below.

Marinated Herbed Baked Potatoes, Beets and Carrots

5-6 medium sized Potatoes
3-4 Carrots
2 small Beets

Scrub and clean the carrots and potatoes under running water. Do not peel them. Cut them into chunks. Wash and peel the beets and cut them into chunks too.

Bring water to a rolling boil in a large pot. Pop only the potatoes into the water. Let them cook for 5-10 minutes, until slightly tender. Switch off the flame and drain.

Place all the veggies in a wide dish/container.

For the Marinade, whisk together with a fork/spoon the following ingredients in a bowl (quantities according to your taste) until well blended and creamy:

Freshly crushed Green Chilli and Garlic paste (crush them together with crystal salt and a pinch of asafoetida)
Olive oil
Tamari
Balsamic Vinegar
Nutritional Yeast
Freshly crushed Pepper
Dried Rosemary
Dried Chives

Note: I just switch things around with the marinade depending on my mood. You can feel free to do the same too. :)

Pour the marinade over the veggies and toss well. Cover and keep aside for a few hours. The longer they sit, the better. I had everything mixed in the morning so by dinner time they were soaked well and ready to be baked.

Pre heat the oven to 250 C.

Pick the veggies out of the marinade liquid and spread them on a cookie sheet and bake them for about half an hour.

After the oven goes off, let them sit inside for 5-10 minutes.

Serve hot.

Enjoy! :)

Monday, November 29, 2010

Vegan Baadusha Recipe


Do you know why Baadusha starts with 'baad'? Because it is one baaadass sweet! heheh Ok stop cringing, I promise not to make anymore poor jokes for the rest of this post. :oP

We've been making these babies for Diwali in the recent years. One of the quickest desserts to make! The only 'work' involved is the deep frying and even that can be easy with a partner. In my case, I shape the Baadushas and pop them into the oil and DH deep fries them and transfers them into the sugar syrup. 10-15 minutes of this et voilà, all done! :)

Baadusha

2 C maida/all purpose flour (I do intend to try these out with whole wheat flour at some point though)
1/2 C cold coconut oil + more for deep frying
2 C sugar
2 C water + more for the dough
A generous pinch of baking soda
Tiny pinch of salt
Chopped nuts - pista, almond, cashew

Fry the chopped nuts in a bit of coconut oil until lightly brown, strain and keep aside.

Pour this strained oil plus the remainder of the 1/2 C oil into the flour along with the salt and rub everything together until crumbs form.

Sprinkle the soda on top, add a little bit of water and knead into a soft dough.

Cover with a moist cloth and keep aside for about 15 minutes.

Meanwhile, prepare a slightly thick sugar syrup with the sugar and water by boiling them together.

While the syrup is still warm, heat the oil for deep frying.

Shape the dough into little balls, flatten them and press your thumb (or index or whichever finger you like) down in the middle to form a crater in each one.

In batches, deep fry them in the hot oil on a medium flame until golden brown and transfer them directly into the warm sugar syrup.

Let them soak for about 10 minutes.

Using a slotted spoon, transfer them onto a plate and place the nuts in the craters.

After they cool slightly, the sugar syrup will harden a bit and form a layer on top.

At this point the Baadushas are ready to munch on. :)

Friday, November 12, 2010

Vegan Chocolate Chip Cookies


I often make these delicious vegan chocolate chip cookies and they are always a hit! :) Most recently, I made it for one of the Diwali nights for all my cousins and they were polished off super quickly! I have been asked for the recipe multiple times and I figured it's high time I post it up on my blog so I can just link it the next time someone asks me how to make them. :)

Vegan Chocolate Chunk Cookies

1 C whole wheat flour
1 C all purpose flour (maida)
1 C vegan chocolate chips (chopped vegan dark chocolate bars would work too)
3/4 chopped walnuts or pecans
3/4 maple syrup (can be replaced with sugar syrup too but please no date syrup or liquid jaggery because they just don't produce the best taste or texture)
1/2 C oil (I like to use either coconut or olive oil)
1 T Baking Powder
1 t Vanilla Extract
1/8 t Salt
1/2 C water (or any vegan milk like ricemilk/soymilk etc...)

Preheat oven to 180 C/350 F
Mix the dry ingredients together (except chocolate and nuts).
Add wet ingredients and mix.
Stir in the chocolate and walnuts.
Pop some fresh cookie dough in your mouth and take a deep, blissful breath.
Resist the temptation to finish the rest of the dough.
Drop by spoonfuls onto cookie sheet.
Bake for 15-20 mins.

Serve hot and enjoy! :)

Monday, November 01, 2010

In Celebration of Veganism


Been a long time since I've posted here! I'm back home now and all settled in. Ready to start wildly experimenting in the kitchen again. :) So I expect to get back to my regular posting schedule soon.

For now, here's a quick Artfire Collection I created for World Vegan Day.


And just for today I have a special discount going on at my Artfire Studio too:

Visit artbysusmitha's Studio
SAVE 15.00 % On
All Items
Use Coupon Code:
VEGANAWESOMENESS1NOV2010
during checkout.

Thursday, September 16, 2010

And the winners of the Go Max Go vegan chocolates are...


Congratulations to:
Christina @calmond
and
Julie @VeganGurl44
for winning the Go Max Go Vegan Candybars!! :)

Go Max Go Candybars
Woo Hoo!!! :) :) :)

Please send me a convo on etsy with your mailing address so I can ship them out to you! :)

Chocolate Dipped Bananas


Chocolate Dipped BananasConsidering how delicious these frozen treats are, it's hard to believe how easy they are to make! :)

2 large, very ripe bananas
1/4 C dark semi-sweet vegan chocolate chips
1 T vanilla ricemilk

Peel and freeze the bananas overnight. Remove from freezer and cut into chunks.

Melt the chocolate chips with the ricemilk. You can do this by either tempering in a double boiler or in a microwave by heating for 30 seconds at a time (maximum 2 times) and stirring until the chocolate is completely melted and smooth.

Dip the banana chunks into the chocolate with the help of a fork and arrange on a plate lined with wax paper (I didn't use the wax paper but it would make things a bit easier if you did). The chocolate sets very quickly because the bananas are frozen so work as quickly as possible.

Re freeze everything for a couple of hours.

This tastes yummy straight out of the freezer but I also like to warm it up in the mircowave for about 20 seconds for a melty, gooey dessert. :)

Bananas on Foodista

Saturday, September 11, 2010

Hypnotic Energy Paintings


I was soaking in the jacuzzi next to the hotel pool one evening and this sweet little girl came into the tub and struck up a conversation with me. We started playing "who can hold their breath the longest under water" and she kicked my butt at it most of the time! LOL After some time she introduced herself as Gloria and the two ladies with her were her mom Denisa and her aunt Sania.

And that's how I met Dr. Denisa Legac, one of the very interesting people I've crossed paths with on this trip. She is a Life Coach from Croatia and also a very talented artist. She creates beautiful paintings with healing messages behind them. These are called Hypnotic Energy Paintings and she incorporates them into the therapy process.

I decided to do an audio interview with her so that you can hear in her own voice all about this amazing healing style. I have chosen a few of her art pieces which spoke to me most and under each picture I've posted an audio clip in which Denisa describes the underlying message.

You can find more of her paintings on her gallery page at her No Limits Therapy website.

Dr. Denisa Legac


Young Love


Learning to Love


Learning to Love


Desire-Passion-More